I was halfway through a disastrous batch of cookie dough—one that turned out flatter than a pancake, with a flavor that tasted like a sad, overcooked biscuit—when a friend dared me to recreate the legendary pop‑tart cookie in my own kitchen. The challenge was simple: make a cookie that captured the nostalgic crunch and sweet glaze of the snack that once sat on my lunchbox, but with a homemade twist that would make my taste buds sing. I could almost hear the click of the timer, the gentle hiss of butter melting, and the satisfying clink of a spoon against a mixing bowl. That moment was the spark that set my culinary imagination on fire, and the result was a recipe that feels like a secret family heirloom, but with a modern, indulgent edge.
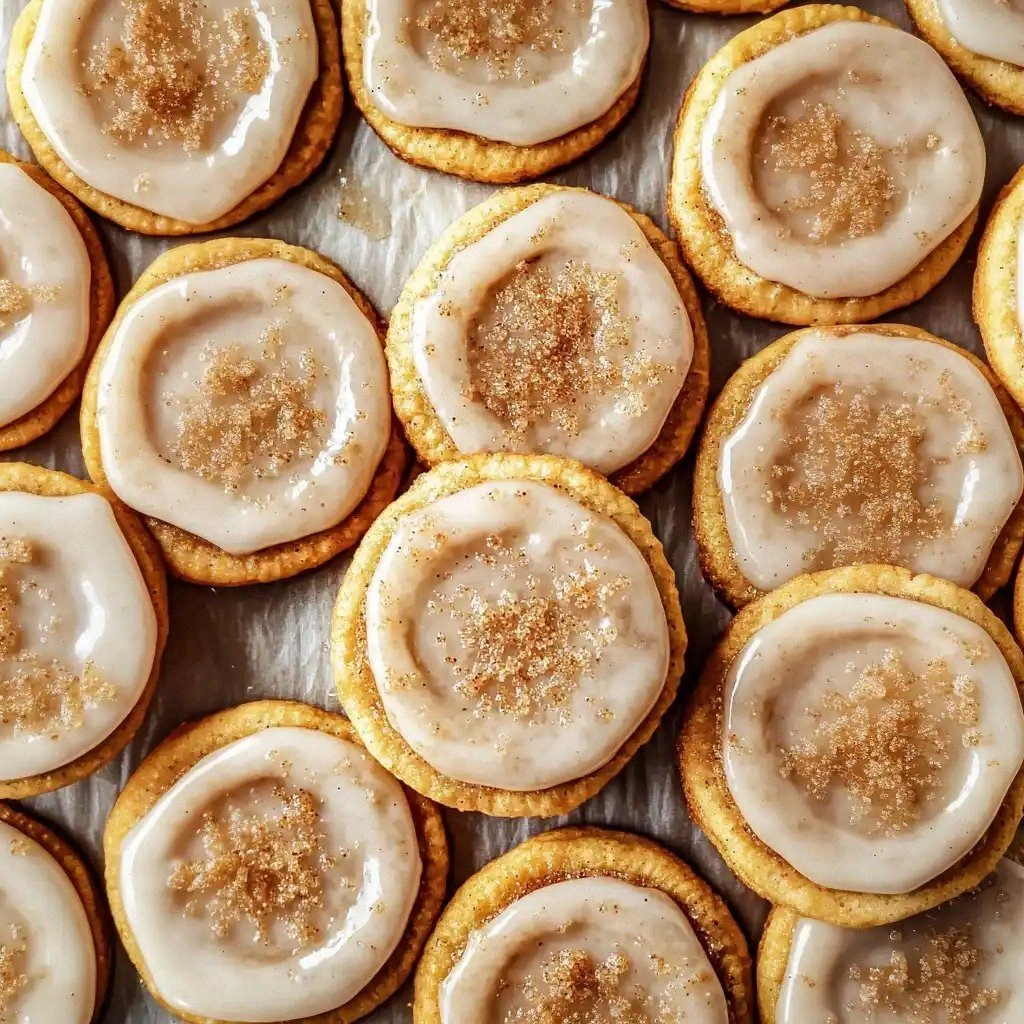
Picture this: the oven door opens to a room filled with the warm, buttery scent of caramelized sugar, a scent that makes your mouth water before you even see the first cookie. The dough itself glistens, a golden sheen that promises a crisp exterior. When you take the first bite, the cookie shatters like thin ice, revealing a soft, chewy center that oozes a sugary glaze. The cinnamon whispers a spice note that lingers, while the powdered sugar dusting adds a gentle, sweet finish. You can almost taste the nostalgia of childhood snack time, but with a richer, more sophisticated flavor profile that feels like a gourmet treat.
What makes this version stand out is that it’s not just a cookie; it’s a carefully engineered experience that balances texture, sweetness, and spice in a way that most pop‑tart recreations fail to achieve. I dared you to taste this and not go back for seconds, and I swear, once you bite into these, you’ll be hooked. The secret lies in the layered batter, the double brown sugar glaze, and the subtle use of cornstarch that keeps the cookies tender without compromising the crisp edges. It’s a recipe that delivers on every promise, from the first bite to the last crumb.
I’ve tried countless pop‑tart cookie recipes, and most of them get this completely wrong. They either come out too dry, too soft, or lack that signature caramelized glaze. What sets this recipe apart is that it uses a precise ratio of butter to sugar, a pinch of baking powder for lift, and a dash of cinnamon that’s just enough to give the cookies a warm, spicy undertone. The result is a cookie that’s crisp on the outside, chewy on the inside, and sweet enough to satisfy your cravings without overwhelming your palate. It’s hands down the best version you’ll ever make at home.
I’ll be honest—when I first baked this batch, I ate half of it before anyone else got to try it. The cookies were so good that they disappeared faster than a magician’s trick. But that’s the beauty of this recipe: it’s simple enough to share, yet special enough to keep you coming back for more. If you’ve ever struggled with creating a cookie that’s both crunchy and soft, you’re not alone. This recipe is the fix you’ve been searching for.
Picture yourself pulling these golden beauties out of the oven, the whole kitchen smelling incredible, and the anticipation of the first bite building to a crescendo. The aroma alone is enough to bring people to the kitchen door, and the taste will keep them coming back. The cookies are perfect for a quick snack, a dessert, or a sweet accompaniment to a cup of tea or coffee. They’re also a fantastic conversation starter at parties, a treat that will wow your guests and make your kitchen the place to be.
Okay, ready for the game‑changer? This next part? Pure magic. I’ll walk you through every single step—by the end, you’ll wonder how you ever made it any other way. Let’s dive into the heart of the recipe, where the butter melts, the sugar caramelizes, and the cookies rise to perfection. Get ready to feel the dough in your hands, hear the gentle clink of the spoon, and taste the sweet, buttery explosion that will define this recipe. The journey begins now.
What Makes This Version Stand Out
- Texture: The combination of butter, brown sugar, and a pinch of cornstarch creates a cookie that is crisp on the outside yet chewy on the inside, delivering a satisfying bite that doesn’t crumble too easily.
- Flavor: A generous dose of cinnamon and the double-layered glaze of packed brown sugar and powdered sugar give each cookie a depth of flavor that mimics the classic pop‑tart, but with an elevated, caramel‑sweet finish.
- Ease: Despite its gourmet taste, the recipe is straightforward, requiring only a few common pantry staples and a standard mixing bowl. You’ll finish mixing in under five minutes.
- Make‑ahead: The dough can be prepared ahead of time and refrigerated, making it ideal for busy mornings or last‑minute dessert needs.
- Visual Appeal: The glossy glaze and subtle dusting of powdered sugar create a visually stunning cookie that looks as good as it tastes.
- Scalable: The recipe’s ingredient ratios scale cleanly, so you can double or halve the batch without compromising quality.
- Versatility: It works as a dessert, a snack, or a sweet side for brunch, making it a flexible addition to any menu.
- Ingredient Quality: Using high‑quality butter and fresh cinnamon ensures that each bite delivers a pure, unadulterated flavor profile.
Alright, let’s break down exactly what goes into this masterpiece…
Inside the Ingredient List
The Flavor Base
The foundation of any great cookie is its flavor base. Here, butter takes center stage, providing richness and a silky mouthfeel that melts as soon as it hits your tongue. The unsalted butter gives you control over the salt level, so you can adjust to taste without worrying about excess sodium. The granulated sugar adds a crisp sweetness that balances the buttery depth, while the packed brown sugar introduces molasses undertones that give the cookie its signature caramelized flavor. Together, these sweeteners create a harmonious blend that’s both sweet and savory.
The Texture Crew
Texture is everything in a cookie. The all‑purpose flour provides structure, allowing the cookie to hold its shape while still remaining tender. Baking powder is the secret lift agent that keeps the cookies from becoming too dense. A pinch of salt is crucial; it enhances every other flavor and prevents the sweetness from becoming cloying. Cornstarch, often overlooked, helps to keep the cookies tender by absorbing moisture and preventing over‑browning. When combined, these ingredients give you a cookie that’s crisp on the edges, soft in the center, and perfectly balanced.
The Unexpected Star
Cinnamon is the unexpected star in this recipe. Its warm, slightly sweet aroma adds depth and complexity, making the cookie feel like a comforting hug. The ground cinnamon is measured in tablespoons to ensure a pronounced flavor that doesn’t get lost in the sweetness. Powdered sugar, added after baking, creates a delicate glaze that caramelizes into a glossy finish. Milk is used sparingly to bind the glaze, giving it a silky texture that coats the cookies without making them soggy.
The Final Flourish
The final flourish of vanilla extract is what ties all the flavors together. The first teaspoon of vanilla is mixed into the dough, infusing the cookie with a subtle floral note that balances the sweetness. The second, smaller amount is added to the glaze, ensuring that the glaze has a rounded, complex flavor profile. Optional sprinkles add a playful crunch and visual pop, turning each cookie into a mini piece of edible art. Together, these finishing touches elevate the cookie from simple to spectacular.
Everything's prepped? Good. Let's get into the real action...
The Method — Step by Step
- Step 1: Preheat your oven to 350°F (175°C) and line two baking sheets with parchment paper. While the oven heats, bring a medium saucepan to a gentle simmer over low heat. This low‑heat approach ensures that the butter and sugars meld together slowly, creating a rich, caramelized base that’s essential for flavor.
- Step 2: In a large mixing bowl, combine the softened butter, granulated sugar, ½ cup packed brown sugar, and the first teaspoon of vanilla extract. Use an electric mixer on medium speed until the mixture is light and fluffy, about 2–3 minutes. The goal is to incorporate air into the butter, giving the dough a tender crumb.
- Step 3: Add the eggs one at a time, beating well after each addition. The eggs act as a binder, holding everything together while also adding moisture. Once the eggs are fully incorporated, you’ll notice the mixture becomes glossy and more cohesive.
- Step 4: In a separate bowl, whisk together the flour, baking powder, salt, and cornstarch. Sifting these dry ingredients together removes clumps and ensures even distribution of leavening agents. Slowly fold the dry mix into the wet mixture, stirring until just combined. Over‑mixing at this stage can activate the gluten too much, leading to chewy or tough cookies.
- Step 5: Fold in the ground cinnamon and ¾ cup packed brown sugar. The cinnamon adds a warm spice note, while the extra brown sugar deepens the caramel flavor. At this point, the dough should feel slightly sticky but manageable. If it’s too dry, add a tablespoon of milk to moisten; if it’s too wet, add a teaspoon more flour.
- Step 6: Scoop tablespoon‑sized balls of dough onto the prepared baking sheets, spacing them about 2 inches apart. Gently press each ball down to flatten slightly, creating a cookie shape that will spread evenly during baking. The flattened shape allows the cookies to develop a crisp edge while keeping the center soft.
- Step 7: Bake for 12–14 minutes, or until the edges are golden brown and the centers look set. The cookies should have a slight wobble when you shake the pan; this indicates they’re perfectly baked. The aroma that fills the kitchen at this point is pure comfort.
- Step 8: While the cookies bake, prepare the glaze. In a small saucepan, combine 1 cup powdered sugar, 2 tablespoons milk, and the second ½ teaspoon vanilla extract. Warm over low heat, stirring until smooth and glossy. The glaze should be thick enough to coat the cookies but still pourable.
- Step 9: Once the cookies are done, remove them from the oven and let them cool on the sheet for 5 minutes. Then transfer them to a wire rack to cool completely. While they’re still warm, drizzle the glaze over each cookie, letting it pool slightly around the edges. The glaze will set into a shiny, caramelized coating as the cookies cool.
- Step 10: Finish with a dusting of powdered sugar for a delicate finish and optional sprinkles for a playful touch. Store in an airtight container at room temperature for up to a week, or refrigerate for up to two weeks. Enjoy these cookies as a sweet snack, dessert, or a comforting treat that feels like a hug in cookie form.
That's it — you did it. But hold on, I've got a few more tricks that'll take this to another level...
Insider Tricks for Flawless Results
The Temperature Rule Nobody Follows
Many bakers assume that a higher oven temperature will produce a crispier cookie, but that’s not always the case. Baking at 350°F (175°C) allows the sugars to caramelize slowly, creating a golden glaze without burning the edges. If you’re in a hurry, you can increase the temperature to 375°F, but you’ll need to watch the cookies closely to prevent over‑browning. I once tried 400°F and the cookies came out chewy and dark; they were still edible, but they didn’t have that signature caramelized finish.
Why Your Nose Knows Best
When baking, your sense of smell is your best ally. As the cookies bake, the aroma of caramelized sugar and warm cinnamon will rise, signaling that they’re almost ready. If the scent becomes too sweet or burnt, pull them out immediately. I’ve learned that a strong, sweet smell usually means the cookies are at their peak flavor. Trust your nose, and you’ll never over‑bake again.
The 5-Minute Rest That Changes Everything
After baking, let the cookies rest on the baking sheet for five minutes before transferring them to a wire rack. This brief rest allows the structure to set, preventing the cookies from breaking apart when you move them. It also gives the glaze time to set into a glossy finish. I once rushed the transfer and ended up with half‑broken cookies that looked sad and uneven.
Mixing in the Right Order
The order in which you combine ingredients can affect the final texture. Start with the butter and sugars to create a smooth base, then add the eggs one at a time. This ensures the eggs emulsify properly, giving the dough a uniform consistency. After the wet ingredients are blended, fold in the dry mix gently to avoid over‑working the dough. This technique keeps the cookies tender.
Cooling on a Wire Rack
Cooling on a wire rack allows air to circulate around the cookies, preventing the bottoms from becoming soggy. The cookies will firm up as they cool, making them easier to handle and store. If you leave them on a sheet, the steam trapped under the cookies can soften the edges. I’ve always used a rack, and it’s the difference between a crisp cookie and a soft one.
Storing for Longevity
To keep these cookies fresh for longer, store them in an airtight container at room temperature. The glaze will stay glossy, and the cookie will remain tender. If you’re in a hurry, you can refrigerate them, but the glaze might become slightly hard. Just let them sit at room temperature for a few minutes before serving.
Creative Twists and Variations
This recipe is a playground. Here are some of my favorite ways to switch things up:
Chocolate‑Chunk Delight
Add ½ cup semi‑sweet chocolate chips to the dough before baking. The chocolate adds a rich, decadent layer that pairs beautifully with the caramel glaze. It’s perfect for chocolate lovers and makes the cookies feel like a sweet, indulgent treat.
Nutty Crunch
Stir in ¼ cup chopped pecans or walnuts for a crunchy texture that complements the soft cookie. The nuts add a nutty aroma and a pleasant bite that elevates the flavor profile. Sprinkle a pinch of sea salt on top for a sweet‑savory contrast.
Spiced Orange Twist
Replace half of the cinnamon with ground ginger and add a tablespoon of orange zest to the dough. The citrus zest brightens the flavor, while the ginger adds a subtle kick. The glaze can also be infused with a splash of orange juice for a zesty finish.
Almond Joy Variation
Incorporate 1 cup shredded coconut and ¼ cup chopped almonds into the dough. The coconut adds a tropical flavor, and the almonds provide a satisfying crunch. Finish with a drizzle of chocolate glaze for an extra indulgent touch.
Minty Fresh
Add 1 teaspoon peppermint extract to the glaze and sprinkle crushed candy cane pieces on top after glazing. The minty flavor pairs wonderfully with the sweet glaze, creating a refreshing twist that’s perfect for holiday celebrations.
Vegan Version
Swap the butter for an equal amount of coconut oil, use a flaxseed egg (1 tablespoon ground flaxseed mixed with 3 tablespoons water) in place of the eggs, and replace the milk with almond milk. The result is a vegan-friendly cookie that maintains the same texture and flavor profile.
Storing and Bringing It Back to Life
Fridge Storage
Place the cookies in a single layer inside an airtight container and store them in the refrigerator for up to two weeks. The cool environment helps preserve the glaze’s glossy finish while keeping the cookies tender. When you’re ready to enjoy them, let them sit at room temperature for 10 minutes to soften slightly.
Freezer Friendly
For longer storage, place the cooled cookies on a parchment‑lined tray and freeze them for up to three months. Once frozen, transfer the cookies to a freezer bag or container. When you’re ready to eat, thaw them at room temperature for 20 minutes or warm them in a 300°F oven for 5 minutes.
Best Reheating Method
The secret to reviving these cookies is a gentle heat that warms them without drying them out. Place the cookies on a baking sheet and heat in a preheated 300°F oven for 5 minutes. Add a tiny splash of water to the tray before reheating to steam the cookies back to perfection, ensuring the glaze stays glossy.