Introduction
Picture this: a Saturday afternoon, the kitchen smelling like warm butter and vanilla, a friend’s skeptical grin, and me, determined to prove that a humble pie can outshine any dessert on the menu. I was staring at a dusty recipe card that had been passed down through generations, but every time I tried it, the crust turned out either too soggy or too hard, and the filling never quite hit that silky, custard‑like finish that makes people go back for seconds. I decided to give it one last shot, armed with a few modern twists, and the result? A buttery, tangy, custard‑like masterpiece that has become the go-to dessert for every family gathering.
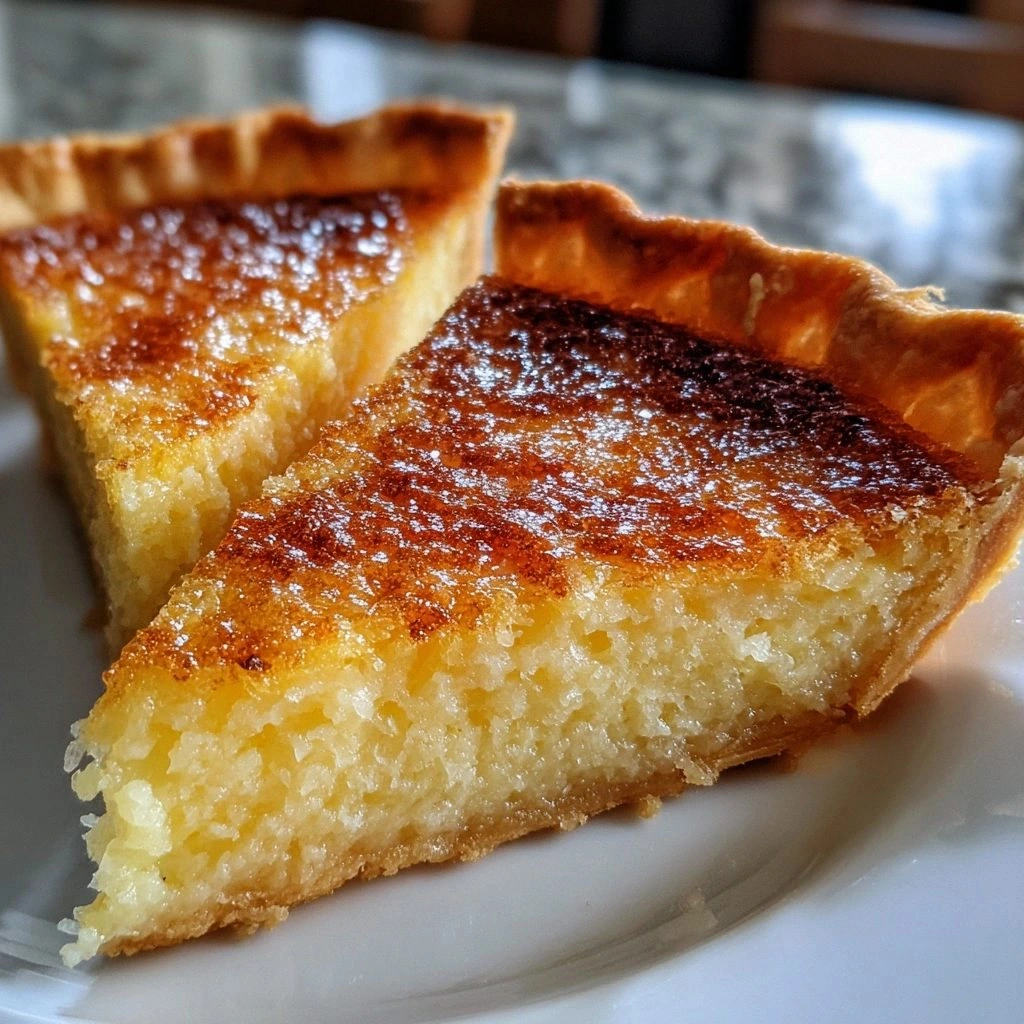
From the moment the first crackle of the crust hits the oven, you know something extraordinary is about to happen. The air is filled with the sweet scent of caramelized sugar and the subtle, earthy aroma of fresh buttermilk. When you lift the slice, the glossy custard glistens like a mirror, and the first bite delivers a perfect balance of sweet and tang, with a texture that’s simultaneously silky and slightly grainy—just enough to remind you that this isn’t your average pie. Every bite is a reminder of how the right combination of ingredients, timing, and a dash of confidence can turn an ordinary dessert into an unforgettable experience.
I dare you to taste this and not go back for seconds. That’s because this version of Buttermilk Pie is hands down the best you’ll ever make at home. It’s the kind of dessert that turns a simple dinner into a celebration and makes your friends question whether they’ve ever had anything better. The secret? A few unconventional techniques and a handful of high‑quality ingredients that elevate the classic recipe to new heights.
Most recipes get this completely wrong. They either overcook the filling, resulting in a rubbery texture, or they bake the crust too long, leaving it dry. Here, I’ll walk you through every single step, revealing the little tricks that make all the difference. By the end, you’ll wonder how you ever made it any other way.
What Makes This Version Stand Out
- Crust: A buttery, flaky base that crisps to golden perfection without becoming soggy, thanks to a precise ratio of flour and butter and a quick pre‑bake.
- Filling: A custard that coats the tongue like velvet, achieved by whisking the eggs and buttermilk until they’re fully blended and then slowly cooking over low heat.
- Flavor: A subtle tang from the buttermilk that cuts through the sweetness, balanced with vanilla and a hint of nutmeg for depth.
- Texture: The filling sets into a smooth, slightly firm consistency that holds its shape when sliced, yet still yields to the first bite.
- Ease: The process is straightforward, with no need for a double‑boiler or fancy equipment—just a reliable oven and a good mixing bowl.
- Make‑ahead: You can assemble the pie a day in advance; the filling will set in the refrigerator, and the crust will hold up wonderfully when reheated.
- Versatility: The base recipe works for sweet or savory variations, making it a true kitchen playground.
- Audience: From picky kids to seasoned bakers, everyone can appreciate the simple yet sophisticated flavor profile.
Alright, let's break down exactly what goes into this masterpiece...
Inside the Ingredient List
The Flavor Base
At the heart of this pie is the buttermilk itself—a fermented dairy product that brings a bright, acidic note to the filling. Buttermilk isn’t just a flavor enhancer; it reacts with the sugar and eggs to create a delicate emulsion that gives the custard its silky mouthfeel. If you can’t find buttermilk, a 1 : 1 mixture of whole milk and white vinegar or lemon juice, left to sit for 5 minutes, will work wonders. This substitution keeps the acidity level just right and preserves the custard’s smoothness.
Another cornerstone is the vanilla extract, which adds a warm, aromatic layer that balances the tang. A good quality vanilla, preferably pure, will provide a more complex flavor than the cheap, artificial versions. A pinch of nutmeg is optional but recommended for a subtle earthy undertone that elevates the overall profile.
The Texture Crew
The eggs are the glue that binds the filling together. Using a combination of whole eggs and egg yolks gives the custard a richer, creamier texture while maintaining a smooth consistency. The ratio of eggs to buttermilk is critical: too many eggs and the filling becomes rubbery; too few and it won’t set properly. A 4‑egg, 1‑cup buttermilk ratio strikes the perfect balance for a 9‑inch pie.
Flour isn’t just for the crust; it’s also used to thicken the filling slightly. Adding a tablespoon of all‑purpose flour to the mixture helps absorb excess liquid, ensuring the custard doesn’t run. This technique is especially useful if you’re using a high‑fat milk or buttermilk. Keep the flour in a fine sieve to avoid lumps.
The Unexpected Star
Brown butter adds a nutty depth that sets this pie apart from the standard recipe. By browning the butter before adding it to the filling, you unlock a rich, caramelized flavor that complements the tang of the buttermilk. If you’re short on time, regular unsalted butter will do, but the extra step is worth the extra flavor.
Some bakers swear by adding a splash of bourbon or a teaspoon of bourbon vanilla. I’ve experimented with a dash of bourbon for a subtle kick, and it works beautifully. Just remember, the alcohol will evaporate during baking, leaving only the flavor behind.
The Final Flourish
Salt is essential to bring out the sweetness and balance the flavors. Even a small pinch can elevate the entire pie. Sugar is, of course, the sweetener, but using a mix of white and brown sugar can add depth. Brown sugar brings a hint of molasses, complementing the nutty butter.
Finally, a small amount of baking powder—just a pinch—helps the filling rise slightly, creating a light, airy texture. This is especially important if you’re using an older oven or baking at a lower temperature.
Everything’s prepped? Good. Let’s get into the real action...
The Method — Step by Step
- Preheat your oven to 350°F (175°C). While the oven is heating, roll out your pie crust and fit it into a 9‑inch pie dish. Prick the bottom with a fork to prevent bubbling. This step ensures the crust doesn’t puff up and stay flat, which is essential for an even bake. If you’re using a pre‑baked crust, skip straight to the filling.
- Brown the butter. In a small saucepan over medium heat, melt 1/4 cup of butter until it turns golden brown and smells nutty. Stir constantly to avoid scorching. This process infuses the filling with a rich, caramelized flavor that elevates the entire pie.
- Whisk the eggs and buttermilk. In a medium bowl, beat 4 eggs, 1 cup of buttermilk, 1/2 cup of sugar, 1 teaspoon vanilla, and a pinch of salt until the mixture is smooth. Add the browned butter, then stir in 1 tablespoon of flour to thicken. The mixture should look glossy and slightly thickened; this indicates it’s ready for the next step.
- Combine the filling with the crust. Pour the custard mixture into the prepared crust, smoothing the top with a spatula. The filling should be evenly distributed, creating a perfect base for the final bake.
- Watch Out: If you over‑bake the pie, the filling will become rubbery, and the crust will over‑brown. Keep a close eye on the pie as it nears the end of the baking time.
- Bake the pie. Place the pie in the preheated oven and bake for 30 minutes, or until the edges are set and the center is just slightly jiggly. A good rule of thumb is that the pie should feel firm to the touch but still give a little when you press the center. This ensures a silky custard without over‑cooking.
- Cool the pie. Once baked, remove the pie from the oven and let it cool on a wire rack for at least 30 minutes. The filling will continue to set as it cools, and the crust will firm up, making it easier to slice.
- Refrigerate. After the pie has cooled, cover it loosely with plastic wrap and refrigerate for at least 2 hours, or overnight. This chilling step allows the flavors to meld and the custard to set fully.
- Serve. Slice the pie with a sharp knife, wiping the blade clean between cuts for a crisp edge. Serve at room temperature or slightly chilled for the best flavor. If you like, dust the top with powdered sugar or a light sprinkle of cinnamon for an extra touch.
That's it — you did it. But hold on, I've got a few more tricks that'll take this to another level...
Insider Tricks for Flawless Results
The Temperature Rule Nobody Follows
Many people bake this pie at 375°F, but that can cause the edges to brown too quickly, leaving the center undercooked. Stick to 350°F; the lower temperature allows the custard to set evenly without over‑baking the crust. If your oven runs hot, consider using a baking stone or placing the pie on a middle rack to keep the heat consistent.
Why Your Nose Knows Best
Before you take the pie out of the oven, pause for a second and sniff. A pleasant, buttery aroma indicates that the butter has browned correctly and the filling is on the right track. If you notice a sharp, sour smell, the buttermilk may have gone bad, or the eggs might be overcooked.
The 5‑Minute Rest That Changes Everything
After removing the pie from the oven, let it rest for exactly five minutes before placing it on the cooling rack. This short rest allows the custard to set slightly, making it easier to cut and reducing the risk of a runny center.
Keep the Crust Fresh
Once the pie has cooled, store the crust in an airtight container. If you’re making the pie a day ahead, wrap it tightly in plastic wrap and keep it in the fridge. When you’re ready to serve, warm the pie in a 350°F oven for 5 minutes to revive the crust’s crispness.
Use a Double Boiler for Extra Smoothness
Some bakers swear by cooking the custard over a double boiler to prevent curdling. If you’re prone to over‑cooking the eggs, try this gentle heat method. It takes a few extra minutes but guarantees a silky texture.
Watch Out for Over‑Whisking
Whisking the eggs too aggressively can incorporate too much air, causing the filling to rise and then collapse. Whisk just enough to combine the ingredients; you’re aiming for a smooth, glossy mixture, not a frothy one.
Creative Twists and Variations
This recipe is a playground. Here are some of my favorite ways to switch things up:
Chocolate Buttermilk Pie
Fold in 2 tablespoons of cocoa powder into the filling for a rich, chocolatey twist. The buttermilk’s tang balances the deep chocolate flavor, creating a dessert that feels indulgent yet fresh.
Spiced Buttermilk Pie
Add a pinch of ground cinnamon, allspice, and a dash of cayenne pepper to the filling. The subtle heat adds a new dimension, making the pie a perfect dessert for fall gatherings.
Blueberry Buttermilk Pie
Stir in 1 cup of fresh blueberries just before baking. The berries burst in the oven, releasing juice that infuses the custard with a natural sweetness and a pop of color.
Almond Buttermilk Pie
Replace half of the flour with almond flour and add 1/4 cup of ground almonds to the filling. The nutty flavor pairs beautifully with the buttermilk’s tang, creating a crunchy, savory-sweet profile.
Buttermilk Pie with a Salted Caramel Topping
Drizzle a salted caramel sauce over the cooled pie before serving. The salty caramel cuts through the richness, offering a sweet‑savory finale.
Storing and Bringing It Back to Life
Fridge Storage
Store the refrigerated pie in an airtight container for up to 3 days. The custard remains firm, and the crust stays crisp when reheated.
Freezer Friendly
Wrap the pie tightly in plastic wrap and then aluminum foil before freezing. It will keep for up to 2 months. Thaw overnight in the refrigerator before reheating.
Best Reheating Method
Preheat your oven to 325°F and place the pie on a baking sheet. Warm for 15 minutes, or until the center is heated through. Add a splash of water to the bottom of the pan to create steam, which helps keep the custard moist.