Picture this: I’m in a cramped kitchen, the timer blares, and my oven is about to betray me. My friends had begged for a holiday cookie that wasn’t just another sugar‑laden cookie. I pulled the recipe from my grandmother’s old notebook and decided to turn that humble cake batter into something that would make everyone say, “I dare you to taste this and not go back for seconds.” The moment the dough hit the pan, the scent of vanilla and caramelized sugar flooded the room, promising a sweet revelation. I laughed, knowing that this would be the beginning of a new family favorite.
I was halfway through the prep when the flour exploded into a cloud, turning my counter into a battlefield. The sticky batter clung to my fingers like a second skin, and I laughed because it felt like I was baking with a living creature. That chaos, however, was the secret sauce that gave these cookies their legendary chewiness. I swear the crunch of the edges, crisping to a golden brown, will shatter like thin ice against your tongue. The kitchen smelled like a holiday bakery, and the anticipation was almost as sweet as the finished product.
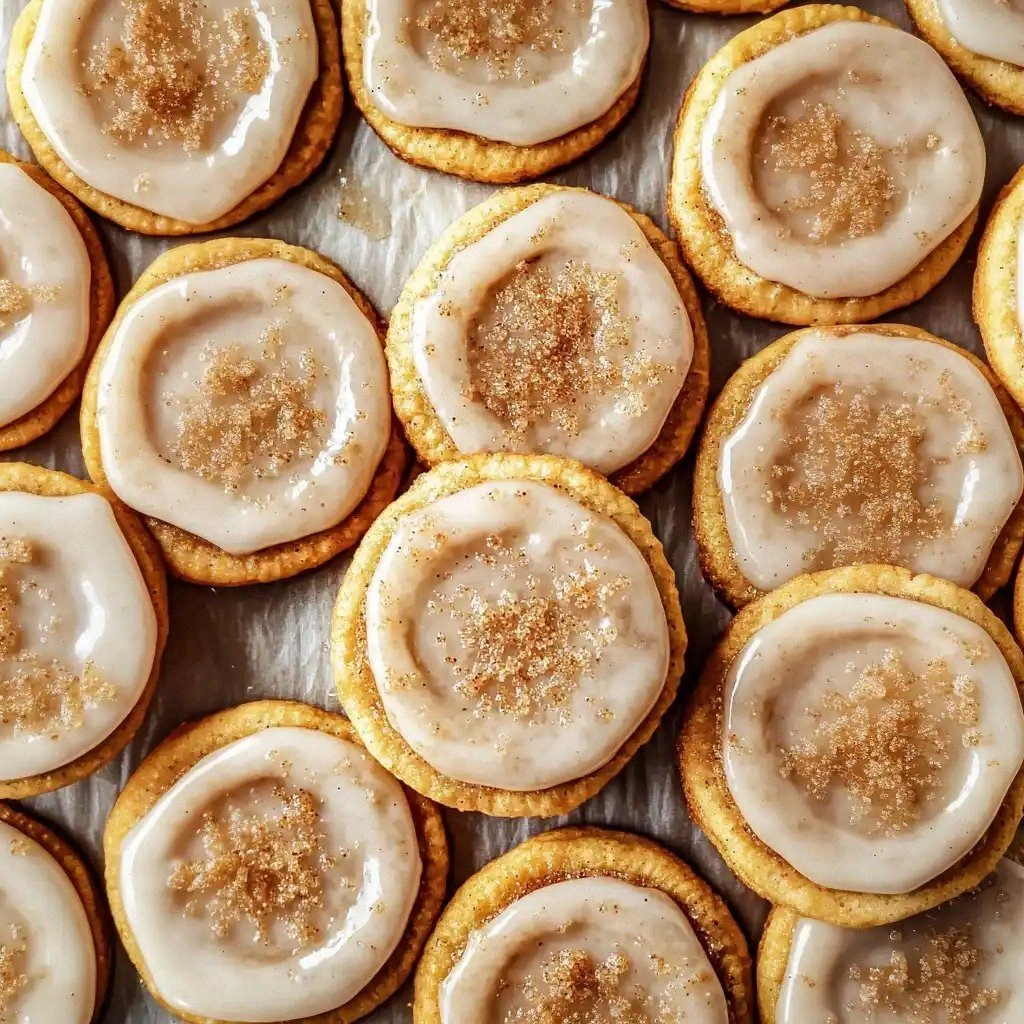
What makes this recipe a standout is that it marries the lightness of cake batter with the indulgence of chocolate chips and the festive punch of dried cranberries. The dough is so soft that it practically melts in your mouth, yet the final product remains sturdy enough to hold a generous scoop of frosting if you dare. The holiday twist isn’t just an ingredient swap; it’s a mood shift that turns a simple cookie into a centerpiece for any gathering. If you’ve ever struggled to keep cake batter cookies from turning into flat, rubbery biscuits, this version is your new secret weapon. The combination of textures and flavors creates a symphony that lingers long after the last bite.
The trick that sets this apart is the use of vanilla cake mix as the backbone of the batter. By incorporating the mix, the cookies gain an airy interior that feels like a bite of cake, while still maintaining the comforting chew of a cookie. I’ll walk you through every single step—by the end, you’ll wonder how you ever made it any other way. Let’s dive in and turn your kitchen into a holiday wonderland. The journey starts with a simple question: are you ready to rewrite cookie history?
What Makes This Version Stand Out
- Flavor Depth: The vanilla cake mix introduces a subtle sweetness that balances the boldness of brown sugar, creating a layered taste profile. This depth ensures each bite is more than just cookie—it feels like a bite of holiday cake. The result is a complex palate that keeps you coming back for more.
- Texture Perfection: The combination of soft cake batter and crisp edges delivers a mouthfeel that is both chewy and crunchy. The dough’s structure holds together while the edges caramelize, giving you the best of both worlds. It’s a texture that will have your guests asking for the recipe.
- Holiday Essence: Dried cranberries bring a tart punch that cuts through the richness, while chocolate chips add familiar comfort. This blend captures the spirit of the season without resorting to heavy spices. The result is a cookie that feels festive and timeless.
- Time Efficiency: With a prep time of just 15 minutes and a cook time of 30 minutes, this recipe fits perfectly into a holiday rush. The method is straightforward, making it ideal for beginners and seasoned bakers alike. You’ll have a batch ready to serve in no time.
- Make‑Ahead Friendly: The dough can be refrigerated for up to 48 hours, allowing you to batch bake ahead of time. This flexibility means you can focus on other holiday tasks while the cookies finish baking. It’s a stress‑free way to stay on schedule.
- Versatile Appeal: Whether you’re feeding a crowd or just treating yourself, these cookies scale effortlessly. The recipe’s simplicity encourages experimentation with add‑ins or flavor variations. It’s a canvas that invites creativity.
Inside the Ingredient List
The Flavor Base
All-purpose flour and the vanilla cake mix form the backbone of this batter, providing structure and a subtle vanilla undertone that elevates the sweetness. The flour absorbs the liquid, creating a cohesive dough that holds together during baking. Skipping the cake mix would result in a denser cookie that lacks the airy interior. If you’re allergic to wheat, try a gluten‑free blend that matches the same weight. The key is to keep the ratio of flour to cake mix consistent for optimal texture.
The Texture Crew
Unsalted butter, white sugar, and brown sugar work in tandem to create a rich, buttery base that caramelizes during baking. The butter’s fat content ensures a tender crumb, while the sugars provide moisture and sweetness. If you prefer a sweeter cookie, double the brown sugar for a deeper caramel flavor. The creamy texture comes from properly creaming the butter and sugars together until light and fluffy. This step is essential for achieving the signature chew.
The Unexpected Star
Mini chocolate chips and dried cranberries are the festive duo that gives this cookie its holiday personality. The chocolate adds a familiar comfort element, while the cranberries bring a tart contrast that brightens the overall flavor. If you’re a fan of nuts, chopped pecans add a delightful crunch and nutty aroma. The cranberries also help keep the dough moist, extending the cookie’s shelf life. Remember, the size of the chips matters; larger chips will melt more slowly, creating pockets of goo.
The Final Flourish
A pinch of sea salt, a splash of vanilla extract, and a whole egg bind the dough together while adding depth and richness. The salt elevates all the other flavors, preventing the cookie from tasting flat. The egg adds protein, which helps the cookies rise slightly and set into a stable structure. The vanilla extract’s aroma enhances the overall sensory experience, making the cookies feel indulgent. This final flourish ensures every bite is a balanced, flavorful explosion.
Everything’s prepped? Good. Let’s get into the real action and start mixing those flavors together.

The Method — Step by Step
- Sift together 2 cups of all‑purpose flour, 1 cup of vanilla cake mix, 1 teaspoon baking soda, and 1 teaspoon sea salt into a large bowl. This ensures an even distribution of leavening agents and prevents clumps. As you sift, you’ll notice the flour’s lightness, a promise of a fluffy interior. Keep the bowl covered with a clean towel to avoid dust settling. Once sifted, set aside to let the dry ingredients rest briefly.
- In a separate mixing bowl, beat 1 cup of unsalted butter, 1 cup of white sugar, and 1 cup of packed brown sugar until the mixture is pale and fluffy. The creaming process incorporates air, which will later help the cookie rise. Use a hand mixer or stand mixer on medium speed for 3–4 minutes. The butter should be soft enough to yield to your finger but not melted. A well‑creamed base is the foundation of a tender cookie.
- Add 1 large egg and 1 teaspoon of vanilla extract to the creamed butter mixture, beating until fully combined. The egg adds structure and richness, while the vanilla enhances the overall aroma. Be careful not to overmix; the goal is a smooth, homogenous batter. The mixture should feel silky and glossy. This step is the moment where the cookie’s flavor profile begins to take shape.
- Gradually fold the dry ingredient mixture into the wet batter, stirring gently until just combined. The dough will appear lumpy, which is perfectly fine. Overmixing can lead to a tough cookie. At this point, the dough should feel like a thick, buttery paste. If the dough is too dry, add a splash of milk to achieve the desired consistency. This is the first time the cake batter’s airy nature will manifest in the cookie.
- Fold in 1 cup of mini chocolate chips and 1 cup of dried cranberries, ensuring an even spread throughout the dough. The cranberries’ moisture will keep the cookies from drying out. The chips add a glossy sheen to the surface, making the cookies visually appealing. If you prefer a more pronounced chocolate flavor, increase the chips to 1½ cups. This step adds both flavor and texture contrast.
- Roll the dough into 1‑inch balls and place them on a parchment‑lined baking sheet, spacing them 2 inches apart. The spacing allows the cookies to spread without merging. If you’re using a cookie scoop, you’ll get uniform size and consistency. Gently flatten each ball with the palm of your hand to create a slightly flattened shape. This ensures even baking and a beautiful golden edge.
- Bake in a preheated 350°F oven for 12–14 minutes, or until the edges turn a light golden brown. The center should remain soft, which will firm up as the cookies cool. Rotate the pan halfway through for even baking. The aroma that fills the kitchen will have you craving more. This is the moment of truth.
- Let the cookies cool on the baking sheet for 5 minutes before transferring them to a wire rack. The residual heat will finish the baking process, ensuring a perfect crumb. The cooling time also allows the chocolate to set slightly, giving a pleasant snap when bitten. Store any leftovers in an airtight container at room temperature for up to a week.
That's it — you did it. But hold on, I've got a few more tricks that'll take this to another level.
Insider Tricks for Flawless Results
The Temperature Rule Nobody Follows
Many bakers bake at the lowest temperature that still cooks the cookies, but this can lead to uneven browning. Set your oven to 350°F and use an oven thermometer to ensure accuracy. Even a 5°F difference can affect the cookie’s rise and texture. Keep the oven door closed until the cookies are nearly done to avoid temperature fluctuations. This small adjustment can transform an average cookie into a masterpiece.
Why Your Nose Knows Best
The aroma of a cookie in progress is a reliable indicator of doneness. When the smell shifts from sweet to a warm, buttery scent, the cookies are ready to be removed. Don’t rely solely on time; the smell tells you when the sugars have caramelized just right. This sensory cue helps avoid over‑baking, preserving the chewy center. Trust your nose as your secret baking assistant.
The 5‑Minute Rest That Changes Everything
After baking, let the cookies rest on the sheet for 5 minutes before moving them to a rack. This resting period allows the structure to set, preventing the cookies from crumbling. The residual heat continues to cook the interior, ensuring a uniform texture. It also makes the cookies easier to handle when you transfer them. A quick rest can make a noticeable difference in the final product.
Add a Splash of Water Before Reheating
Storing cookies in a sealed container can dry them out. Before reheating, add a tiny splash of water to the container and seal it. The steam created during reheating will rehydrate the cookies, restoring their softness. Heat them in a preheated oven at 300°F for 5 minutes. This trick keeps the cookies fresh and chewy for days.
The Perfect Cookie Scoop
Using a cookie scoop ensures uniform size and baking consistency. It also saves time and reduces waste. If you don’t have a scoop, a tablespoon or a small ladle works as a substitute. Consistency in size means even baking, which is crucial for achieving the ideal texture. A small investment in a scoop pays off in taste and presentation.
Creative Twists and Variations
This recipe is a playground. Here are some of my favorite ways to switch things up:
Maple‑Glazed Delight
Swap the vanilla extract for maple syrup and add a pinch of ground cinnamon. The maple brings a warm, caramelized flavor that pairs beautifully with the chocolate chips. The cinnamon adds a subtle spice that enhances the holiday vibe. This version is perfect for those who love a sweet, aromatic treat. Serve with a glass of hot cocoa for an extra indulgent experience.
Chocolate‑Loaded Extravaganza
Increase the chocolate chips to 1½ cups and add a handful of white chocolate chunks. The extra chocolate creates a richer, more decadent cookie. The white chocolate’s sweetness balances the tart cranberries, giving each bite a complex flavor profile. This variation is ideal for chocolate lovers who crave a luxurious treat. Pair with a splash of espresso for an extra kick.
Nutty Crunch Edition
Add ½ cup of chopped walnuts or almonds to the dough. The nuts provide a satisfying crunch and a nutty aroma that complements the cranberry’s tartness. Toast the nuts lightly before adding for a deeper flavor. This version offers a delightful textural contrast, making each bite exciting. It’s a crowd‑pleaser at holiday parties.
Spiced Ginger Surprise
Incorporate ½ teaspoon of ground ginger and ¼ teaspoon of ground cloves into the dry mix. The spices add warmth and depth, evoking classic holiday flavors. The ginger’s subtle heat pairs nicely with the sweet dough. This twist brings a festive aroma to the kitchen and a sophisticated taste to the cookie. It’s a subtle yet powerful upgrade.
Pistachio‑Pomegranate Fusion
Replace the cranberries with pomegranate seeds and add ½ cup of chopped pistachios. The pomegranate’s juicy burst of tartness complements the pistachios’ nutty sweetness. This version introduces a pop of color that makes the cookies visually striking. It’s a modern take on holiday cookies that will impress your guests. The combination also offers a unique nutritional boost.
Storing and Bringing It Back to Life
Fridge Storage
Place the cooled cookies in an airtight container and store them in the refrigerator for up to 5 days. The cool environment keeps the fats solid, preserving the cookie’s structure. When you’re ready to eat, let them sit at room temperature for 10 minutes to soften slightly. Avoid leaving them in the fridge for more than a week, as they may lose flavor. This method is ideal for those who want a quick snack later.
Freezer Friendly
Wrap each cookie individually in plastic wrap and place them in a freezer bag. Store in the freezer for up to 3 months. When you’re ready to enjoy, let them thaw at room temperature for 15 minutes. The cookies will retain their chewy texture and flavor profile. Freezing also allows you to batch bake ahead of holiday events. This technique ensures you always have a fresh batch on hand.
Best Reheating Method
Preheat your oven to 300°F and place the cookies on a parchment‑lined sheet. Heat for 5 minutes, then remove and let them cool. The low temperature gently warms the cookies without over‑baking them. If the cookies feel dry, add a splash of water to the container before reheating to create steam. This simple step keeps the cookies soft and delicious. Reheated cookies taste as good as freshly baked ones.
Now that you’ve mastered the classic version, you can experiment, tweak, and create your own holiday cookie masterpieces. Whether you’re sharing with family or gifting, these cookies will become a staple on every table. Keep the recipe handy, and let the holiday magic continue to bake in your kitchen.