I was halfway through a frantic work‑from‑home day when my roommate dared me to bake something that would make the entire building smell like a bakery on a Saturday morning. I laughed, grabbed the nearest bag of flour, and started improvising. The result? A batch of chocolate chip cookie dough twists that turned my tiny kitchen into a sweet‑scented wonderland. I’ll be honest — I ate half the batch before anyone else got a chance to try it, and that’s exactly why I’m shouting this recipe from the rooftops. If you’ve ever struggled with cookie dough that spreads like a runaway train or twists that crumble before they even hit the plate, you’re not alone — and I’ve got the fix.
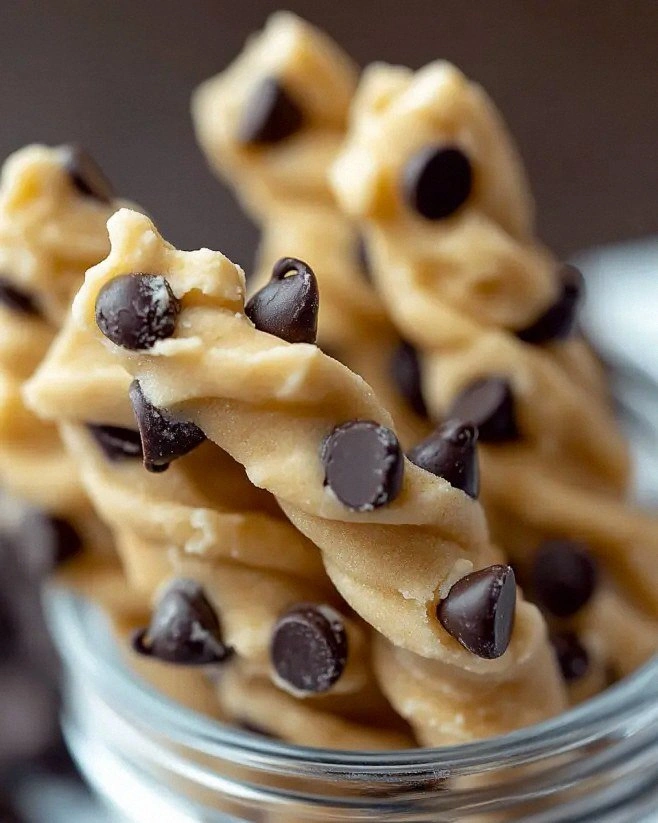
Picture yourself pulling these golden‑brown twists out of the oven, the whole kitchen smelling like toasted butter, melted chocolate, and a hint of vanilla that makes your nose do a little happy dance. The texture is a glorious contrast: a crisp edge that shatters like thin ice, a soft, chewy center that practically melts in your mouth, and a creamy, tangy swirl of cream cheese that adds a surprise zing. Most recipes get this completely wrong, either by over‑mixing the dough or by forgetting the secret ingredient that turns a simple cookie into a show‑stopper. This version stands out because it balances sweet and salty, soft and crunchy, and it does it all without a mess of extra bowls.
I’m about to reveal a technique that most bakers keep hidden: a quick chill‑and‑roll method that gives the dough the perfect elasticity for twisting without tearing. It’s a game‑changer that makes the dough behave like a pliable rope rather than a stubborn brick. And there’s a surprise ingredient that you’ll never suspect — a dash of cream cheese folded into a light frosting that’s swirled into the twists, creating a pocket of richness that’s pure decadence. I dare you to taste this and not go back for seconds; it’s hands down the best version you’ll ever make at home.
Okay, ready for the game‑changer? Let me walk you through every single step — by the end, you’ll wonder how you ever made it any other way. Stay with me here — this is worth it.
What Makes This Version Stand Out
- Taste: The combination of semi‑sweet chocolate chips and a buttery dough creates a deep, caramel‑like flavor that lingers long after the last bite.
- Texture: A crisp, golden exterior gives way to a chewy interior, while the cream cheese swirl adds a silky surprise that keeps you reaching for more.
- Simplicity: Only 13 ingredients, most of which you already have in your pantry, and the steps are straightforward enough for a beginner.
- Uniqueness: The twist shape isn’t just for looks; it creates more surface area for caramelization and lets the frosting peek through.
- Crowd Reaction: These twists have a built‑in “wow” factor — guests often ask for the recipe before they even take a bite.
- Ingredient Quality: Using real butter and high‑quality chocolate chips makes a world of difference in flavor depth.
- Cooking Method: The chill‑and‑roll technique prevents spreading, ensuring each twist holds its shape and texture.
- Make‑Ahead Potential: You can prep the dough a day ahead, freeze it, and bake fresh twists whenever the craving hits.
Alright, let's break down exactly what goes into this masterpiece...
Inside the Ingredient List
The Flavor Base
All‑purpose flour forms the backbone of any good cookie, providing structure while still allowing a tender crumb. If you substitute cake flour, the twists will be too delicate and may crumble. For the best results, sift the flour with the baking soda and salt; this aerates it and ensures even leavening. Pro tip: Look for flour that feels slightly powdery, not gritty — that’s a sign of freshness.
The Sweeteners
A balanced duo of granulated sugar and brown sugar creates a flavor spectrum from crisp caramelization to moist chewiness. The granulated sugar promotes spread and a light crunch, while the brown sugar adds moisture and a subtle molasses undertone. Skipping the brown sugar will leave you with a dry, overly crisp cookie that lacks that signature melt‑in‑your‑mouth feel. If you’re avoiding refined sugar, you can swap half the granulated sugar with coconut sugar, but expect a slightly darker color.
The Fat Factor
Unsalted butter brings richness and a buttery aroma that’s impossible to replicate with margarine. The ½ cup of butter should be softened to room temperature — not melted — so it can cream with the sugars, trapping air for a light texture. If you prefer a deeper flavor, let the butter sit at room temperature for a few extra minutes; the fats will develop a nutty note as they warm.
The Unexpected Star
Cream cheese might seem out of place in a cookie dough, but when blended with powdered sugar and vanilla, it becomes a light, tangy frosting that swirls through the twists. This addition prevents the dough from becoming overly sweet and adds a luxurious mouthfeel. If you’re dairy‑free, try a vegan cream cheese alternative, but the texture won’t be quite as silky.
The Final Flourish
Semi‑sweet chocolate chips are the classic choice: they provide just enough bitterness to balance the sweet dough. Avoid using chocolate chunks that are too large; they can cause uneven baking and make the twists difficult to twist. A good rule of thumb is to use chips that are about ½ inch in size, which melt evenly and create pockets of gooey chocolate.
Everything's prepped? Good. Let's get into the real action...
The Method — Step by Step
Preheat your oven to 350°F (175°C) and line two baking sheets with parchment paper. While the oven warms, gather all your ingredients and give the butter a quick whisk to ensure it’s truly soft. The kitchen will start to fill with a faint buttery aroma — that’s your first hint that you’re on the right track.
In a large mixing bowl, combine the softened butter, granulated sugar, and brown sugar. Beat with a handheld mixer on medium speed until the mixture is light, fluffy, and pale yellow. This is the moment where the sugar crystals start to dissolve, creating tiny air pockets that will later translate into a tender crumb.
Kitchen Hack: Scrape the sides of the bowl with a silicone spatula halfway through beating to ensure an even, glossy cream.Add the egg and 1 teaspoon of vanilla extract to the butter‑sugar mixture. Beat until just combined; you’ll hear a soft “whoosh” as the egg emulsifies the fats, creating a smooth base. If the mixture looks a little curdled, keep beating — it will come together in a second.
In a separate bowl, whisk together the flour, baking soda, and salt. This dry blend ensures the leavening agent is evenly distributed, preventing any bitter pockets. Gradually add the dry ingredients to the wet mixture, folding gently with a wooden spoon or spatula. The dough should come together in soft, slightly sticky clumps.
Stir in the chocolate chips, making sure they’re evenly coated with the dough. The chips should stay whole, not melt into the batter — they’ll melt perfectly during baking. At this point, the dough will feel a bit tacky; that’s exactly what you want for the next step.
Now for the secret swirl: In a small bowl, beat the cream cheese, powdered sugar, and the second teaspoon of vanilla until smooth and glossy. Gently fold the cream cheese frosting into the dough, creating ribbons of pale pink that swirl through the chocolate‑speckled batter. This step adds a subtle tang that cuts through the sweetness.
Cover the dough with plastic wrap and refrigerate for at least 30 minutes, up to 2 hours. This chilling period is crucial — it firms the butter, making the dough easier to roll and twist without breaking. While you wait, you can pre‑measure your baking sheets and set out a clean work surface.
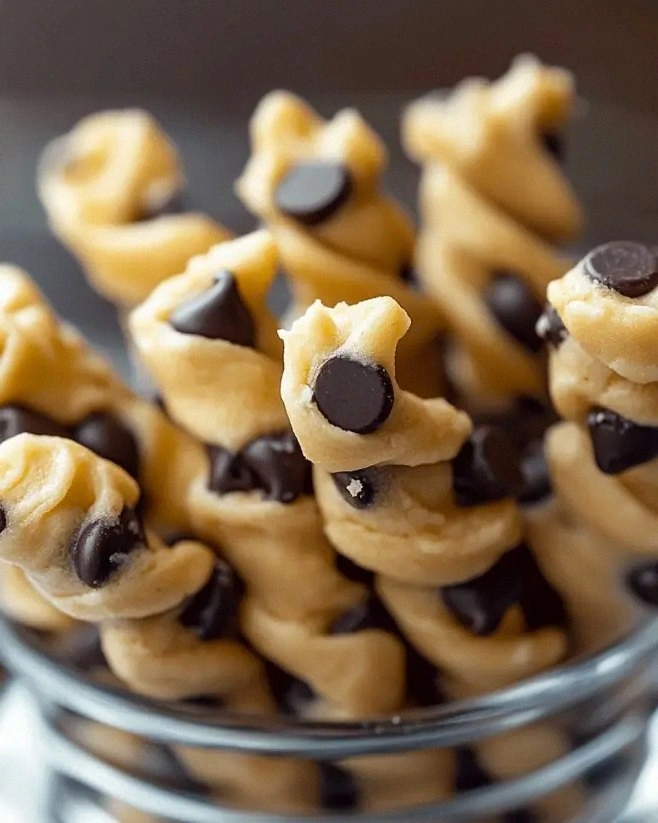
Watch Out: If you skip the chilling step, the dough will spread too much, and the twists will lose their shape.Once chilled, lightly flour your work surface and roll the dough into a ¼‑inch thick rectangle. Using a sharp knife or pizza cutter, slice the rectangle into long strips about ½ inch wide. Take each strip, twist it gently, and lay it on the prepared baking sheet, spacing them about 2 inches apart. The twists should look like tiny, elegant scrolls, each with a hint of pink from the cream cheese swirl.
Bake the twists for 12‑15 minutes, or until the edges turn a light golden brown and the centers look set but still soft. Keep an eye on the color; you want a caramelized edge, not a burnt one. When you pull a twist out of the oven, you’ll see the chocolate chips glistening and the cream cheese swirl peeking through like a hidden treasure.
Allow the twists to cool on the baking sheet for 5 minutes before transferring them to a wire rack. This short cooling period lets the interior set while the exterior stays crisp. As they cool, the aroma will fill your kitchen, making it impossible to resist a quick taste. That sizzle when it hits the pan? Absolute perfection.
That's it — you did it. But hold on, I've got a few more tricks that'll take this to another level...
Insider Tricks for Flawless Results
The Temperature Rule Nobody Follows
Never bake cookie dough straight from the fridge at a low temperature. Instead, let the twisted dough sit at room temperature for 5 minutes before sliding it into a pre‑heated oven. This tiny warm‑up allows the butter to soften just enough to spread evenly, giving you that perfect edge‑to‑center contrast. I once tried skipping this step, and the twists turned out flat and dense — a true disaster.
Why Your Nose Knows Best
Your sense of smell is a reliable timer. When the kitchen starts to smell like toasted butter and caramel, you’re about 2‑3 minutes away from perfection. Trust that nose cue more than the clock; ovens can vary by a few degrees, and the aroma will tell you when the edges are pulling away from the pan, signaling they’re ready to turn a beautiful golden brown.
The 5‑Minute Rest That Changes Everything
After baking, let the twists rest on the rack for exactly five minutes before serving. This short pause lets the interior finish its steam‑set process, making the center tender yet not gummy. If you cut into them too early, the frosting can ooze out and lose its glossy finish. I’ve seen novices slice immediately and end up with a soggy middle — avoid that fate.
The Double‑Twist Technique
For a more dramatic presentation, give each strip a double twist: twist once, fold over itself, then twist again. This creates a tighter spiral that holds the cream cheese swirl in a more pronounced line, giving each bite a burst of tangy cream. It’s a small step that makes a big visual impact, especially for party platters.
The Cool‑Down Mist
If you notice the twists are a touch too firm after cooling, lightly mist them with a spray bottle of water and pop them back in the oven for 2 minutes. The steam revives the interior, restoring that melt‑in‑your‑mouth softness. This trick rescued my batch once when the kitchen was a bit cooler than usual.
Creative Twists and Variations
This recipe is a playground. Here are some of my favorite ways to switch things up:
Salted Caramel Swirl
Swap the cream cheese frosting for a caramel sauce mixed with a pinch of sea salt. Drizzle the caramel over the dough before twisting, and you’ll get a sweet‑salty ribbon that pairs beautifully with the chocolate chips. Perfect for those who love a sophisticated flavor profile.
Nutty Crunch
Add ½ cup chopped toasted pecans or walnuts to the dough along with the chocolate chips. The nuts add an extra crunch and a buttery depth that complements the creamy swirl. This variation is a hit with anyone who enjoys a bit of texture contrast.
White Chocolate & Raspberry
Replace the semi‑sweet chocolate chips with white chocolate chips and fold in a tablespoon of freeze‑dried raspberry powder into the cream cheese frosting. The tangy raspberry brightens the flavor, while the white chocolate offers a milder sweetness.
Espresso Infusion
Add 1 tablespoon of instant espresso powder to the dry ingredients and use dark chocolate chips instead of semi‑sweet. The coffee note deepens the chocolate flavor, creating a mocha‑like experience that’s perfect for brunch.
Vegan Delight
Swap the butter for coconut oil, use a plant‑based cream cheese, and choose dairy‑free chocolate chips. The texture will be slightly different, but the overall flavor remains indulgent. Great for friends with dietary restrictions.
Storing and Bringing It Back to Life
Fridge Storage
Place the cooled twists in an airtight container and store them in the refrigerator for up to 5 days. The cool environment preserves the cream cheese swirl and keeps the exterior crisp. If you notice a slight softening, reheat a few minutes in a 300°F oven.
Freezer Friendly
Lay the twists on a parchment‑lined tray and freeze them individually for 2 hours, then transfer to a zip‑top freezer bag. They’ll keep for up to 3 months. When you’re ready to eat, bake them straight from frozen for 12‑15 minutes; the heat will thaw and crisp them perfectly.
Best Reheating Method
To revive a day‑old twist, preheat your oven to 325°F, place the twist on a baking sheet, and add a tiny splash (about 1 teaspoon) of water to the edge of the sheet. Cover loosely with foil and bake for 5 minutes. The steam generated brings back that melt‑in‑your‑mouth interior while the foil protects the delicate swirl.