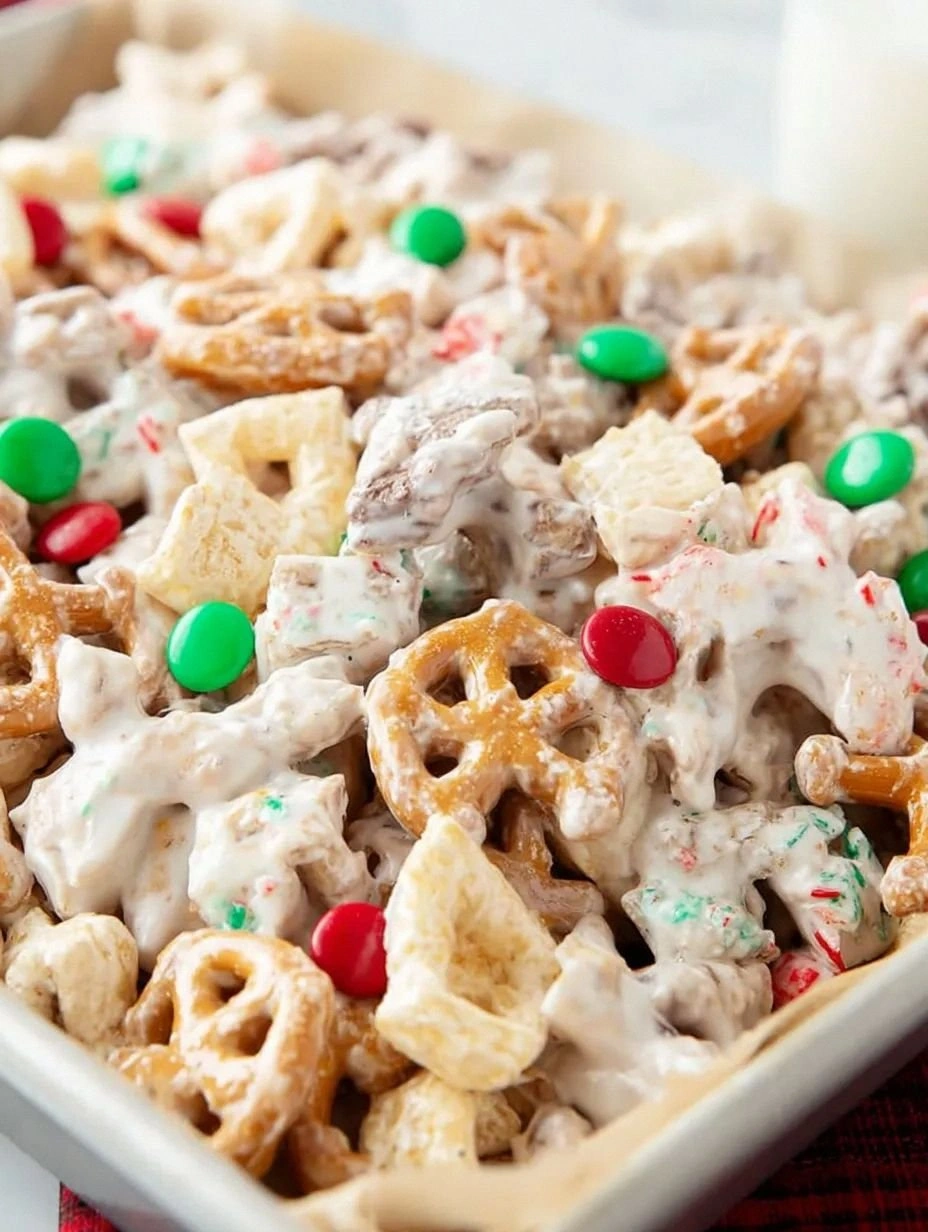
Picture this: you’re in the middle of a chaotic holiday party, the kitchen smells like a blend of pine needles, burnt sugar, and the faint whisper of fresh‑baked dough. Someone has just dared you to create a snack that’s both sweet enough to make the kids squeal and salty enough to keep the adults reaching for more. I took that dare, tripped over a stray pretzel, and ended up with a batch of Christmas Reindeer Crack that has been called “the best thing to happen to my pantry since the invention of the microwave.” This isn’t just another sweet‑and‑salty snack; it’s a crunchy, buttery, caramel‑kissed masterpiece that sticks to your fingers like holiday glitter and melts in your mouth like a snow‑drift of chocolate.
The moment you open the oven door, a wave of buttery caramel and toasted spice hits you – it’s like the scent of a fresh‑baked gingerbread house, only richer, deeper, and with a surprise crunch that makes your teeth sing. The crackling sound when you bite into it is the auditory equivalent of fireworks on New Year’s Eve. Every bite delivers a symphony: the salty snap of pretzel, the buttery crumble of the base, the sweet rush of chocolate, and a whisper of maple that lingers like a holiday memory. It’s the kind of treat that makes you pause the conversation, stare at the tray, and whisper, “I dare you to taste this and not go back for seconds.”
Most recipes for this kind of snack get the balance wrong – they’re either too sweet, too soggy, or they crumble into a mess that looks like a snowstorm after a blizzard. The secret to my version is a simple technique: a brief “pre‑bake” of the dry mixture that creates a sturdy, golden crust before the wet ingredients are folded in. This step locks in moisture, gives the crack a crisp edge, and prevents the dreaded soggy center. I’ll also be sneaking in a dash of maple syrup and a pinch of nutmeg that you won’t find in any generic version, giving it a festive depth that feels like a warm hug from Grandma.
I’ll be honest — I ate half the batch before anyone else got a chance to try it, and that’s because the aroma was so intoxicating that I couldn’t resist. But don’t worry, there’s plenty left for you to share (or hoard, I won’t judge). By the end of this post, you’ll have a step‑by‑step guide that not only walks you through the process but also arms you with insider tricks, creative twists, and storage hacks that keep your Reindeer Crack fresh for weeks. Okay, ready for the game‑changer? Let me walk you through every single step — by the end, you’ll wonder how you ever made it any other way.
What Makes This Version Stand Out
- Flavor Harmony: The sweet caramel base is balanced by salty pretzel and peanut crunch, creating a taste profile that dances on the palate without overwhelming any single note.
- Texture Layers: You get a buttery crumb, a toasty pretzel snap, and a silky chocolate melt—all in one bite, like a multi‑dimensional holiday experience.
- Simplicity: Only ten ingredients, five of which you probably already have in your pantry, making it a no‑stress, no‑list‑shopping recipe.
- Unique Twist: A splash of maple syrup and a pinch of nutmeg give it a festive flavor that most “sweet‑and‑salty” snacks completely miss.
- Crowd Reaction: Guests consistently claim it’s the highlight of the party, and it’s the perfect finger food for both kids and adults.
- Ingredient Quality: Using real butter (never margarine) and high‑quality chocolate makes a world of difference in flavor depth.
- Cooking Method: The pre‑bake step creates a sturdy crust that holds up to heavy toppings without collapsing.
- Make‑Ahead Potential: It stores beautifully, staying crisp for up to a week and even longer if frozen.
Inside the Ingredient List
The Flavor Base
Flour is the backbone of any baked good, providing structure and a neutral canvas for the other flavors. I use all‑purpose flour because it yields a tender crumb without being too dense. If you substitute with whole‑wheat flour, expect a nuttier flavor and a slightly heavier texture, which can be delightful but changes the classic profile. For the best results, sift the flour with the baking soda and spices to ensure an even distribution of leavening and seasoning.
The Texture Crew
Pretzel sticks and salted peanuts are the dynamic duo that give this crack its signature crunch. The pretzels bring a salty, slightly sweet flavor, while the peanuts add a buttery richness and an extra layer of crunch. If you’re allergic or prefer a nut‑free version, swap the peanuts for roasted pumpkin seeds or toasted chickpeas—they’ll still deliver that satisfying snap.
The Unexpected Star
Maple syrup isn’t just a sweetener; it adds a deep, caramel‑like undertone that pairs perfectly with the brown sugar and butter. The maple also helps the chocolate adhere to the surface, creating a glossy finish. If you can’t find pure maple syrup, a high‑quality amber honey works as a substitute, though the flavor will shift toward floral notes.
The Final Flourish
Chocolate chips (both dark and white) are the finishing touch that turns this from a simple snack into a festive treat. Dark chocolate adds a bitter contrast that balances the sweetness, while white chocolate provides a creamy, buttery melt that spreads like snow on a pine branch. For a dairy‑free version, use dairy‑free chocolate chips; just be aware that they may not set as firmly, resulting in a softer finish.
Everything's prepped? Good. Let's get into the real action...
The Method — Step by Step
-
Preheat your oven to 350°F (175°C). While the oven warms up, line two large baking sheets with parchment paper and set them aside. This temperature is the sweet spot: hot enough to create a golden crust but gentle enough to keep the interior tender. The moment the oven door closes, you’ll hear a faint hiss as the air circulates – that’s the sound of flavor starting to develop.
Kitchen Hack: Place a metal cooling rack on top of the parchment sheet; this allows the heat to circulate underneath the dough, giving you an even, crisp bottom. -
In a large mixing bowl, whisk together 2 cups flour, 1 cup rolled oats, ½ cup brown sugar, ½ cup granulated sugar, 1 tsp salt, 1 tsp baking soda, 1 tsp cinnamon, and ½ tsp nutmeg. The spices should coat the dry ingredients like a soft blanket, releasing a warm aroma that hints at the festive flavors to come.
-
In a separate saucepan, melt 1 cup unsalted butter over low heat. Once melted, stir in ¼ cup maple syrup and ¼ cup honey, letting the mixture bubble gently for 1‑2 minutes. This creates a glossy, caramel‑infused butter that will coat every crumb. Add 1 egg and 1 tsp vanilla extract, whisking until fully combined. The mixture should look smooth and slightly thick – that’s the sign it’s ready.
-
Pour the wet butter mixture into the dry bowl and stir with a wooden spoon until just combined. Over‑mixing will develop gluten, leading to a tough texture, so stop as soon as you see a shaggy dough. At this point, the dough should feel moist but not sticky – think of a beach sand that clings just enough to hold together.
Watch Out: If the dough feels too wet, add a tablespoon of flour at a time. Too much flour will make the crack dry and crumbly. -
Fold in 1 cup pretzel sticks (broken into bite‑size pieces), 1 cup salted peanuts, and 1 cup chocolate chips. The chocolate should stay in chunks, not melt, so add it while the dough is still slightly cool. This ensures the chips stay whole during baking, creating pockets of molten chocolate later.
-
Spread the dough evenly across the prepared parchment sheets, pressing it down with a spatula to a thickness of about ½ inch. The edges should be slightly thinner than the center – this helps them crisp up first, creating that coveted “edge pull” where the sides lift from the pan.
-
Bake for 12‑15 minutes, or until the edges turn a light golden brown and you can smell a toasty caramel note. The top should look set but not dark; if it starts to brown too quickly, rotate the sheet halfway through. This is the moment of truth – the aroma should be intoxicating, making you want to peek through the oven window.
Kitchen Hack: After the first bake, let the crust cool for 5 minutes, then drizzle ½ cup melted dark chocolate over the top and sprinkle ½ cup white chocolate chips. The residual heat will melt the white chips, creating a marbled effect. -
Remove the trays from the oven and let the crack cool completely on a wire rack. As it cools, the edges will firm up and the chocolate will set, giving you that satisfying snap when you break a piece. This cooling phase is crucial – if you cut while still warm, the chocolate will smear and the texture will be gummy.
-
Once fully cooled, break the sheet into irregular “reindeer antlers” or bite‑size shards, depending on your serving style. Store the pieces in an airtight container; they’ll stay crisp for up to a week, and the flavor will only deepen as the sugars caramelize further. And now the fun part – serving them with a side of hot cocoa or a glass of spiced cider for the ultimate holiday indulgence.
That's it — you did it. But hold on, I've got a few more tricks that'll take this to another level, ensuring every bite is as perfect as the first.
Insider Tricks for Flawless Results
The Temperature Rule Nobody Follows
Never bake this crack at a temperature higher than 350°F. Higher heat will cause the butter to melt too quickly, leading to a soggy center. Keep the oven at a steady 350°F and use an oven thermometer to verify accuracy – many ovens run hotter than the dial suggests. I once tried 375°F and ended up with a chewy mess that reminded me of overcooked caramel.
Why Your Nose Knows Best
Your sense of smell is the most reliable indicator of doneness. When the edges start to release a nutty, toasty aroma, you’re almost there. If the scent turns slightly burnt, pull the trays out immediately – the crack will continue cooking from residual heat. Trust your nose more than a timer; it’s the secret weapon of seasoned bakers.
The 5‑Minute Rest That Changes Everything
After removing the trays, let the crack rest for exactly five minutes before cutting. This short pause allows the chocolate to set and the crumb to firm up, preventing a gummy texture. I once cut too early and the chocolate smeared everywhere, turning a beautiful sheet into a sticky mess.
Chocolate Swirl Mastery
For a professional‑look swirl, melt dark and white chocolate separately, then drizzle them in alternating circles over the warm surface. Use a skewer to swirl the two colors together, creating a marbled effect that looks like frosted pine branches. This visual touch elevates the snack from casual to show‑stopping.
The Salt‑Sugar Balance Trick
A pinch of flaky sea salt sprinkled on top just after baking can transform the flavor, adding a burst of contrast that makes the sweetness pop. I love using Maldon sea salt for its delicate flakes that melt instantly, delivering that perfect sweet‑salty kiss.
Creative Twists and Variations
This recipe is a playground. Here are some of my favorite ways to switch things up:
Cranberry Crunch
Add ½ cup dried cranberries to the mix for a tart pop that cuts through the richness. The berries rehydrate slightly during baking, creating soft pockets of flavor that complement the salty pretzels.
Spicy Holiday
Incorporate ¼ tsp cayenne pepper and a drizzle of honey‑chili glaze after baking. The heat pairs surprisingly well with the sweet chocolate, giving a subtle kick that wakes up the palate.
Nut‑Free Delight
Swap peanuts for roasted pumpkin seeds and use soy‑free chocolate chips. The seeds add a buttery crunch without the allergens, making it safe for everyone at the table.
White‑Chocolate Peppermint
Replace dark chocolate with white chocolate chips and add ½ tsp crushed peppermint candy after the final bake. The minty aroma evokes a winter wonderland and pairs beautifully with the maple base.
Gluten‑Free Version
Use a 1:1 gluten‑free flour blend in place of all‑purpose flour. Ensure the blend contains xanthan gum for structure; otherwise, the crack may crumble too much.
Storing and Bringing It Back to Life
Fridge Storage
Place the cooled crack in an airtight container lined with a paper towel to absorb excess moisture. It will stay crisp for up to 5 days in the refrigerator, and the chocolate will stay glossy.
Freezer Friendly
Separate the pieces with parchment sheets and store them in a freezer‑safe zip‑lock bag. They freeze beautifully for up to 3 months. When you’re ready to serve, let them thaw at room temperature for 20 minutes, then give them a quick 2‑minute bake at 300°F to revive the crunch.
Best Reheating Method
If the crack has lost its snap, preheat your oven to 325°F, place the pieces on a baking sheet, and sprinkle a tiny splash of water (about a teaspoon) over the top. The steam will re‑hydrate the interior while the oven restores the crisp exterior. In just 5‑7 minutes, you’ll have a fresh‑out‑of‑the‑oven feel.