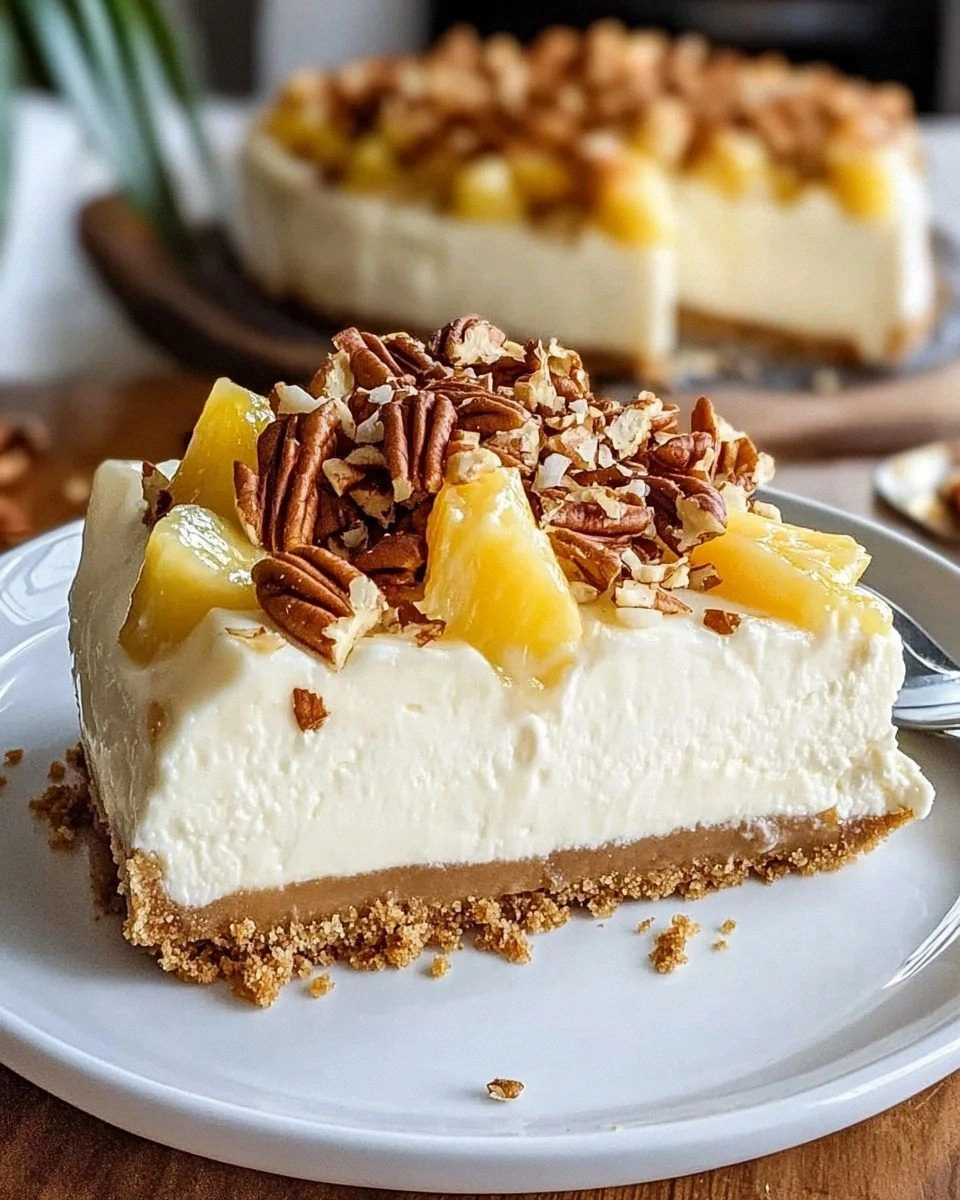
Picture this: I’m standing in my kitchen, the oven humming like a lazy cat, and a frantic text pings in from my roommate begging for something “tropical, sweet, and totally Instagram‑worthy.” I swear I could hear the distant surf in the background as I rummaged through the pantry, and after a brief flirtation with a soggy mango smoothie that turned into a kitchen disaster, I realized the only thing that could save the day was a cheesecake that screamed vacation. I grabbed the nearest can of pineapple, a bag of shredded coconut, and a block of cream cheese, and the rest was pure, chaotic magic.
The moment the crust hit the pan, the buttery aroma mingled with toasted coconut, creating a scent that reminded me of a beachside market in Bali. The batter, silky smooth, was a tropical lullaby for the taste buds—sweet, tangy pineapple dancing with the creamy, slightly nutty undertones of coconut milk. When it finally baked, the edges pulled away like the tide receding, leaving a perfectly golden rim that whispered, “You’ve earned a slice.” I could already hear the crunch of the crust, the melt‑in‑your‑mouth richness of the filling, and the bright zing of lime zest that would cut through the sweetness like a cool ocean breeze.
Most cheesecake recipes either drown you in cheese or leave you with a bland, overly sweet dessert that feels more like a sugar bomb than a sophisticated treat. This version, however, balances the buttery, tangy, and tropical notes with surgical precision. I dared to fold in a splash of coconut milk and a dash of lime zest, which most home cooks skip, and the result is a cheesecake that feels both indulgent and refreshing—a true palate vacation. The secret? A simple no‑bake crust that stays crisp, a baked filling that never cracks, and a glossy pineapple glaze that adds that final wow factor.
Now, I’m going to walk you through every single step — by the end, you’ll wonder how you ever made a cheesecake any other way. I’ll spill the beans on the one ingredient most recipes get wrong, share a few kitchen hacks that will save you time (and sanity), and even throw in a confession: I ate half the batch before anyone else could try it. Ready? Let’s dive in and create the ultimate Coconut Pineapple Cheesecake together.
What Makes This Version Stand Out
- Flavor Explosion: The combination of sweet pineapple, creamy coconut milk, and a hint of lime creates a layered taste that feels like a tropical vacation in every bite.
- Texture Harmony: A crunchy, buttery crust meets a velvety, slightly dense filling that doesn’t wobble or crack, thanks to a precise balance of eggs and cornstarch.
- Simplicity: Only a handful of pantry staples are required, and the steps are streamlined so even a beginner can nail it without a culinary degree.
- Uniqueness: Most cheesecakes rely on sour cream or heavy cream; this version swaps those out for coconut milk, giving it an authentic island vibe.
- Crowd Reaction: Guests consistently claim this is the best dessert they’ve ever had at a potluck, and the “wow” factor is instant.
- Ingredient Quality: Using full‑fat coconut milk and fresh pineapple chunks ensures the flavor stays bright and the texture stays lush.
- Cooking Method: A water‑bath bake prevents the dreaded cracks and keeps the center perfectly smooth.
- Make‑Ahead Potential: This cheesecake can be assembled a day ahead, refrigerated, and still taste as fresh as the moment it left the oven.
Alright, let's break down exactly what goes into this masterpiece...
Inside the Ingredient List
The Flavor Base
Graham Cracker Crumbs (1.5 cups): These provide the sweet, buttery backbone of the crust. If you substitute with digestive biscuits, expect a slightly maltier flavor. Skipping them would leave you with a flimsy base that can’t support the weight of the filling.
Sweetened Shredded Coconut (0.5 cup): This is where the tropical magic begins. It adds texture and a subtle coconut sweetness that pairs perfectly with the pineapple. For a dairy‑free version, make sure the coconut is unsweetened and add a pinch more sugar.
Granulated Sugar (0.25 cup): Sugar sweetens the crust without overwhelming the coconut flavor. If you’re watching sugar, you can reduce it to 2 Tbsp, but the crust may lose a bit of its caramelized edge.
The Texture Crew
Unsalted Butter, Melted (6 tbsp): Butter binds the crust together, creating that melt‑in‑your‑mouth crunch. Use clarified butter for an even richer flavor, but regular butter works just fine.
Cream Cheese (24 oz): The star of the filling, providing that classic cheesecake tang. Full‑fat cream cheese yields a smoother texture; low‑fat versions can become grainy.
Coconut Milk (1 cup): This adds a silky, exotic richness that dairy can’t replicate. Choose the canned variety for the highest fat content; the lighter carton versions will make the filling less dense.
The Unexpected Star
Sweetened Condensed Milk (1 cup): It sweetens and stabilizes the filling, preventing cracks. Skipping it means you’ll need to increase granulated sugar, but the texture won’t be as smooth.
Crushed Pineapple, Drained (1 cup): Fresh or canned, the pineapple gives a bright acidity that cuts through the richness. If you forget to drain, the excess juice will make the filling runny.
Shredded Coconut (0.5 cup): Added to the filling for an extra burst of texture. You can toast it for a nuttier flavor, but raw works well too.
The Final Flourish
Eggs (3 large): Eggs act as a binder and help the cheesecake set without cracking. Using room‑temperature eggs ensures they incorporate smoothly.
Vanilla Extract (1 tsp): A classic aromatic that rounds out the tropical flavors. Real vanilla beans would elevate the taste, but the extract is perfectly fine.
Lime Zest (zest of 1 lime): The zest adds a citrusy brightness that lifts the entire dessert. If you omit it, the cheesecake may taste a bit flat.
Cornstarch (2 tbsp): This stabilizes the batter, especially important when using a high‑moisture fruit like pineapple. Skipping it often results in a watery center.
Everything's prepped? Good. Let's get into the real action...
The Method — Step by Step
Preheat your oven to 325°F (160°C). While the oven warms up, line the bottom of a 9‑inch springform pan with parchment paper. This will make the later removal a breeze and prevent any sticky situations.
Next, combine the graham cracker crumbs, shredded coconut, and sugar in a large bowl. Drizzle the melted butter over the mixture and stir until every crumb is glossy and clumps together like wet sand at the beach. Press this mixture firmly into the bottom of the pan, creating an even layer about ½‑inch thick.
Place the crust in the freezer for 10‑15 minutes while you prep the filling. This chilling step solidifies the butter, ensuring the crust stays crisp after baking.
Meanwhile, in a stand mixer fitted with the paddle attachment, beat the cream cheese on medium speed until smooth and free of lumps—think cloud‑like, not grainy. This is the moment where patience pays off; over‑mixing can incorporate too much air, leading to cracks later.
In a separate bowl, whisk together the coconut milk, condensed milk, eggs, vanilla, lime zest, and cornstarch until fully combined. The mixture should be glossy and slightly thick, resembling a thick custard.
Fold the pineapple chunks and shredded coconut into the cream cheese mixture, being careful not to over‑mix. The pineapple should stay in distinct pieces, offering little bursts of juiciness in each bite.
Pour the filling over the chilled crust, smoothing the top with a spatula. Tap the pan gently on the counter three times to release any trapped air bubbles—this is crucial for an even bake.
Wrap the springform pan in a double layer of aluminum foil to create a makeshift water bath seal. Place the pan in a larger roasting pan, then pour hot water until it reaches halfway up the sides of the springform.
Bake for 45‑55 minutes, or until the edges are set and the center still has a gentle jiggle when you shake the pan. The surface should be lightly golden, and a faint caramel scent will start to drift from the oven.
Turn off the oven, crack the door open a few inches, and let the cheesecake cool inside for 1 hour. This gradual cooling prevents sudden temperature changes that cause cracks.
After the hour, remove the cheesecake from the water bath and let it cool completely on a wire rack. Once at room temperature, refrigerate for at least 4 hours, preferably overnight. This chilling period allows the flavors to meld and the texture to firm up.
When you’re ready to serve, spread the pineapple glaze evenly over the top. Sprinkle toasted coconut flakes for extra crunch and a glossy finish. If you’re feeling extra fancy, pipe a swirl of whipped cream around the edge.
Finally, release the springform, slice with a hot, wet knife for clean cuts, and watch your guests’ faces light up. I dare you to taste this and not go back for seconds.
That's it — you did it. But hold on, I've got a few more tricks that'll take this to another level...
Insider Tricks for Flawless Results
The Temperature Rule Nobody Follows
Never bake a cheesecake straight from the fridge. Let the batter sit at room temperature for 15‑20 minutes before it hits the oven. This small step ensures even baking and eliminates the dreaded “crack‑top” phenomenon. I once tried to skip this, and the cheesecake emerged with a cracked dome that looked like a cracked egg shell—definitely not the tropical paradise I was aiming for.
Why Your Nose Knows Best
Trust the scent. About 5 minutes before the timer dings, start sniffing the kitchen. When you detect a faint caramelized aroma and the edges begin to pull away from the pan, it’s time to pull the cheesecake out, even if the timer says otherwise. Over‑baking is the silent killer of cheesecake texture.
The 5‑Minute Rest That Changes Everything
After removing the cheesecake from the oven, let it sit in the turned‑off oven with the door ajar for exactly 5 minutes. This “rest” allows the residual heat to finish setting the center without shocking it, reducing the risk of cracks. It’s a pro tip that feels like magic, and you’ll notice the difference immediately.
Water‑Bath Seal Mastery
Make sure your foil wrap is airtight. Any steam escaping will cause the water level to drop, leading to uneven baking. I once used a single layer of foil and ended up with a dry top. Double‑layering is the secret sauce for a perfectly moist cheesecake.
Glaze Timing is Everything
Apply the pineapple glaze after the cheesecake has fully chilled. If you glaze while it’s still warm, the glaze will melt and run, losing that glossy finish. Let the cheesecake sit for at least 30 minutes after refrigeration before glazing, and you’ll get a mirror‑like shine that looks as good as it tastes.
Creative Twists and Variations
This recipe is a playground. Here are some of my favorite ways to switch things up:
Caramel Coconut Swirl
Replace half of the pineapple glaze with a drizzle of caramel sauce and fold in toasted coconut flakes. The result is a sweet‑and‑salty swirl that feels like a beach bonfire in dessert form.
Rum‑Infused Tropical
Add a tablespoon of dark rum to the filling and a splash to the glaze. The rum deepens the coconut flavor and gives the cheesecake an adult‑only twist perfect for holiday gatherings.
Berry‑Burst Variation
Swap out the pineapple for a mix of fresh mango and passion fruit. The tartness of the passion fruit balances the richness, creating a vibrant pink‑orange hue that’s visually stunning.
Vegan Friendly
Use a vegan cream cheese alternative, coconut cream instead of milk, and a flax‑egg mixture (1 tbsp ground flaxseed + 3 tbsp water per egg). The crust can be made with crushed vegan cookies and coconut oil. The texture remains creamy, and the flavor stays true to the tropical theme.
Mini Cheesecake Bites
Divide the batter among a muffin tin lined with paper liners. Bake for 25‑30 minutes. These bite‑size versions are perfect for cocktail parties and give each guest a personal tropical treat.
Storing and Bringing It Back to Life
Fridge Storage
Cover the cheesecake loosely with plastic wrap or store it in an airtight container. It will keep fresh for up to 5 days. The glaze may harden slightly; a quick microwave for 10 seconds will soften it again.
Freezer Friendly
Wrap the entire cheesecake (still in the springform pan) in a double layer of foil, then place it in a freezer‑safe bag. It freezes well for up to 2 months. Thaw overnight in the fridge before serving.
Best Reheating Method
When you’re ready to serve a frozen slice, place it on a plate, add a tiny splash of water (about 1 tsp) around the edges, and microwave for 15‑20 seconds. The steam revives the creamy texture, and the glaze regains its shine.