Picture this: you’re halfway through a week of bland take‑out, your fridge is a sad, lonely collection of frozen veggies, and your friend drops a dare into your inbox: “Make something that screams summer and still feels like a Sunday brunch.” I stared at the empty pantry, shrugged, and decided it was time to create a dish that would make me question why I even bother with the grocery store. I opened the cupboard, pulled out a handful of chicken breasts, a jar of honey, a packet of panko, and a bottle of soy sauce that had been gathering dust for weeks. The moment the honey hit the skillet, a sweet, golden aroma erupted, and I knew I had stumbled upon a secret weapon for instant dinner satisfaction.
I was in the middle of a kitchen experiment when the real magic happened. The chicken, coated in a buttery crust of flour and panko, sizzled like a tiny, crispy orchestra. The honey and soy sauce glistened together, forming a glossy glaze that clung to each bite like velvet. The garlic released its punch, filling the air with a savory perfume that made even the most skeptical taste buds do a double take. The heat rose, the steam curled, and the whole room smelled like a summer festival in a pan. That’s the moment I realized: this isn’t just a meal—it’s an invitation to taste the world in a single bite.
Why does this version feel like a revelation? Because it blends the comforting crunch of a classic fried chicken with the bright, sticky sweetness of honey, all baked to keep the kitchen mess to a minimum. The method is straightforward, yet each step is a deliberate act of flavor engineering: the dry coating, the sweet‑savory glaze, the final burst of sesame and scallions that add a satisfying crunch and fresh brightness. The result is a dish that’s crisp on the outside, juicy on the inside, and has a depth of flavor that makes you question every other chicken recipe you’ve ever tried. I dare you to taste this and not go back for seconds—once you’ve had it, the idea of plain grilled chicken will feel like a bad dream.
What sets this apart from the endless variations on the internet? It’s the harmony of textures and the balance of sweet and salty that makes each bite unforgettable. The honey isn’t just a glaze; it’s a caramelized, aromatic coating that locks in juices and gives a subtle crunch when it sets. The panko provides a light, airy crunch that’s far less heavy than traditional breadcrumbs, making it feel like a “light” version of fried chicken without sacrificing flavor. And the secret sauce, a simple blend of soy, rice vinegar, garlic, and cornstarch, thickens into a glossy, savory coat that’s almost impossible to resist. This is hands down the best version you’ll ever make at home, and it’s about to become your new go‑to for weeknight dinners and weekend gatherings alike.
What Makes This Version Stand Out
- Crunch: The combination of flour and panko creates a light, airy crust that shatters like thin ice when you bite into it, delivering a satisfying snap that keeps you coming back for more.
- Sweetness: Honey is not just a sweetener—it’s a flavor enhancer that caramelizes and forms a glossy glaze, turning each piece of chicken into a caramelized treasure.
- Umami: The low‑sodium soy sauce brings depth without overpowering, allowing the other flavors to shine while adding a savory backbone that balances the sweetness.
- Texture Play: The cornstarch‑water mixture thickens the glaze to a silky finish, giving the dish that “fried‑but‑baked” feel without the greasy aftermath.
- Convenience: Baked, not fried—this method saves you from the oil splatter and the cleanup that comes with deep‑frying, making it a low‑effort, high‑reward option.
- Versatility: The base is a blank canvas that can be tweaked with different spices, sauces, or even a splash of citrus for a tangy twist.
- Crowd‑Pleaser: The sweet‑savory profile is universally loved, making it perfect for family dinners, potlucks, or a quick weekday meal.
- Make‑Ahead Friendly: The chicken can be pre‑marinated and baked ahead of time, then reheated without losing its crispness or flavor.
Inside the Ingredient List
The Flavor Base
The honey and soy sauce are the heart of this dish. Honey brings that golden, caramelized sweetness that coats the chicken in a glossy, sticky glaze. Soy sauce adds depth, umami, and a hint of saltiness that balances the honey’s sweetness. If you skip the soy sauce, the glaze becomes too sweet and loses that savory kick that keeps each bite from feeling like a dessert. If you want a different flavor profile, try swapping the soy sauce for tamari for a gluten‑free version or add a splash of hoisin for a slightly sweeter, thicker sauce.
The Texture Crew
Flour and panko are the dynamic duo that create that coveted crunch. The flour forms a base that helps the coating stick, while the panko adds a light, airy crunch that’s far less dense than traditional breadcrumbs. If you omit the flour, the coating may fall off during baking, resulting in a less even crust. For a gluten‑free twist, use almond flour or a gluten‑free breadcrumb blend. A quick tip: sift the flour and panko together before coating the chicken to ensure an even distribution.
The Unexpected Star
Cornstarch is the unsung hero that thickens the glaze into a silky, glossy coat. Without it, the glaze would be runny and fail to cling to the chicken. If you don’t have cornstarch on hand, arrowroot powder or tapioca starch can work as a substitute, though the texture may be slightly different. A quick hack: mix the cornstarch with cold water before adding it to the sauce to prevent clumping, ensuring a smooth glaze.
The Final Flourish
Sesame seeds and scallions add a final pop of crunch and freshness that lifts the dish from ordinary to unforgettable. Toasted sesame seeds bring a nutty aroma and subtle crunch, while scallions provide a bright, herbaceous note that cuts through the richness. If you’re allergic to sesame, replace it with chopped almonds or pine nuts for a different crunch. If you prefer a milder flavor, reduce the scallions to a tablespoon.
Everything's prepped? Good. Let's get into the real action...
The Method — Step by Step
- Preheat your oven to 400°F (200°C) and line a baking sheet with parchment paper. While the oven warms, pat the chicken cubes dry with paper towels; this ensures a crispier crust. The room should start to fill with the sweet scent of honey even before you begin, which is a good sign that the glaze will caramelize beautifully. This is the moment of truth—if you rush this step, the coating will not adhere properly. Keep an eye on the oven temperature; an over‑heated oven can burn the honey before the chicken cooks through.
- In a shallow bowl, combine the flour, salt, and black pepper. Toss the chicken cubes in the flour mixture until they’re evenly coated, shaking off any excess. Then dip each piece in the beaten eggs, letting any excess drip off, and finally roll them in panko breadcrumbs. This triple‑layered coating is what gives the dish its signature crunch. The eggs act as a glue, binding the flour to the panko, while the panko adds the light, airy texture. If you’re short on time, you can skip the egg step, but the coating will be less uniform.
- Heat avocado oil in a large skillet over medium‑high heat. Add the coated chicken in a single layer, making sure not to overcrowd the pan—crowding will cause the pieces to steam rather than sear. Sear each side for 2–3 minutes until golden brown, then transfer the chicken to the prepared baking sheet. The searing process locks in juices and gives the chicken a beautiful caramelized exterior. This step is essential; skipping it will result in a less flavorful crust.
- While the chicken bakes, whisk together honey, soy sauce, minced garlic, rice vinegar, and cornstarch in a small bowl. Add the cornstarch to a separate cup of cold water first, whisk until smooth, then stir into the glaze mixture. This slurry prevents the cornstarch from clumping when it hits the heat. The glaze will thicken as it cooks, forming a glossy, flavorful coat that clings to each piece. If you’re using a different sweetener, such as maple syrup, reduce the soy sauce slightly to maintain balance.
- Place the baking sheet in the preheated oven and bake for 15–18 minutes, or until the internal temperature reaches 165°F (74°C). About halfway through, drizzle the glaze over the chicken, then return it to the oven. The glaze should caramelize and thicken, creating a sticky, golden coating. Keep the oven door closed to maintain a steady temperature, which ensures even cooking. If you notice the glaze burning, lower the oven temperature by 25°F (14°C).
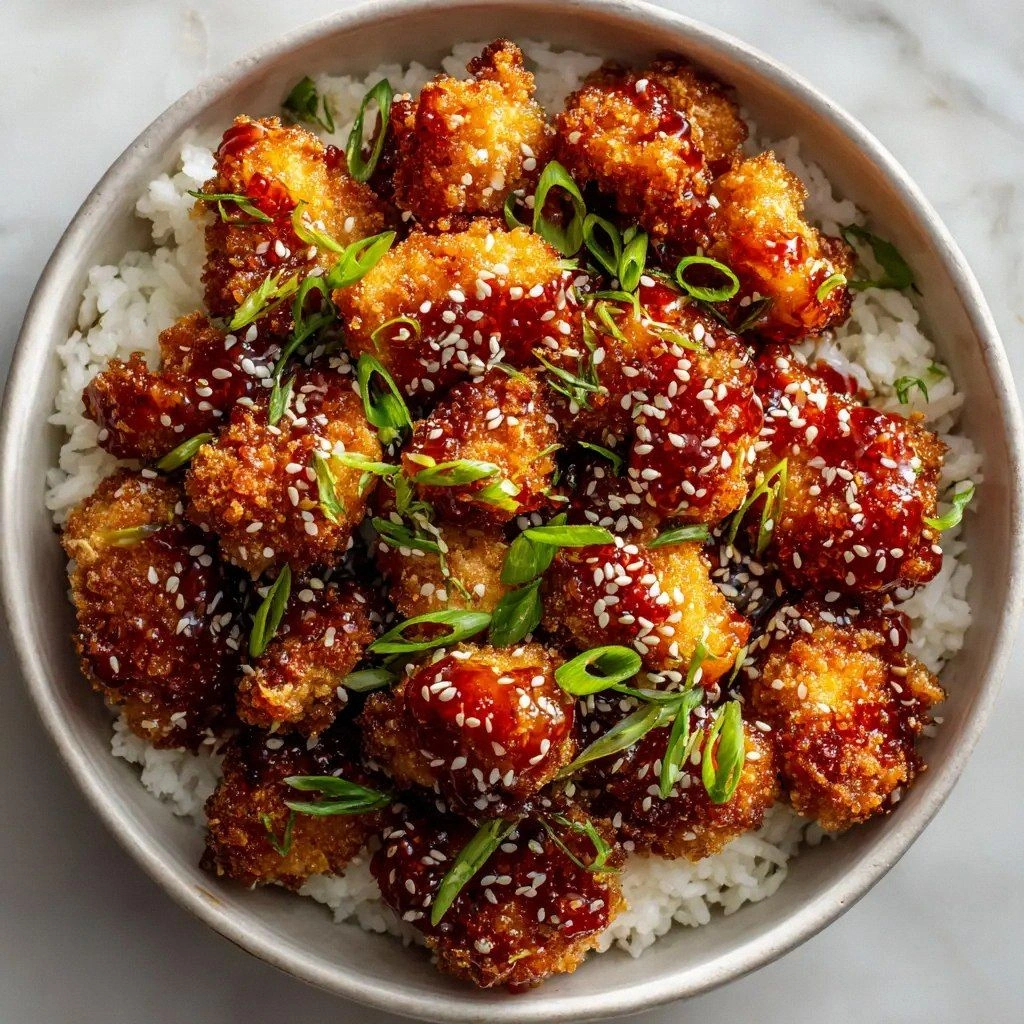
- Once the chicken is cooked, remove the baking sheet and let the pieces rest for 5 minutes. This short rest allows the juices to redistribute, ensuring each bite is juicy. While the chicken rests, stir the remaining glaze until it reaches a thick, syrupy consistency. Drizzle the glaze over the rested chicken, then sprinkle with toasted sesame seeds and sliced scallions. The final touch of sesame adds a nutty crunch, and the scallions provide a fresh, bright contrast.
- Serve the honey chicken over fluffy steamed white rice, ensuring the rice is hot and lightly seasoned with a pinch of salt. The rice absorbs the extra glaze, turning each grain into a sweet‑savory delight. A squeeze of lime over the top adds a bright citrus note that cuts through the richness. If you prefer a low‑carb option, substitute the rice with cauliflower rice or a side of sautéed greens. The dish is versatile enough to pair with a simple side salad or steamed vegetables.
- Enjoy while hot for the best texture; the chicken’s coating will be crispest immediately after baking. If you have leftovers, store them in an airtight container in the refrigerator for up to 3 days. Reheat in the oven at 350°F (175°C) for 10 minutes to restore crispness, or use a skillet over medium heat for a quick reheat. Remember to add a splash of water before reheating to keep the chicken from drying out. And there you have it—this is how you turn a simple chicken dish into a crowd‑pleasing masterpiece.
That’s it—you did it. But hold on, I’ve got a few more tricks that will take this to another level. Stick with me, and you’ll become a honey‑glazed chicken guru in no time.
Insider Tricks for Flawless Results
The Temperature Rule Nobody Follows
Many people think any oven temperature will do, but the secret to a crispy coating is a high heat that quickly caramelizes the glaze. Set your oven to 425°F (220°C) for a shorter baking time of 12–15 minutes. The higher heat creates a more pronounced Maillard reaction, turning the coating into a golden, crackly shell. If you’re using a convection oven, reduce the temperature by 25°F to avoid over‑browning.
Why Your Nose Knows Best
Before you even touch the oven, take a deep breath of the honey glaze. The aroma will tell you if the glaze is too thick or too thin. If it smells like burnt sugar, you’re over‑cooking it; if it’s barely fragrant, you need more honey or less water in the slurry. Your nose is a reliable indicator of the glaze’s readiness, so trust it—if it smells like a caramelized candy, you’re ready to drizzle it over the chicken.
The 5-Minute Rest That Changes Everything
After baking, let the chicken rest for exactly five minutes. This brief pause allows the juices to redistribute, preventing them from spilling out when you cut into the meat. It also gives the coating a chance to set, resulting in a crispier bite. Skipping this step will leave you with a soggy exterior and a juicy, but less satisfying, texture.
Use the Right Oil
Avocado oil is my go‑to because of its high smoke point and mild flavor, but you can also use grapeseed or canola oil. Avoid using olive oil for searing, as it can burn and impart an unwanted bitterness. If you’re aiming for a more robust flavor, a splash of sesame oil in the glaze adds depth without overpowering the honey.
Batch Prep for Busy Nights
If you’re short on time, marinate the chicken in the honey‑soy mixture overnight. This allows the flavors to penetrate deeper and reduces the cooking time by up to 10 minutes. Store the marinated chicken in the refrigerator until ready to bake. This trick is perfect for busy families who want a gourmet meal without the fuss.
Creative Twists and Variations
This recipe is a playground. Here are some of my favorite ways to switch things up:
Spicy Sriracha Honey
Add a tablespoon of Sriracha to the glaze for a fiery kick that balances the sweetness. The heat from the Sriracha pairs beautifully with the honey, creating a flavor profile that’s both sweet and spicy. Serve with a side of cool cucumber salad to offset the heat.
Thai Coconut Curry Glaze
Replace the soy sauce with coconut aminos and stir in a tablespoon of red curry paste. The coconut milk in the glaze adds a creamy, tropical note that transforms the dish into a Thai‑inspired delight. Pair it with jasmine rice and a sprinkle of fresh cilantro.
Herb‑Infused Panko
Mix dried rosemary, thyme, and oregano into the panko before coating the chicken. The herbs infuse the crust with aromatic flavors that complement the honey glaze. This variation is perfect for a rustic dinner party.
Maple‑Mustard Glaze
Swap honey for pure maple syrup and add a teaspoon of Dijon mustard. The mustard adds a subtle tang that cuts through the sweetness, while the maple provides a deep, caramelized flavor. This version works wonderfully with roasted sweet potatoes.
Asian Sesame Crunch
Sprinkle toasted sesame seeds into the panko mixture before coating the chicken. The extra sesame adds a nutty crunch that elevates the texture. Finish with a drizzle of toasted sesame oil for an extra layer of flavor.
Storing and Bringing It Back to Life
Fridge Storage
Store the cooked chicken in an airtight container in the refrigerator for up to 3 days. Keep the glaze in a separate small container to prevent the chicken from becoming soggy. When ready to eat, reheat in a preheated oven at 350°F (175°C) for 10 minutes.
Freezer Friendly
For longer storage, place the chicken in a freezer‑safe zip‑lock bag, removing as much air as possible. Freeze for up to 2 months. To thaw, let it sit in the refrigerator overnight. Reheat in the oven at 350°F (175°C) for 12–15 minutes, or in a skillet over medium heat.
Best Reheating Method
Reheating in the oven restores the crispness better than a microwave. Before reheating, add a splash of water to the chicken to keep it moist. Cover loosely with foil to prevent the glaze from drying out. A quick 5‑minute blast in the oven at 400°F (200°C) is enough to revive the dish.