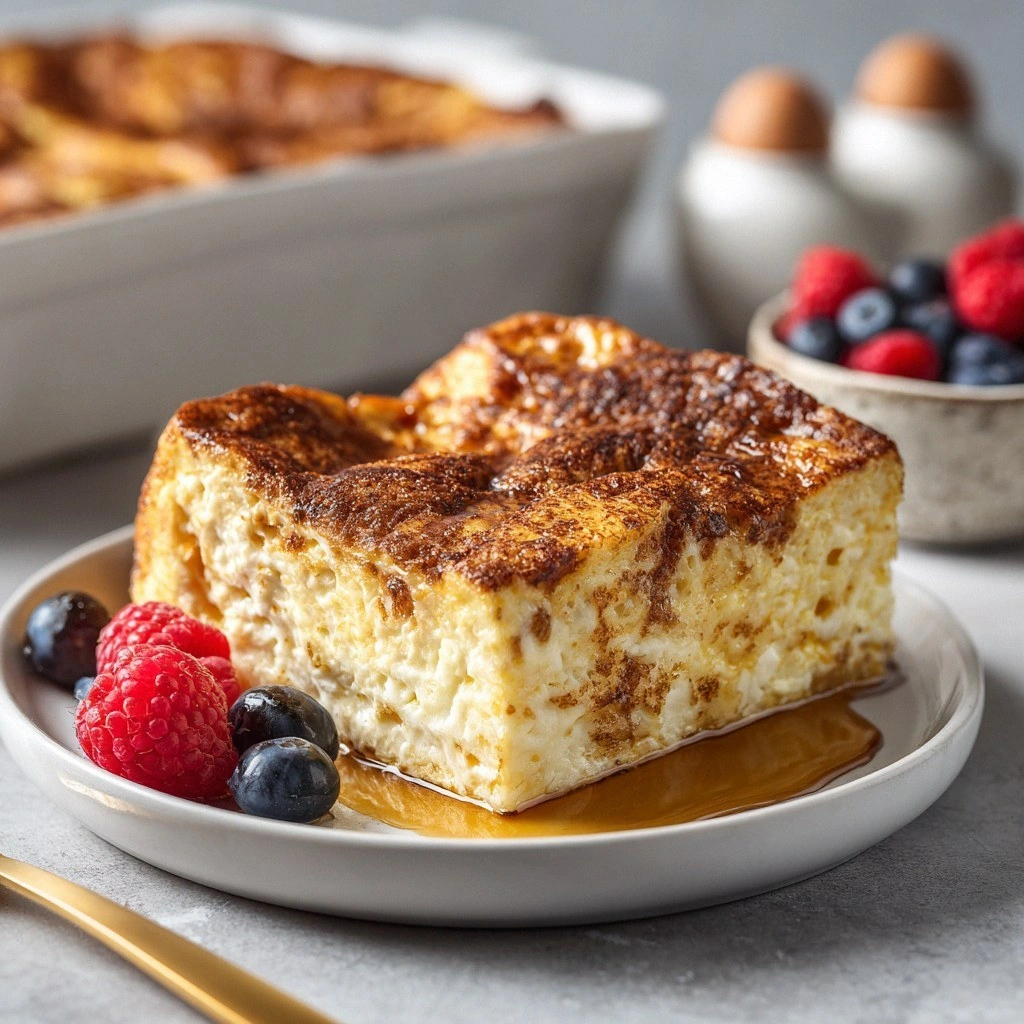
I was halfway through a brunch spread that looked more like a culinary crime scene when I realized the French toast was as dry as a desert. The batter had been left to sit too long, the bread had absorbed everything but flavor, and the whole plate was a sad, soggy disappointment. I stared at the pan, feeling the heat of the stove and the weight of the audience’s expectant eyes, and whispered, “This has to change.” That whispered promise became a dare: I would turn a flop into a triumph, a humble breakfast into a showstopper that would have people shouting, “I dare you to taste this and not go back for seconds.”
Picture this: the kitchen hums with the gentle whir of the blender, the air thick with the sweet scent of vanilla and cinnamon, a splash of almond milk glistening like a clear lake. The sound of the batter swirling, a rhythmic thump as it hits the skillet, and the subtle crackle that signals the perfect golden crust. The texture is a cloud of fluff that melts in your mouth, leaving a lingering hint of caramelized sugar and a faint whisper of toasted butter. And that first bite? It’s a revelation, a burst of sweet, savory, and nutty flavors that dance on your tongue, like confetti at a celebration. You’ll feel the heat of the pan, the warmth of the batter, and the subtle crunch that shatters like thin ice when you bite into the edge. If you’ve ever struggled to make French toast that’s anything but ordinary, this is the secret you’ve been missing.
This version is a game‑changer because it takes the classic recipe and gives it a fluffy, airy structure that’s almost impossible to achieve with the traditional whisk‑and‑mix method. The blender locks in air, creating a batter that rises and holds its shape, so each bite is a fluffy cloud. The low‑fat, low‑carb base keeps the flavor intense while still being light enough for a guilt‑free indulgence. The addition of almond milk and a touch of maple syrup balances the sweetness without overpowering the natural grain of the bread. And the secret ingredient—baking powder—works in tandem with the blender’s aeration to produce a texture that feels like a croissant and tastes like a slice of heaven. The result? A French toast that looks like a masterpiece and tastes like a dream.
What Makes This Version Stand Out
- Fluff Factor: The blender incorporates air like a pastry chef’s whisk, giving each slice a cloud‑like lift that holds its shape throughout the bake.
- Flavor Depth: Vanilla, cinnamon, and a splash of maple syrup create a layered taste profile that feels both comforting and sophisticated.
- Texture Magic: The batter’s airy consistency prevents the dreaded “chewed bread” texture, delivering a crisp exterior and a tender interior.
- Low‑Carb Friendly: Replacing heavy cream with almond milk keeps the carb count low without sacrificing richness.
- Make‑Ahead Potential: The batter can be pre‑mixed and refrigerated overnight, making Sunday brunch preparation a breeze.
- Crowd‑Pleaser: The visually stunning golden crust and the burst of sweet aroma will have guests begging for seconds.
- Ingredient Quality: Using fresh berries and real maple syrup elevates the dish beyond the usual store‑bought syrup.
- Time Efficiency: Prep takes just 15 minutes, and the bake finishes in 30 minutes—perfect for a quick yet impressive meal.
Inside the Ingredient List
The Flavor Base
All‑purpose flour is the backbone of this batter, providing structure and a neutral canvas for the spices. It’s the silent hero that holds the entire mix together; without it, the batter would collapse like a crumpled paper. If you prefer a healthier twist, swap half the flour for whole wheat; the result will be slightly denser but far more nutritious. Keep the flour at room temperature—cool flour can clump, which would ruin the batter’s silky texture.
The Texture Crew
Baking powder is the secret weapon that makes the French toast puff up like a soufflé. It reacts with the almond milk to create tiny bubbles that give the batter its airy lift. If you’re allergic to baking powder, a pinch of baking soda plus an acidic ingredient (like lemon juice) will work as a substitute, but the texture may be less fluffy. A dash of salt balances the sweetness and brings out the deeper flavors of the cinnamon and vanilla.
The Unexpected Star
Almond milk brings a subtle nutty undertone and keeps the batter light. It’s low in calories yet rich in flavor, making it a perfect partner for the maple syrup. If you’re not a fan of almond, oat milk will provide a sweeter, thicker base; just reduce the maple syrup slightly to avoid overpowering the taste. A splash of vanilla extract ties all the flavors together, giving the batter that aromatic, comforting scent that makes the dish irresistible.
The Final Flourish
Fresh berries add a burst of color and a juicy counterpoint to the sweet batter. They’re not just decorative; the natural acidity cuts through the richness, creating a balanced bite. If berries are out of season, sliced bananas or diced apples work beautifully, each adding their own sweet nuance. A light dusting of powdered sugar after baking gives a subtle sweetness that’s almost invisible, letting the other flavors shine.
Everything's prepped? Good. Let's get into the real action...
The Method — Step by Step
- Start by gathering all your ingredients and setting the blender jar on a stable surface. The key to a smooth batter is to add liquids first—almond milk, eggs, and vanilla—so the flour can be incorporated without clumping. This step feels almost ceremonial; it’s the moment when the batter begins to transform from ordinary to extraordinary.
- Add the flour, baking powder, salt, and cinnamon to the blender. Seal the lid tightly and pulse just enough to combine; you’re aiming for a batter that’s thick but still pourable. If the mixture looks lumpy, pulse a few more times, but avoid over‑blending, which can make the batter tough.
- Let the batter rest for five minutes. During this pause, the flour absorbs the liquids and the baking powder begins its chemical reaction—this is when the batter starts to rise. Think of it as a brief nap for the batter, ensuring maximum fluffiness later.
- Heat a non‑stick skillet over medium heat and lightly grease it with a tablespoon of melted butter. The butter adds flavor and prevents the batter from sticking; a quick test is to sprinkle a drop of water—if it sizzles and evaporates instantly, the pan is ready.
- Pour about a quarter‑cup of batter onto the skillet for each slice of bread. The batter should spread slightly but not pool; this is the moment of truth. As the edges start to pull away, you’ll hear the gentle crackle that signals the batter is setting.
- Let the first side cook until golden brown, about 2–3 minutes. Flip carefully with a spatula; the second side will need just 1–2 minutes. Watch the color change—it should be a deep, even brown, not a burnt shade.
- Once all slices are browned, remove them from the skillet and place them on a wire rack to keep the bottoms crisp. This also allows the steam to escape, preventing sogginess.
- While the batter is cooling, drizzle a little maple syrup over each slice and scatter fresh berries on top. The berries add a splash of color and a juicy burst that complements the sweet, buttery base.
- Dust lightly with powdered sugar for a subtle finishing touch. The sugar should melt slightly on the warm surface, creating a soft glaze that enhances the overall flavor.
- Serve immediately, preferably with a side of Greek yogurt or a dollop of whipped cream for an extra indulgent layer. The contrast of creamy yogurt against the airy French toast is a match made in culinary heaven.
That's it— you did it. But hold on, I've got a few more tricks that'll take this to another level. The secret lies in the finishing touches, the way you plate, and the small adjustments that make a big difference.
Insider Tricks for Flawless Results
The Temperature Rule Nobody Follows
Many cooks skip the step of testing the skillet temperature with a water drop. Drop a single drop of water—if it sizzles and evaporates in a second, the pan is at the perfect temperature. This simple test prevents the batter from sticking or burning, ensuring a golden crust every time. A pan that’s too hot will produce a dark, caramelized exterior that masks the airy interior.
Why Your Nose Knows Best
Your sense of smell is your most reliable indicator of doneness. When the batter starts to set, you’ll detect a warm, buttery aroma that signals the perfect moment to flip. Trust your nose, not your timer; a few seconds earlier or later can change the texture from fluffy to dense.
The 5‑Minute Rest That Changes Everything
After removing the cooked slices, let them rest on a rack for five minutes. This brief pause allows the steam to escape, keeping the bottom crisp and preventing sogginess. It also gives the flavors a chance to meld, creating a harmonious taste profile that’s both sweet and savory.
Keep the Butter Fresh
Melt the butter just before you start cooking. Butter that’s been sitting in the fridge for too long can develop a sour taste, which will seep into the batter. Keep a small pot of melted butter on the stove; it’s an essential ingredient that adds richness without overwhelming the delicate flavors.
The Sweet‑Savory Balance
Maple syrup is the sweetener of choice, but it can be replaced with honey or agave for a different flavor profile. However, honey has a stronger taste, so use it sparingly. The key is to balance sweetness with the natural tartness of fresh berries, creating a well‑rounded flavor that satisfies every palate.
Creative Twists and Variations
This recipe is a playground. Here are some of my favorite ways to switch things up:
Citrus Burst
Add zest from one orange to the batter for a bright, citrusy note that cuts through the sweetness. The zest’s essential oils add a fresh aroma that elevates the entire dish. Pair it with a drizzle of lemon‑infused maple syrup for a zesty finish.
Nutty Delight
Replace the almond milk with coconut milk for a tropical twist. Add a handful of chopped pecans or walnuts to the batter for crunch. The coconut’s subtle sweetness pairs beautifully with the buttery base.
Savory Surprise
Swap out the maple syrup for a savory glaze made from soy sauce, honey, and a dash of ginger. Top the slices with sautéed spinach and feta for a breakfast‑meat‑inspired variation. The salty, umami flavors contrast the fluffy batter in a delightful way.
Chocolate Lover’s Dream
Stir in a tablespoon of cocoa powder to the batter for a chocolatey depth. Sprinkle chocolate chips on top before baking for a molten center. Finish with a dusting of cocoa powder and a splash of chocolate syrup for an indulgent touch.
Mediterranean Touch
Use sun‑dried tomatoes and olives in the batter for a savory, Mediterranean vibe. Add a pinch of oregano for an aromatic kick. Serve with a side of hummus and warm pita for a brunch that feels like a trip to the Mediterranean.
Vegan Version
Replace eggs with a flaxseed‑egg mixture and use a plant‑based milk alternative. Ensure the butter is vegan by using coconut oil or a plant‑based butter substitute. The result is a fluffy, vegan French toast that doesn’t compromise on flavor.
Storing and Bringing It Back to Life
Fridge Storage
Store leftover slices in an airtight container in the refrigerator for up to 3 days. The batter’s airy structure may soften slightly, but a quick reheating in a toaster will restore the crunch. Keep the berries separate until serving to maintain their freshness.
Freezer Friendly
For longer storage, freeze the baked slices in a single layer on a parchment‑lined tray before transferring to a freezer bag. They’ll keep for up to 2 months. Thaw overnight in the refrigerator and toast for a minute on each side to revive the texture.
Best Reheating Method
Reheat by placing the slices in a preheated oven at 350°F (175°C) for 5 minutes. For a crispier result, finish with a quick 1‑minute broil. Add a splash of water before reheating to steam the batter back to its original fluffiness.