Picture this: I was in the middle of a brunch rush, a stack of ordinary pancakes on the counter, and the batter had turned into a thick, lumpy mess that could have doubled as a pancake sculpture. I stared at the batter, thinking about the inevitable disaster, when a friend challenged me to make a protein‑rich version that would actually taste good. I laughed, but I also knew that the next batch could be a game‑changer if I got the right balance. That moment sparked the idea for the High Protein Banana Pancakes that you’ll discover below.
The kitchen was a symphony of sizzling pans, the sweet scent of ripe bananas drifting through the air, and the faint hiss of a hot skillet. I could hear the rhythmic slap of batter onto the pan, a sound that promised fluffy crescents of delight. The texture was already teasing my imagination—soft, airy, and slightly sticky, like a cloud that has decided to land on a plate. Each bite was a promise of energy, a quick burst of flavor that would carry me through the day. The anticipation of the first bite made the whole scene feel like a culinary movie premiere.
What makes this version stand out is not just the protein boost; it’s the harmony of flavors, the effortless texture, and the fact that you can make it in minutes. The banana adds natural sweetness and a creamy body that keeps the pancakes moist without the need for added fats. The protein powder gives a subtle earthiness that balances the banana’s sweetness and delivers a satisfying bite that keeps you full. The simple method means even a kitchen rookie can whip up a breakfast that feels like a gourmet treat. And the best part? It’s a recipe that can be tweaked for every taste preference, from vegan to keto, with the same core ingredients.
I dare you to taste this and not go back for seconds—because once you try it, the ordinary pancakes will feel like a distant memory. The secret lies in the gentle folding technique, the precise splash of liquid, and the subtle heat control that ensures every pancake is golden on the outside and tender inside. This is hands down the best version you’ll ever make at home. Picture yourself pulling these from the skillet, the whole kitchen smelling incredible, and feeling the satisfaction of a breakfast that works as hard as you do. Let me walk you through every single step—by the end, you'll wonder how you ever made it any other way.
What Makes This Version Stand Out
- Flavor: The ripe banana provides natural sweetness, eliminating the need for added sugar while giving a deep, tropical undertone that pairs beautifully with the subtle earthiness of protein powder.
- Texture: The batter stays silky and pourable, and the pancakes rise to a fluffy interior with a golden crust that is crisp enough to give that satisfying bite.
- Nutrition: Each serving packs 7 grams of protein, 7 grams of carbs, and only 5 grams of fat—perfect for a quick energy boost without the heaviness of traditional pancakes.
- Speed: The entire process takes under 20 minutes from start to finish, making it ideal for busy mornings or post‑workout meals.
- Versatility: The base can be customized with nut butters, spices, or fruit toppings, turning a simple breakfast into a gourmet experience.
- Make‑ahead Potential: The pancakes can be prepared in bulk, frozen, and reheated without losing their fluffy quality, saving you time on hectic days.
- Ingredient Quality: Using a high‑quality protein powder ensures a clean, unflavored taste that blends seamlessly with the banana’s natural flavor.
Inside the Ingredient List
The Flavor Base
The banana is the heart of this batter. Its natural sugars caramelize on the skillet, producing a sweet, fragrant aroma that lures the senses. If you skip the banana, the pancakes become dry and bland, lacking the creamy body that keeps them moist. A ripe banana with a slightly bruised spot ensures maximum sweetness and a smoother mash.
The Protein Power
The protein powder is the secret weapon that turns a simple batter into a nutrient‑dense meal. It adds a subtle earthy note that balances the banana’s sweetness, and it helps the pancakes hold together without the need for flour. If you use a flavored powder, be careful not to overpower the natural flavors; vanilla or unflavored varieties work best.
The Liquid Lift
The splash of water or milk is crucial for achieving the right consistency. Too little liquid, and the batter becomes thick and difficult to pour; too much, and the pancakes become runny and flat. A splash of milk adds a touch of richness, while water keeps the calorie count lower. Adjust the splash to your preferred thickness.
The Final Flourish
Eggs bind everything together, giving the pancakes structure and a slight fluff. They also contribute a mild, savory undertone that enhances the overall flavor profile. If you prefer a vegan version, you can replace eggs with a flaxseed or chia egg, but the texture will change slightly.
Everything's prepped? Good. Let's get into the real action and bring these pancakes to life.
The Method — Step by Step
- Begin by mashing the banana in a bowl until it is smooth with only a few small lumps remaining. The texture should resemble thick oatmeal. This ensures an even distribution of flavor and a creamy base for the batter.
- Add the protein powder to the mashed banana and whisk until fully incorporated. The mixture will look slightly thick; that’s normal. If you prefer a smoother batter, let the mixture sit for a minute to allow the powder to hydrate.
- Crack the eggs into a separate bowl and beat them lightly. Then fold the beaten eggs into the banana‑protein mixture. The eggs bind everything together and give the pancakes a light lift. This step is the moment of truth—watch for the batter to become silky and pourable.
- Heat a non‑stick skillet over medium heat and lightly oil it with a paper towel dab of neutral oil. Test the heat by flicking a few drops of water onto the surface; if they dance and evaporate quickly, the skillet is ready.
- Pour about 1/4 cup of batter onto the skillet for each pancake. Let it cook until bubbles form on the surface and the edges start to set, usually 2–3 minutes. The watch‑out moment: if you lift the pan too early, the pancakes will be raw in the center. If you wait too long, the edges will burn.
- Once the edges lift and the underside is golden, flip the pancake with a spatula. Cook for another 1–2 minutes until the second side is golden brown. The sizzle when it hits the pan? Absolute perfection.
- Repeat the process with the remaining batter, stacking the finished pancakes on a warm plate. If you need to keep them warm, cover the stack with a clean towel to retain heat.
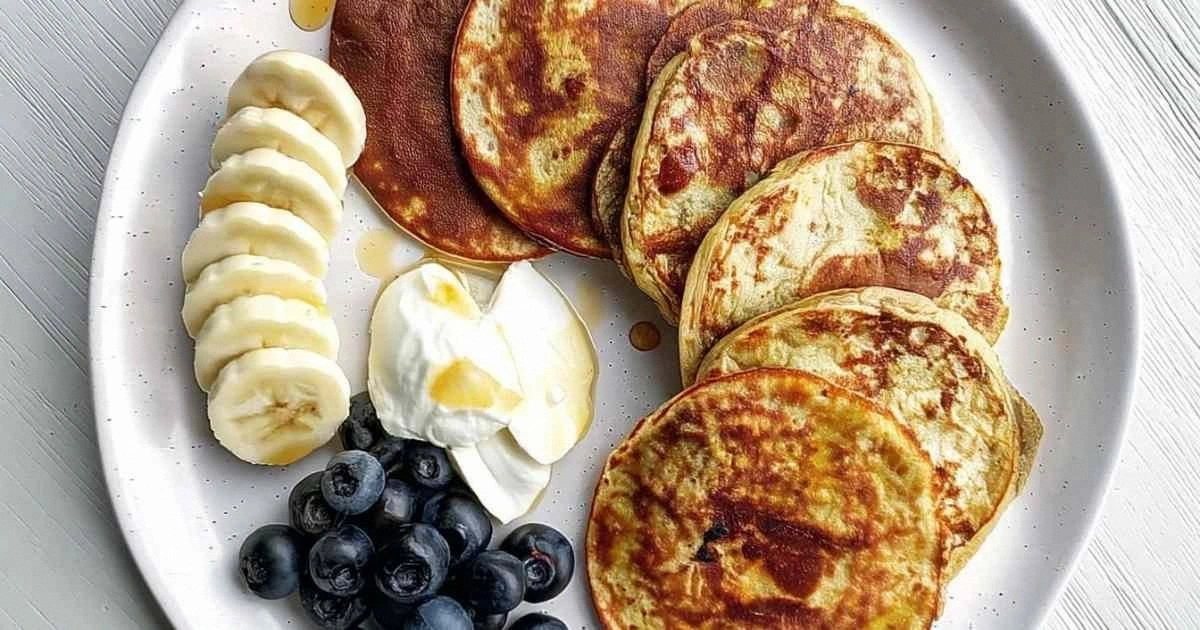
- Serve immediately with your favorite toppings—fresh berries, a drizzle of honey, or a sprinkle of chopped nuts. The pancakes are best enjoyed hot, but they also make a great lunch option when paired with a protein shake.
That's it — you did it. But hold on, I've got a few more tricks that'll take this to another level. These insider tips will help you avoid common pitfalls and elevate the flavor profile even further.
Insider Tricks for Flawless Results
The Temperature Rule Nobody Follows
Many cooks set their skillet too high, which causes the pancakes to brown quickly on the outside while staying raw inside. I recommend starting at medium and adjusting down if you notice the edges darkening too fast. A steady medium heat ensures even cooking and a golden finish.
Why Your Nose Knows Best
The aroma of pancakes is a powerful indicator of readiness. When you smell a sweet, buttery scent rising from the skillet, it means the batter is setting and ready to flip. If you notice a faint, raw smell, give it a minute longer. Your nose is a reliable kitchen assistant.
The 5‑Minute Rest That Changes Everything
After flipping, let the pancakes rest on the skillet for 30 seconds before flipping again. This pause allows the interior to set, preventing the pancakes from collapsing. A friend once tried skipping this step, and the result was a soggy, uneven pancake that fell apart.
The Secret of a Crunchy Edge
For a crisp edge, sprinkle a pinch of fine sea salt over the batter before flipping. The salt draws out moisture, creating a delicate crunch that contrasts beautifully with the soft interior. It also enhances the overall flavor profile.
The Finish Line: Topping Tricks
Top the pancakes with a dollop of Greek yogurt, a drizzle of almond butter, or a handful of fresh berries. The yogurt adds a creamy tang that balances the sweetness, while the almond butter introduces a nutty depth. The berries add bright color and a burst of natural sweetness.
Creative Twists and Variations
This recipe is a playground. Here are some of my favorite ways to switch things up:
Cinnamon Swirl Banana Pancakes
Add 1 teaspoon of ground cinnamon to the batter for a warm, spicy note. The cinnamon complements the banana and protein powder, creating a comforting flavor that feels like a hug.
Chocolate Chip Protein Pancakes
Fold in a handful of dark chocolate chips after adding the eggs. The chocolate provides a rich, indulgent flavor while still keeping the protein content high.
Berry Burst Pancakes
Stir in ½ cup of fresh blueberries or sliced strawberries into the batter. The berries burst with juice as the pancakes cook, adding a juicy, tangy layer to each bite.
Nutty Crunch Pancakes
Top the finished pancakes with chopped walnuts or pecans. The nuts add a satisfying crunch and a dose of healthy fats that keep you satiated longer.
Vegan Protein Pancakes
Replace the eggs with a flaxseed or chia egg, and use a plant‑based protein powder. The result is a vegan-friendly pancake that still delivers on texture and protein.
Low‑Carb Protein Pancakes
Swap the banana for a mashed avocado or use a low‑carb protein powder. The pancakes become a keto‑friendly option without sacrificing flavor.
Storing and Bringing It Back to Life
Fridge Storage
Cool the pancakes completely, then stack them with parchment paper between layers. Store them in an airtight container in the refrigerator for up to 3 days. This prevents them from sticking together and keeps the texture intact.
Freezer Friendly
Place the stacked pancakes on a baking sheet and freeze until solid. Transfer to a freezer bag, and they’ll stay fresh for up to 2 months. When you’re ready to eat, pop a stack out and let it thaw for 10 minutes.
Best Reheating Method
Reheat the pancakes in a skillet over low heat, adding a splash of water to create steam. This steams them back to a fluffy, warm state. Alternatively, microwave for 20–30 seconds, then finish in the skillet for a crisp edge.