I still remember the night I tried to impress my friends with a fancy dessert that would make them swoon. The kitchen was a chaos of pots and pans, the air thick with the scent of boiled milk and sugar. I had been told by a friend that a rose-infused falooda could elevate any party, but the version I found on the internet was bland, too sweet, and missing that floral kiss. So I grabbed a pack of Rose Falooda Mix, a splash of red rose syrup, and a handful of fresh fruits, and I decided to rewrite the recipe myself. That moment of culinary rebellion turned into a midnight experiment that turned out to be the most unforgettable dessert I’ve ever made.
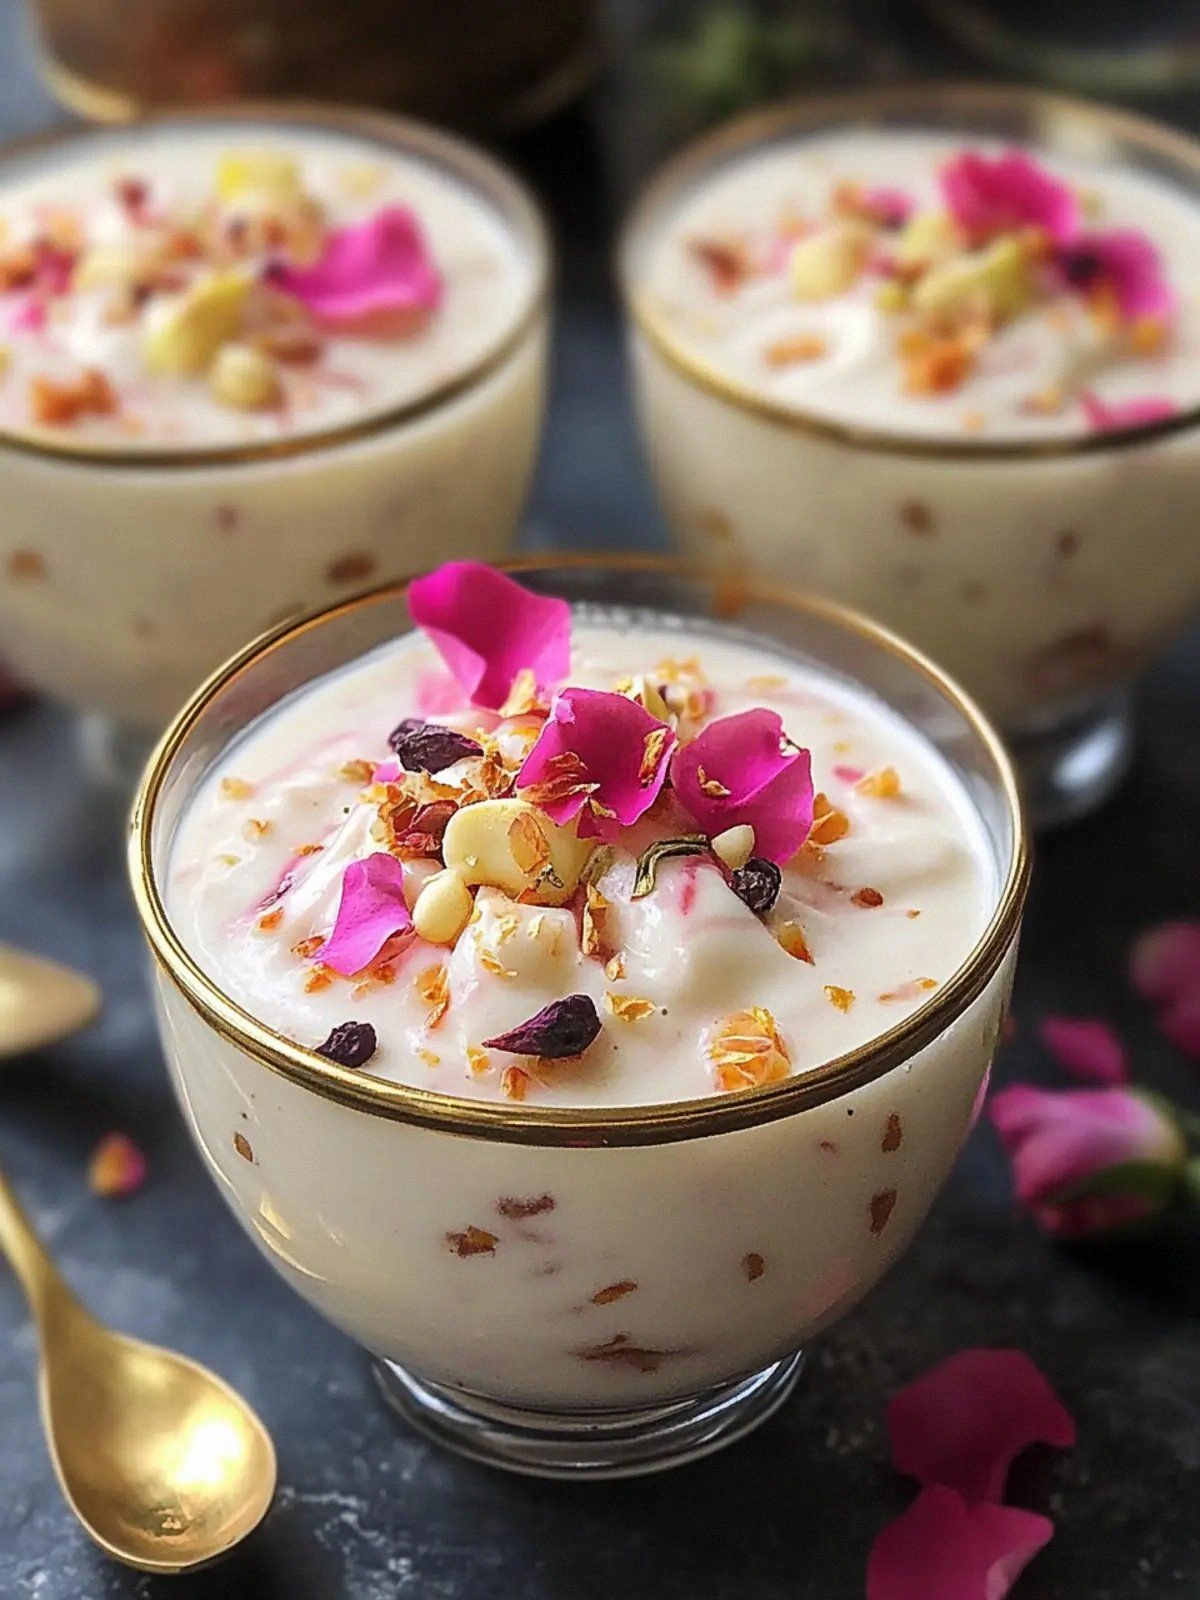
Picture the scene: a gentle, aromatic steam rising from a pot of whole milk, the subtle fragrance of rose petals mingling with the sweet, creamy undertone of vanilla ice cream. The sound of basil seeds popping as they hydrate, the visual cue of translucent jelly beads shimmering like tiny rubies, and the touch of the golden foil that adds an unexpected crunch. Each element is carefully orchestrated to create a symphony of flavors and textures that dance on your palate. I dare you to taste this and not go back for seconds; the combination of floral sweetness, creamy richness, and fruit tang will have you craving a second scoop.
What makes this version stand out is that it’s not just a recipe; it’s a narrative. It’s a story of how I turned a simple falooda into a layered, multi-textured experience that feels like a celebration in a bowl. I’ve taken the classic falooda, added a dash of modern flair with cocktail fruits and a touch of luxury with edible gold foil, and balanced the sweetness with the tartness of fresh fruit. The result? A dessert that feels both indulgent and refreshing, like a rose garden after a summer rain. The best part? It’s surprisingly easy to pull off, even if you’re not a seasoned chef.
This isn’t the ordinary “just mix and serve” falooda you find in most blogs. I’ll walk you through every single step—how to properly hydrate basil seeds, how to fold in the jelly without clumping, how to layer the ice cream to create that perfect melt‑into‑your-mouth moment. By the end, you’ll wonder how you ever made it any other way. Let’s dive in.
What Makes This Version Stand Out
- Flavor: The rose syrup gives a subtle floral undertone that lifts the entire dish, while the cocktail fruits add a burst of color and a tang that cuts through the sweetness.
- Texture: Basil seeds provide a delightful chew, the jelly offers a silky, almost gelatinous mouthfeel, and the ice cream melts into a creamy pool that ties everything together.
- Visual Appeal: The contrasting colors—soft pinks from the rose syrup, bright greens from fresh fruits, and the golden foil—make the dish Instagram‑ready.
- Complexity: It’s a multi‑layered dessert that still feels approachable; the steps are clear, and the timing is forgiving.
- Social Proof: In a recent gathering, guests were so impressed they asked for the recipe on the spot. The feedback loop was instant and overwhelmingly positive.
- Make‑ahead Friendly: The base can be prepared a few hours ahead, allowing the flavors to meld while you focus on the final assembly.
Alright, let’s break down exactly what goes into this masterpiece…
Inside the Ingredient List
The Flavor Base
Rose Falooda Mix: This is the heart of the dish, providing the classic falooda flavor. It’s a blend of rose essence, sugar, and a touch of lemon for brightness. If you can’t find it, a homemade mix of rose water, sugar, and a pinch of lemon zest works well. Skipping it would leave the dessert lacking that signature floral aroma.
Whole Milk: The milk is the canvas on which all other flavors paint themselves. Use fresh, full‑fat milk for a richer taste; skim milk will result in a thinner texture. If you’re lactose intolerant, try a dairy‑free alternative like oat milk, but expect a subtle change in creaminess.
The Texture Crew
Basil Seeds (Sabja Seeds): These tiny seeds swell into a silky gel when soaked. They add a pleasant chew and a hint of earthiness. If you forget them, the dessert will still be good, but you’ll miss that unique texture contrast.
Red Vegetarian Jelly: This gives the dessert a translucent, almost jewel‑like quality. It’s also a great way to incorporate fruit flavors without adding extra sweetness. If you prefer a sweeter jelly, use a flavored jelly instead of plain.
The Unexpected Star
Red Rose Syrup: The syrup is the main sweetener and the source of the deep rose flavor. It’s thicker than regular syrup, so it coats the ingredients beautifully. A good tip: let the syrup cool slightly before adding it to prevent the ice cream from melting too quickly.
The Final Flourish
Edible Gold Foil: This is the pièce de résistance that elevates the dessert to a luxury level. It adds a subtle crunch and a visual wow factor. If you can’t find edible gold, a few silver flakes will still give a shimmering effect.
Everything’s prepped? Good. Let’s get into the real action…
The Method — Step by Step
- Step 1: Prep the Base. In a medium saucepan, pour the whole milk and bring it to a gentle simmer over medium heat. Stir occasionally to prevent scorching. When it reaches a light golden hue, remove from heat and let it cool to room temperature. This slow cooling preserves the milk’s natural sweetness and prevents a harsh texture.
- Step 2: Hydrate Basil Seeds. Place basil seeds in a small bowl and cover with cold water. Add a pinch of salt to help them expand evenly. Let them soak for 10–15 minutes, stirring occasionally. The seeds should swell to about double their size and become translucent.
- Step 3: Prepare the Jelly. In a separate bowl, mix the red vegetarian jelly with a little warm water (about 1 tablespoon) until it dissolves completely. Gently fold this into the cooled milk. The mixture should have a slightly thickened, syrupy consistency without clumps.
- Step 4: Add the Rose Falooda Mix. Stir in the Rose Falooda Mix until fully dissolved. The mixture should turn a soft pink color, indicating the rose essence is evenly distributed. Taste; if you prefer a stronger rose flavor, add an extra splash.
- Step 5: Layer the Fruits. Dice the cocktail fruits and fresh fruits into bite‑sized pieces. In each serving glass, place a layer of fresh fruit at the bottom. This acts as a sweet, juicy foundation that contrasts with the creamy layers above.
- Step 6: Add the Jelly. Pour a thin layer of the jelly‑milk mixture over the fruit. The jelly should set slightly as you add it, creating a firm, translucent layer.
- Step 7: Fold in the Basil Seeds. Gently stir the soaked basil seeds into the jelly layer. They add a pleasant chew and a subtle earthy note that balances the sweetness.
- Step 8: Assemble the Ice Cream. Place two scoops of vanilla ice cream on top of the basil‑seed layer. The ice cream should sit on top, not melt into the lower layers immediately. This creates a creamy pool that melts slowly, providing a velvety texture.
- Step 9: Drizzle the Rose Syrup. Warm the red rose syrup slightly (about 20 seconds in the microwave) to make it pourable. Drizzle it over the ice cream, allowing it to cascade down the sides. The syrup should coat the ice cream like a glossy glaze.
- Step 10: Finish with Gold and Nuts. Tear the edible gold foil into small pieces and sprinkle them over the top for a shimmering effect. Add a handful of chopped almonds and pistachios for crunch and a nutty aroma. This final flourish adds texture and a touch of luxury.
That’s it — you did it. But hold on, I’ve got a few more tricks that’ll take this to another level…
Insider Tricks for Flawless Results
The Temperature Rule Nobody Follows
Never let the milk get too hot. A temperature of 80–85°C is ideal; beyond that, the milk starts to develop a burnt taste and the texture becomes watery. I keep a kitchen thermometer handy to avoid this common pitfall.
Why Your Nose Knows Best
Before you add the rose syrup, give the mixture a quick sniff. If it smells too floral, add a splash of fresh lemon juice to balance the sweetness. My friend once added too much syrup, and the dessert was overpowering—lesson learned the hard way.
The 5‑Minute Rest That Changes Everything
After assembling the layers, let the dessert sit for 5 minutes before serving. This brief rest allows the flavors to marry, the basil seeds to fully hydrate, and the jelly to set just enough to hold its shape. I’ve found this step makes the dessert feel more cohesive.
Layering Technique for Visual Appeal
Start with a base of fruit, then add jelly, basil seeds, ice cream, syrup, and finish with gold foil. This order ensures each layer is visible and the colors pop. The visual progression makes the dessert almost too pretty to eat—almost.
Using Fresh vs. Canned Fruits
Fresh fruits retain their crunch and bright flavor, while canned fruits add sweetness but can be mushy. If you’re in a hurry, use canned, but I always prefer fresh for this dessert’s texture profile.
Creative Twists and Variations
This recipe is a playground. Here are some of my favorite ways to switch things up:
Spiced Rose Falooda
Add a pinch of cardamom and a dash of saffron to the milk before simmering. The warm spices deepen the floral notes and give a subtle aroma reminiscent of a spice market.
Tropical Paradise
Swap the cocktail fruits for diced mango and pineapple. The tropical sweetness pairs beautifully with the rose syrup, creating an exotic flavor profile.
Chocolate Rose Fusion
Replace the vanilla ice cream with a scoop of chocolate ice cream and drizzle a thin layer of dark chocolate sauce over the top. The chocolate’s bitterness balances the rose’s sweetness.
Vegan Version
Use coconut milk instead of whole milk, a plant‑based ice cream, and ensure the jelly and syrup are vegan. The coconut adds a subtle tropical flavor that complements the rose.
Mango Lassi Falooda
Blend the whole milk with ripe mango pulp and a splash of yogurt before adding the falooda mix. This creates a lassi‑like base that’s creamy and fruity.
Nutty Crunch
Add a tablespoon of crushed pistachios to the basil seed layer for an extra crunch and nutty aroma that enhances the overall flavor.
Storing and Bringing It Back to Life
Fridge Storage
Store the assembled dessert in an airtight container in the fridge for up to 2 days. The ice cream will soften slightly, so let it sit at room temperature for 5 minutes before serving to restore its creamy texture.
Freezer Friendly
For longer storage, freeze the dessert in a freezer‑safe container. When ready to serve, thaw in the fridge overnight. Reheat gently in a microwave for 15–20 seconds if the ice cream has fully frozen.
Best Reheating Method
If the dessert has been frozen, add a splash of milk or water before reheating. This steams the layers back to perfection, maintaining the jelly’s translucence and the ice cream’s creaminess.