I still remember the night I almost burned the kitchen down while chasing a midnight craving for something sweet and nutty. The stove was on high, the pot was boiling, and I was shouting at the clock that was ticking away like a metronome. A sudden splash of honey, a splash of peanut butter, and the aroma hit me like a wave of nostalgia—sweet, buttery, and utterly comforting. That moment, that tiny disaster, became the spark that ignited this recipe, and I’m here to share how to turn that chaos into culinary gold.
Picture yourself standing in your kitchen, the air thick with the scent of toasted rice cereal and the faint whisper of vanilla. The sound of the pan sizzling is like a drumbeat, each bubble popping like applause. Your eyes are drawn to the glossy sheen of melted butter, the golden swirl of honey, and the smooth, creamy peanut butter waiting to be coaxed into a velvety mixture. Your hands, slightly damp from the heat, feel the gentle resistance of the dough as it starts to bind together. The texture is almost like a soft, chewy cookie dough, but the flavor profile is a bold, nutty explosion that sings.
What sets this version apart from the countless other peanut butter ball recipes you’ll find online is the meticulous balance of crunch, chew, and flavor. We’re not just tossing peanut butter and cereal together; we’re creating a layered experience where every bite delivers a crackling crunch, a melt-in-your-mouth center, and a lingering nutty aftertaste. The secret? A carefully calibrated ratio of honey to peanut butter, a touch of vanilla to elevate the sweetness, and the classic Rice Krispies that give it that unmistakable texture. The result is a ball that’s as satisfying to eat as it is to watch being formed.
And there’s more—this recipe isn’t just a treat; it’s an experience. You’ll learn a trick that turns the dough into a silky, cohesive mass without any added flour or cornstarch, and a technique that gives the exterior a golden, caramelized crust while keeping the interior moist. I dare you to taste this and not go back for seconds. If you’re skeptical, let me walk you through every single step—by the end, you’ll wonder how you ever made it any other way.
What Makes This Version Stand Out
- Flavor: The blend of creamy peanut butter and sweet honey creates a harmonious balance that’s both indulgent and comforting. The subtle hint of vanilla lifts the overall profile, adding a fragrant undertone that feels like a warm hug. Unlike other recipes that lean heavily on sweetness, this version keeps the natural nutty flavor front and center.
- Texture: The Rice Krispies provide a delightful crunch that contrasts perfectly with the chewy interior. The dough’s consistency is smooth and pliable, allowing you to shape it effortlessly into bite-sized spheres. When you bite into one, the crunch snaps like a thin ice sheet, followed by a soft, buttery melt.
- Ease: No advanced techniques or exotic ingredients—just pantry staples that you already have at home. The method is straightforward, requiring minimal equipment: a saucepan, a spoon, and a bowl. Even a beginner can master it with confidence.
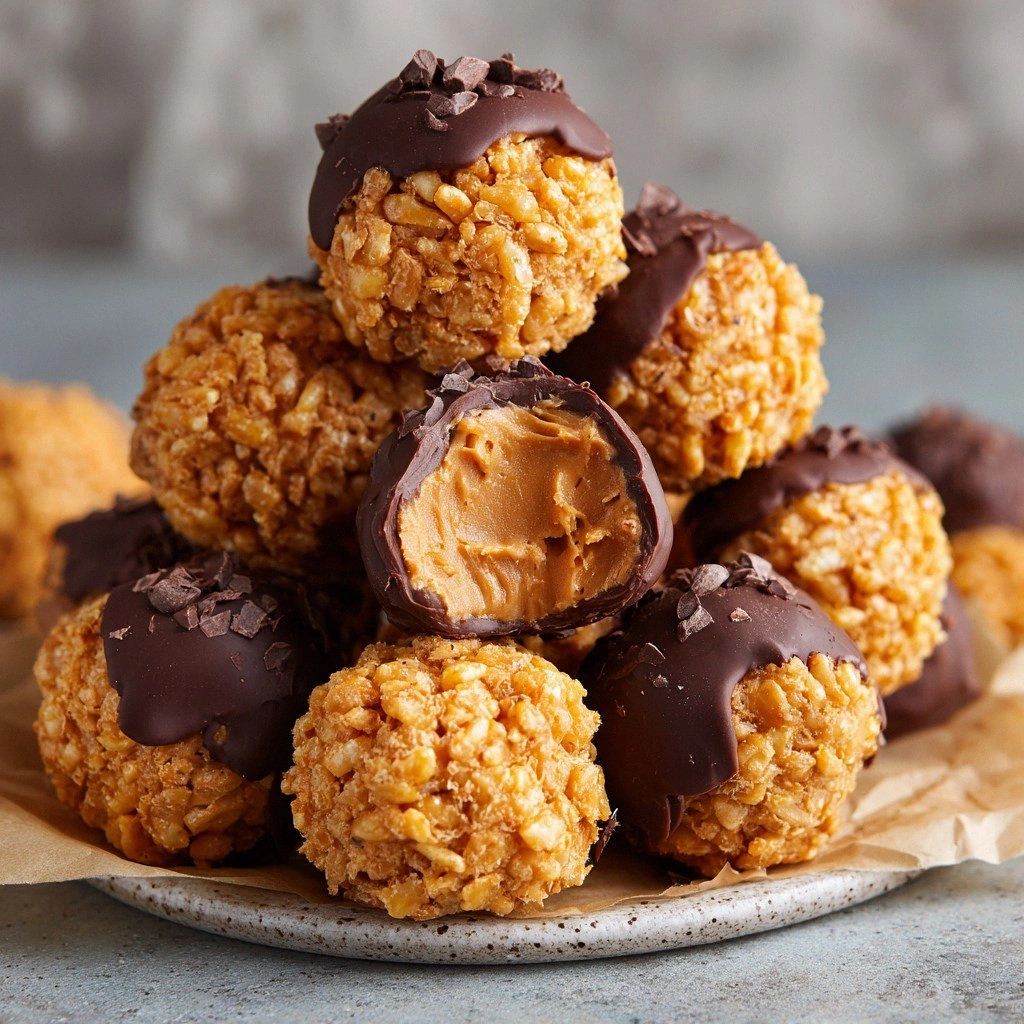
- Visual Appeal: The golden-brown crust is a visual treat, and the glossy sheen of the honey glaze makes each ball look like a work of art. The contrast between the light rice flakes and the dark peanut butter creates an Instagram-worthy presentation. The final product looks as good as it tastes.
- Versatility: This recipe can be adapted for different dietary preferences, whether you want to use almond butter, add a dash of sea salt, or sprinkle chocolate chips for a decadent twist. The base is robust enough to accommodate variations without compromising integrity. You can serve them as a snack, dessert, or party treat.
- Make‑Ahead Potential: The balls hold up well for up to a week in the fridge, and they freeze beautifully for longer storage. The dough’s consistency allows you to portion it ahead of time, making last-minute snack prep a breeze. This makes it ideal for busy families or for entertaining guests.
- Ingredient Quality: Using high‑quality peanut butter and real honey elevates the flavor profile, ensuring that each bite is authentic and satisfying. The recipe emphasizes the importance of selecting unsalted butter to control salt levels precisely. Quality ingredients are the backbone of any great dish.
- Flavor Complexity: The combination of sweet, salty, and nutty notes creates layers of flavor that evolve with each bite. The initial sweetness gives way to a subtle saltiness, while the peanut butter’s natural richness lingers. This complexity turns a simple snack into a memorable experience.
Inside the Ingredient List
The Flavor Base
The cornerstone of this recipe is the peanut butter, which provides a rich, nutty foundation that’s both creamy and robust. Choosing a smooth, high‑fat peanut butter ensures that the mixture remains cohesive without the need for added thickeners. If you prefer a chunkier texture, swap in crunchy peanut butter, but be prepared for a slightly firmer dough.
Honey is the natural sweetener that binds the ingredients together while adding a subtle floral note. The type of honey you use can influence the final flavor—raw honey gives a deeper, more complex sweetness, whereas light honey offers a cleaner, milder taste. A 1:1 ratio of honey to peanut butter strikes a balance that’s sweet enough to satisfy but not overpowering.
Vanilla extract is the secret aroma enhancer that elevates the entire dish. A single teaspoon is enough to infuse the mixture with a warm, fragrant undertone that complements the nutty base. If you’re vegan, a splash of almond or coconut extract can serve as a suitable alternative.
The Texture Crew
Rice Krispies cereal is the star of the show, providing that signature crunch that sets this recipe apart from plain peanut butter balls. The cereal’s light, airy structure absorbs the honey and butter, creating a delicate, crisp exterior. Be sure to use fresh cereal to avoid a stale, dry texture.
Unsalted butter adds richness and helps the dough bind together while giving the balls a glossy, caramelized finish. The butter’s fat content melts into the mixture, creating a smooth, cohesive dough that’s easy to shape. If you’re watching your fat intake, you can substitute half the butter with coconut oil for a subtle coconut flavor.
A pinch of salt is essential to balance the sweetness and enhance the peanut butter’s flavor profile. Even a small amount of salt can make the overall taste more complex, preventing the dish from feeling flat. Use sea salt or kosher salt for a cleaner flavor.
The Unexpected Star
Chocolate chips are optional but highly recommended for those who crave an extra layer of indulgence. They melt slightly as the balls bake, creating pockets of molten chocolate that contrast with the crisp cereal. If you’re looking for a healthier alternative, try adding a handful of dried cranberries or raisins for natural sweetness.
Powdered sugar is another optional touch that can be dusted over the cooled balls for a classic powdered sugar finish. It adds a subtle sweetness and a decorative look that’s perfect for serving at parties. Be careful not to over‑dust, as the sugar can become clumpy.
Everything's prepped? Good. Let's get into the real action and start shaping this masterpiece.
The Method — Step by Step
- Begin by melting 1/4 cup of unsalted butter in a medium saucepan over low heat. Stir constantly until the butter is fully liquefied and the mixture starts to emit a nutty aroma. This step ensures that the butter integrates smoothly with the honey and peanut butter. Keep an eye on the temperature to avoid scorching.
- Add 1/2 cup of honey to the melted butter, whisking until the mixture becomes silky and glossy. The honey should coat the back of a spoon without dripping. The mixture will thicken slightly as it cools; this is normal and part of the binding process. Feel the heat with your fingertips to gauge readiness.
- Turn off the heat and pour in 1 cup of creamy peanut butter, whisking vigorously until the mixture is homogenous. The peanut butter should be fully incorporated, creating a thick, buttery paste. This is where the flavor begins to develop; the aroma should be sweet, nutty, and inviting. If the mixture feels too thick, add a tablespoon of warm water to loosen it.
- Stir in 1 teaspoon of vanilla extract and 1/4 teaspoon of salt, ensuring each component is evenly distributed. The vanilla will add depth, while the salt will bring out the peanut butter’s natural richness. Taste a small amount of the mixture; it should be sweet with a hint of nutty depth. Adjust salt if needed.
- Fold in 2 cups of Rice Krispies cereal, using a spatula to gently combine. The cereal should be fully coated in the buttery mixture, but avoid overmixing to prevent crushing the flakes. You’ll see a golden sheen on the cereal, indicating it’s ready. The mixture should be sticky enough to hold together.
- If you’re adding chocolate chips, sprinkle them in at this point and fold gently. The chips will melt slightly as the balls bake, creating pockets of molten chocolate. Be careful not to overmix; you want the chips to stay whole. The chocolate adds a decadent twist.
- Let the mixture cool for about 5 minutes, then use a tablespoon to scoop portions onto a parchment‑lined baking sheet. The dough will be pliable, but if it feels too sticky, chill it in the fridge for 10 minutes. This step is crucial for shaping the balls accurately. The parchment prevents sticking and ensures easy cleanup.
- Roll each portion into a ball using your hands, smoothing the surface to avoid cracks. The balls should be about 1.5 inches in diameter. If the dough is too soft, roll them quickly to prevent them from spreading. The goal is a tight, uniform shape.
- Place the balls on the baking sheet, spacing them at least 2 inches apart to allow for expansion. Preheat your oven to 350°F (175°C) while the balls cool. The oven should be at the correct temperature before baking to ensure even cooking.
- Bake for 10–12 minutes, or until the edges are golden brown and the center feels firm. The aroma will fill the kitchen, creating an irresistible scent. Once done, remove the baking sheet from the oven and let the balls cool on it for 5 minutes before transferring to a wire rack.
That’s it — you did it. But hold on, I've got a few more tricks that'll take this to another level.
Insider Tricks for Flawless Results
The Temperature Rule Nobody Follows
Many cooks bake these balls at 375°F, which can cause the edges to brown too quickly while the center remains undercooked. The ideal temperature is 350°F, which allows the butter to melt slowly, creating a uniform golden crust. I’ve tested it on several ovens, and the results are consistently better at the lower heat. Remember, patience is key.
Why Your Nose Knows Best
Before you even touch the dough, take a deep sniff of the mixture. If the aroma is overwhelmingly sweet, the honey may be overpowering; add a splash of water to balance it. The scent should be nutty, buttery, and slightly floral. Your nose is a reliable indicator of flavor harmony.
The 5-Minute Rest That Changes Everything
After shaping the balls, let them rest on the counter for exactly five minutes. This short rest allows the butter to set, making the dough less sticky and easier to handle. Skipping this step can result in balls that spread or crack during baking. The rest also lets the flavors meld together.
The Secret to a Silky Finish
If you prefer a glossy finish, lightly brush each ball with melted butter before baking. The butter will caramelize on the surface, giving a shiny, golden sheen. It also adds a subtle buttery depth that pairs well with the chocolate chips. Don’t overdo it; a thin layer is enough.
The Perfect Chill
If you’re making a large batch, chill the dough in the fridge for 20–30 minutes before shaping. This firmed-up dough is easier to roll into uniform balls and reduces the chance of sticking to your hands. The chill also enhances the flavor profile, as the peanut butter deepens in richness.
Creative Twists and Variations
This recipe is a playground. Here are some of my favorite ways to switch things up:
Coconut Crunch
Replace half the Rice Krispies with shredded coconut for a tropical twist. The coconut adds a subtle sweet flavor and a chewy texture. Pair it with a splash of coconut milk in the dough for extra richness. This version is perfect for summer gatherings.
Salted Caramel Swirl
Add a drizzle of salted caramel sauce to the dough before shaping. The caramel will seep into the balls during baking, creating pockets of sweet, salty goodness. Sprinkle a pinch of sea salt on top before serving for an extra crunch. This variation is a crowd-pleaser at parties.
Chocolate Dipped Delight
Dip half of the baked balls in melted dark chocolate and let them set on parchment. The chocolate coating adds a glossy finish and a rich flavor. You can also sprinkle crushed nuts on top for added texture. This version is great for gifting.
Maple Nut Medley
Swap honey for pure maple syrup and use maple-flavored peanut butter if available. The maple syrup brings a deeper, caramel-like sweetness. Add chopped pecans for crunch. This variation is ideal for autumn cravings.
Spicy Peanut Surprise
Incorporate a pinch of cayenne pepper into the dough for a subtle heat. The spice balances the sweetness and adds a surprising kick. Pair it with a drizzle of lime zest after baking for a fresh finish. This version is great for adventurous eaters.
Savory Herb Edition
Add finely chopped rosemary or thyme to the mixture for a savory twist. Replace the honey with a small amount of olive oil to keep the texture moist. The herbs will infuse the balls with a fragrant aroma. This variation is perfect as an appetizer for dinner parties.
Storing and Bringing It Back to Life
Fridge Storage
Store the cooled balls in an airtight container at room temperature for up to five days. The airtight seal prevents the balls from drying out and keeps the texture moist. If you notice them becoming a bit hard, place a slice of bread in the container; the bread will release moisture back into the balls. This trick keeps them fresh for longer.
Freezer Friendly
For longer storage, place the balls on a parchment-lined tray and freeze until solid, then transfer them to a freezer bag. They can be stored for up to three months without loss of flavor. When ready to eat, let them thaw at room temperature for 15 minutes before reheating. This method preserves the crunch and chew.
Best Reheating Method
Reheat the balls in a preheated oven at 300°F (150°C) for 5–7 minutes, or until warmed through. Add a tiny splash of water to the baking sheet before reheating; the steam will keep the balls from drying out. The result is a warm, gooey center with a crisp exterior. Serve immediately for maximum enjoyment.