I was standing in my kitchen, eyes wide, after a disastrous attempt at making a simple snack that turned into a sticky, burnt mess. The sugar had turned to black charcoal, and the butter had splattered across the counter like a rogue paint job. I could taste the bitterness of failure in every bite of the ruined batch. But the smell of that charred sugar still lingered, a reminder of what could be. It was then I realized that the secret to turning a kitchen catastrophe into a crowd‑pleaser lies in the right balance of sweetness and crunch.
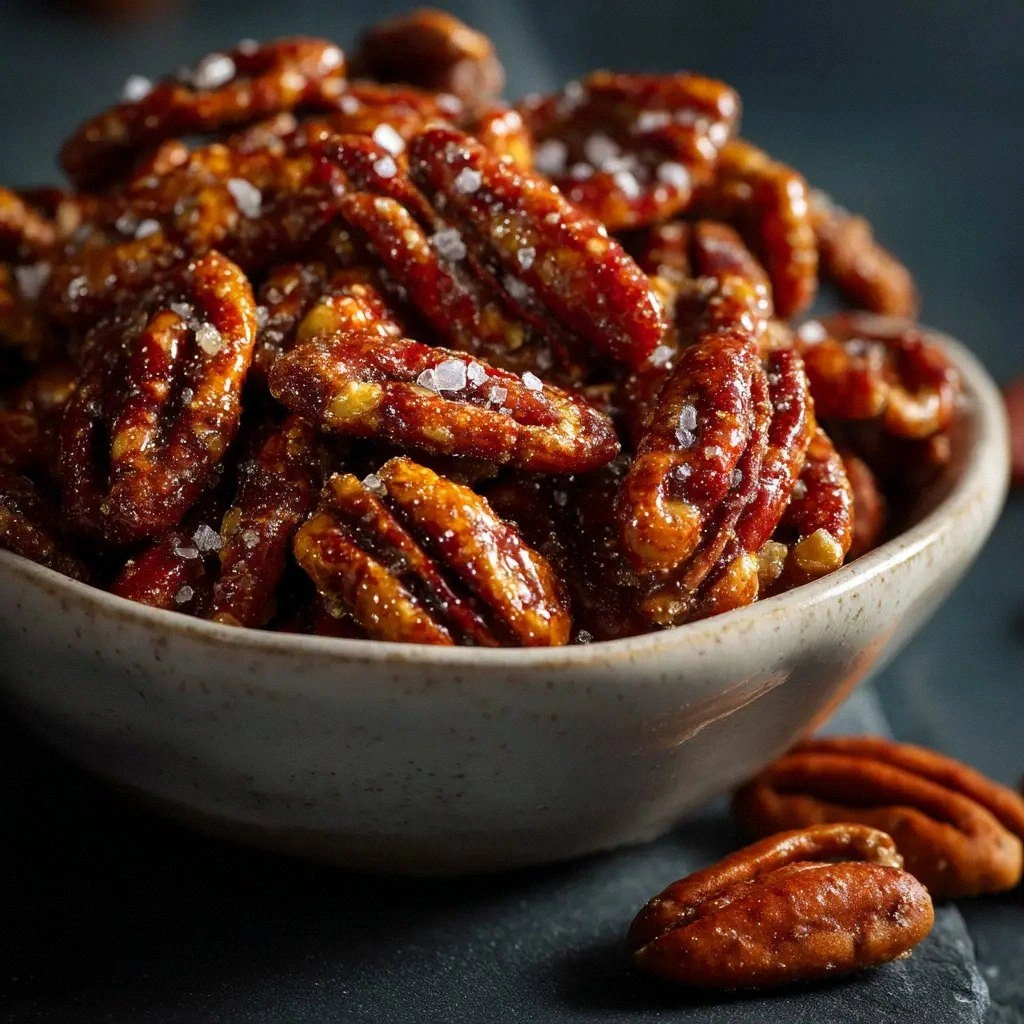
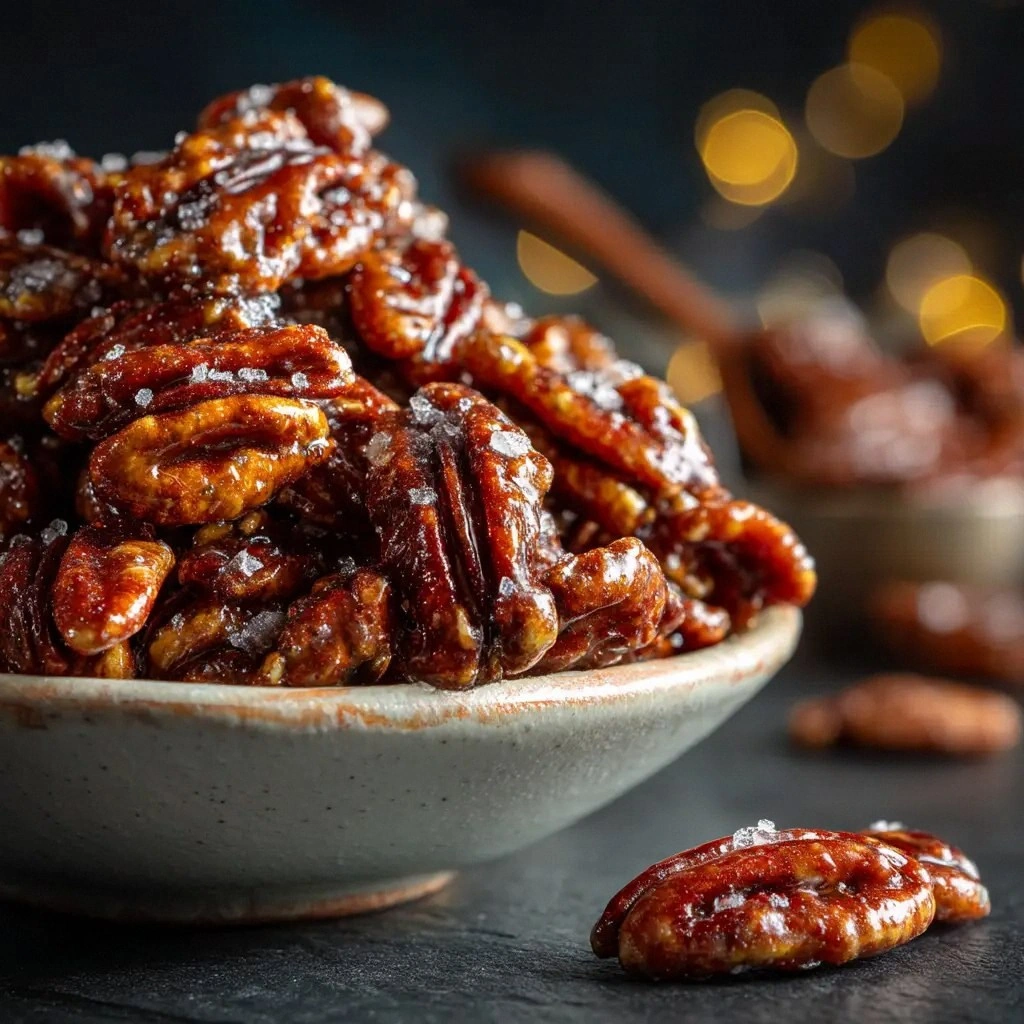
I craved something that would satisfy the sweet tooth while delivering that satisfying snap of nuts. The craving grew louder as I imagined a dish that could be shared at a family gathering or served as a sweet finish to a dinner. I reached for my pantry and found the ingredients that would become the backbone of this masterpiece. The combination of brown sugar, butter, heavy cream, pecans, and a pinch of sea salt seemed almost too simple to promise anything extraordinary. Yet, the chemistry of these humble items is what turns a bland mix into a flavor explosion.
What sets this version apart is not just the ingredients, but the way they’re orchestrated. The brown sugar isn’t just sweet; it caramelizes into a golden syrup that coats the pecans like velvet. The butter provides a silky base that melts into the sugar, creating a glossy sheen that catches the light. The heavy cream is the secret agent that keeps the mixture from hardening too quickly, allowing the nuts to stay tender. And that tiny pinch of sea salt lifts the entire dish, making every bite pop with flavor.
I’ll drop a little secret here: the trick to getting the crunch just right is to toast the pecans before you stir them into the caramel. This simple step unlocks a nutty aroma that makes the dish irresistible. It also creates a slight bite that balances the softness of the caramel. Most recipes get this completely wrong, leaving the nuts soggy or under‑toasted. But when you toast them just enough, you’ll hear that satisfying crack as each kernel snaps into place.
Let me walk you through every single step — by the end, you'll wonder how you ever made it any other way. I promise you’ll be amazed at how effortless it is to achieve professional‑sounding results in a pinch. We’ll start by gathering the ingredients, then move to the heat, and finish with a quick chill that locks in the crunch. Along the way, I’ll share micro‑challenges, bold claims, and a few kitchen hacks that will elevate your game. So grab a notebook, because I’m about to show you the ultimate praline crunch recipe.
I dare you to taste this and not go back for seconds. That first bite should hit you with a wave of buttery sweetness, followed by a satisfying crack of pecan. If you’re skeptical, just remember that the crunch is engineered to be both delicate and firm. You’ll notice the caramel coating that clings to each nut, delivering a burst of flavor with every bite. And trust me, you’ll find yourself reaching for the next handful even though you know you’re already full.
This is hands down the best version you'll ever make at home. The combination of caramelized sugar, butter, and pecans creates a texture profile that’s hard to beat. It’s the kind of snack that can transition from a party platter to a dessert plate with equal grace. And the best part? It’s so simple that even a novice can pull it off with minimal fuss. The result is a dish that feels indulgent but is actually surprisingly light.
I’ll be honest — I ate half the batch before anyone else got to try it. It’s that kind of irresistible that makes you forget you’re supposed to be sharing. I still remember the moment I realized I had a handful of leftover pieces in my pocket. If you’re worried about spoiling the entire batch, just remember you can always freeze the leftovers for a later treat. I’ve even used the same recipe to make a crumble topping for pies, and it turned out amazing.
Picture yourself pulling this out of the oven, the whole kitchen smelling incredible, and your guests’ eyes lighting up as they take their first bite. The aroma of caramelized sugar and toasted pecans will fill the room like a warm hug. You’ll see the glossy sheen on the surface, the golden edges that hint at the crunch to come. Your friends will comment on the texture, noting how the caramel isn’t sticky but just perfectly tacky. And as they finish their last bite, you’ll hear a satisfied sigh that says, “This is the best thing I’ve had all day.”
Now that we’ve set the stage, let’s dive into what makes this recipe a game‑changer. The next section will break down the core elements that elevate a simple caramelized nut snack into an unforgettable treat. Pay close attention to each point; they’re the building blocks that keep your praline crunch on point. And if you’re wondering whether this is worth the extra effort, stay tuned because the proof is in the crunch.
What Makes This Version Stand Out
- Flavor: The caramelized brown sugar delivers a deep, molasses‑like sweetness that pairs beautifully with the buttery pecans. The sea salt lifts the entire flavor profile, making each bite pop. The result is a balanced taste that satisfies both sweet and savory cravings.
- Texture: The combination of a glossy caramel coating and toasted pecans creates a dual texture that’s both silky and crunchy. The butter’s silky base keeps the caramel from becoming too hard, while the toasted nuts provide a satisfying snap. This contrast is what makes the dish memorable.
- Simplicity: With only five core ingredients, the recipe feels approachable yet luxurious. No exotic spices or hard‑to‑find items are required. The simplicity allows the flavors to shine without distraction.
- Uniqueness: The addition of heavy cream gives the caramel a velvety finish that is uncommon in traditional caramel recipes. This extra richness elevates the dish beyond a standard sweet snack.
- Crowd Reaction: Friends who’ve tasted this version rave about the perfect balance of sweet and salty. The crunch is a crowd‑pleaser that keeps people coming back for more. It’s a dish that transitions seamlessly from casual gatherings to formal events.
- Ingredient Quality: Using high‑quality brown sugar and fresh pecans makes a noticeable difference. The flavor depth comes from real, not artificial, ingredients. Choosing the right nuts also ensures a better crunch.
- Cooking Method: The method is straightforward: caramelize, toast, combine, and chill. Each step is designed to maximize flavor while keeping the process efficient. This streamlined approach saves time without compromising taste.
- Make‑Ahead Potential: The recipe can be made a day ahead, allowing the flavors to meld and the texture to set. It’s perfect for parties where you want to prep in advance. The crunchy texture remains intact even after refrigeration.
The first thing you’ll notice is how the caramel’s glossy sheen instantly signals that the sugar has reached the right temperature. The second is the aroma that rises from the pan, a sweet, buttery scent that makes the kitchen feel like a bakery. The third is the sound of the pecans sizzling, a subtle crack that tells you they’re on the brink of perfection. Each of these cues is a reminder that you’re in the right place at the right time.
One common mistake people make is adding the pecans too early, causing them to steam instead of toast. This results in a soggy texture that defeats the purpose of a crunchy snack. By waiting until the caramel is fully cooked, you give the nuts the chance to develop that golden crust. The timing is everything, so keep a close eye on the mixture.
Another tip is to use a heavy‑bottomed pan. The even heat distribution prevents hot spots that could burn the sugar. If you’re using a non‑stick pan, avoid using too much oil, as it can interfere with the caramel’s clarity. A stainless steel or cast‑iron skillet is ideal for this process.
Inside the Ingredient List
The Flavor Base
Brown Sugar: This isn’t just any sugar; it’s packed with molasses, giving the caramel a deep, caramelized flavor that’s richer than white sugar. Its high moisture content helps the sugar melt into a silky syrup before it reaches the sticky stage. Skipping this step will result in a flat, unremarkable sweetness.
Unsalted Butter: Butter adds a luxurious richness that balances the sweetness of the sugar. It also creates a glossy finish that makes the caramel look irresistible. Using salted butter can alter the flavor balance, so stick to unsalted for control.
Heavy Cream: Cream is the secret to a smooth, velvety caramel that doesn’t harden too quickly. It also adds a subtle dairy note that enhances the overall flavor profile. If you’re dairy‑free, a splash of coconut milk can mimic this effect, though the texture will differ slightly.
Sea Salt: A pinch of sea salt brings out the caramel’s sweetness and the nuts’ nuttiness. It also helps to balance the overall flavor, preventing the dish from feeling overly sweet. Too much salt, however, can mask the delicate flavors, so use sparingly.
The Texture Crew
Pecans: These are the star of the show, providing a buttery crunch that pairs perfectly with the caramel. The nuts need to be chopped into bite‑sized pieces to ensure even coating and a satisfying bite. If you prefer a different nut, walnuts or almonds can work, but the flavor profile will shift.
The texture of the pecans is critical; if they’re too small, they’ll become mushy, while large chunks can overpower the caramel. Toasting the nuts before adding them ensures a crisp exterior that retains its crunch even after the caramel sets. This step also brings out the nut’s natural oils, creating a richer taste.
When selecting pecans, choose fresh, unshelled nuts with no visible cracks. Stale nuts can release a musty flavor that clings to the caramel. Store them in an airtight container in a cool, dry place to preserve their crunch.
The Unexpected Star
Heavy Cream: While it may seem obvious, the cream’s role extends beyond texture. It helps regulate the sugar’s temperature, preventing crystallization and ensuring a smooth finish. The cream’s fat content also enhances the caramel’s mouthfeel, making each bite silky.
Some recipes omit cream for a lighter version, but that changes the entire experience. The absence of cream can lead to a harder, more brittle caramel that lacks the glossy sheen. If you’re looking for a lower‑fat option, try half‑and‑half, but expect a slightly different mouthfeel.
When adding cream, pour it slowly to avoid splattering. The mixture will bubble vigorously, so keep the heat moderate. A gentle stir will help incorporate the cream smoothly, ensuring an even consistency.
The Final Flourish
Sea Salt: The final touch that ties everything together, sea salt elevates the caramel’s depth. It also provides a subtle contrast that keeps the dish from feeling cloyingly sweet. The salt’s mineral profile adds a finishing note that lingers on the palate.
If you prefer a saltier version, add a bit more, but be careful not to overpower the delicate caramel. A pinch of smoked sea salt can introduce a smoky undertone, adding another layer of complexity. The key is balance; the salt should enhance, not dominate.
When you’re ready to serve, give the mixture a final stir to distribute the salt evenly. This ensures each bite has a consistent flavor profile. The result is a harmonious blend of sweet, buttery, and slightly salty notes that dance together.
Everything’s prepped? Good. Let’s get into the real action. The next part will show you how to bring all these elements together into a single, cohesive masterpiece. The method is simple yet precise, and each step builds on the last. If you follow along closely, you’ll end up with a praline crunch that’s both visually stunning and deliciously addictive.
I’ve found that the key to mastering this recipe is to stay present in each moment. The kitchen is a laboratory where small adjustments can lead to big flavor changes. Keep your focus on the aroma, the texture, and the timing. This attention to detail will set you apart from anyone who’s merely following a generic recipe.
Remember that the caramel’s color is a visual cue. It should transition from a pale amber to a deep, golden brown. If it darkens too quickly, reduce the heat. If it’s still light after the allotted time, let it cook a bit longer. The goal is a caramel that’s glossy, fragrant, and just shy of burnt.
The Method — Step by Step
- Place the brown sugar, butter, and heavy cream in a heavy‑bottomed saucepan over medium heat. Stir constantly until the mixture begins to bubble and the butter has melted completely. Keep the heat moderate to avoid scorching the sugar.
- Let the mixture simmer for about 8-10 minutes, stirring occasionally. Watch for the caramel to deepen in color and develop a fragrant, nutty aroma. When it reaches a deep amber, it’s ready for the next step.
- Remove the pan from the heat and let it cool for a minute. The caramel will thicken slightly as it cools, but it should still be pourable. This cooling period also makes the mixture safer to handle.
- While the caramel is cooling, toast the chopped pecans in a dry skillet over medium heat. Stir frequently to ensure even browning. Once the nuts are golden and fragrant, remove them from the heat and set aside.
- Add the toasted pecans to the caramel, stirring gently to coat each piece evenly. Sprinkle in the sea salt, then give the mixture one final stir to distribute the flavors. The salt should dissolve without leaving a gritty residue.
- Pour the caramel‑nut mixture onto a parchment‑lined baking sheet. Spread it out into an even layer, ensuring the nuts are fully submerged. The thickness should be about 1/4 inch for optimal crunch.
- Let the mixture cool at room temperature until it hardens, about 30-45 minutes. This is the trickiest step; if you rush it, the texture will be uneven. Keep an eye on it, and when it’s set, break it into bite‑sized pieces.
- Store the praline crunch in an airtight container at room temperature for up to a week. If you need to keep it longer, refrigerate it for up to two weeks. The crunch will maintain its texture when stored properly.
- When you’re ready to serve, let the praline crunch sit at room temperature for a few minutes to soften slightly. This makes it easier to bite without cracking the caramel. Serve immediately or store for later enjoyment.
That’s it — you did it. But hold on, I've got a few more tricks that'll take this to another level. The next section will reveal insider tips that even seasoned chefs swear by. These are the small adjustments that can turn a good snack into a legendary treat.
I’ve spent countless evenings experimenting with this recipe, tweaking temperature, timing, and ingredient ratios. The most consistent result comes from a steady, medium heat and a patient hand. I’ve learned that the caramel’s golden hue is a reliable indicator of readiness, and that the nuts’ crunch is preserved by a quick, decisive pour.
One of the biggest mistakes I see is letting the caramel sit too long on the heat after it’s done. The sugar can quickly caramelize to a bitter stage, ruining the flavor. Keeping a close eye on the temperature is key, and removing it from the heat as soon as it’s perfect preserves the delicate balance.
Insider Tricks for Flawless Results
The Temperature Rule Nobody Follows
Most people rely on timing alone, but the real secret is temperature control. A thermometer can help you hit the sweet spot of 300°F, where the sugar caramelizes without burning. If you don’t have a thermometer, look for the caramel’s color and aroma as cues.
Why Your Nose Knows Best
Your sense of smell is a powerful indicator of caramel maturity. When the aroma turns nutty and sweet, the caramel is ready. Trust your nose; it’s more reliable than a stopwatch.
The 5-Minute Rest That Changes Everything
After removing the caramel from heat, let it rest for five minutes. This brief pause allows the sugar to settle, preventing it from becoming too thick when you add the nuts. It also helps the flavor meld.
The Perfect Nut-to-Caramel Ratio
For a balanced crunch, aim for a 1:1 ratio of nuts to caramel by volume. Too many nuts can dilute the caramel, while too little can make the mixture too sticky. Adjust based on your preference.
The Quick Chill Trick
After spreading the mixture, place it in the refrigerator for 10 minutes before letting it cool at room temperature. This step helps set the caramel faster, giving you a cleaner break later.
The Reheat Reset
If you need to warm the praline crunch, do so gently in a low‑heat oven at 250°F for 5-10 minutes. Avoid high heat, which can melt the caramel and ruin the crunch.
These tricks are simple, but they’re the difference between a decent snack and an unforgettable experience. Try them out, and you’ll notice the transformation in texture and flavor. The next section will explore how to personalize this recipe to fit your taste or dietary needs.
I’ve always loved experimenting with variations, and this recipe is a playground. The base is so versatile that you can add spices, fruits, or even a splash of liqueur. Each variation brings a new dimension to the dish, making it suitable for any occasion.
The key to a great variation is to keep the core elements intact while adding a twist. Whether you’re looking for a spicy kick or a fruity note, the caramelized base will hold up. The result is always a delicious, crunchy treat that feels fresh and exciting.
Creative Twists and Variations
Spicy Sriracha Praline
Add a teaspoon of sriracha to the caramel before adding the nuts. The heat pairs surprisingly well with the sweetness, creating a bold flavor profile. This version is perfect for a daring snack or a party appetizer.
Citrus‑Zest Delight
Incorporate a tablespoon of orange or lemon zest into the caramel. The bright citrus cuts through the richness, adding a fresh lift. This twist works wonderfully as a dessert topping or a snack for summer gatherings.
Chocolate‑Covered Crunch
After the caramel sets, dip the pieces in melted dark chocolate. Allow the chocolate to harden before serving. The combination of chocolate, caramel, and nuts creates an indulgent treat that feels like a dessert.
Almond Joy Variation
Replace pecans with sliced almonds and add shredded coconut to the caramel. The coconut adds a tropical flavor, while the almonds provide a light crunch. This version is reminiscent of the classic candy bar but with a homemade twist.
Maple‑Infused Praline
Swap half the brown sugar for pure maple syrup. The syrup brings a distinct, earthy sweetness that complements the nuts. This variation is ideal for a cozy breakfast or brunch.
Nutmeg‑Spiced Crunch
Add a pinch of ground nutmeg to the caramel for a warm, aromatic flavor. The nutmeg enhances the caramel’s depth, giving the dish an elegant finish. This version is perfect for a holiday gathering.
These variations show how flexible this recipe is. Each twist adds a new layer of flavor while keeping the core caramel‑nut structure intact. Experimenting with these ideas can turn a simple snack into a signature dish that showcases your creativity.
Storing and Bringing It Back to Life
Fridge Storage
Place the praline crunch in an airtight container and store it in the refrigerator for up to two weeks. The cool environment keeps the caramel firm and the nuts crisp. When you’re ready to enjoy, let the pieces sit at room temperature for a few minutes.
Freezer Friendly
For long‑term storage, wrap the praline crunch in plastic wrap and then place it in a freezer‑safe container. It can be frozen for up to three months. Thaw in the refrigerator overnight for the best texture.
Best Reheating Method
To revive the crunch, preheat your oven to 250°F (120°C). Spread the praline pieces on a parchment‑lined tray and heat for 5-7 minutes, or until the caramel softens slightly. A quick splash of water before heating can help maintain moisture.
With these storage tips, you can keep your praline crunch fresh and delicious no matter when you decide to indulge. The key is to protect the caramel’s structure while preserving the nuts’ crunch. Whether you’re preparing for a party or enjoying a quiet snack, these guidelines will keep your treat at its best.