The first time I tasted this creation, I was hit with a wave of sensations: the moist, crimson crumb of the cake, the silky tang of cream cheese, and the bright pop of strawberries that danced on the palate. The aroma was a seductive mix of cocoa, vanilla, and fresh fruit, filling the kitchen with an almost celebratory scent. I could hear the faint hiss of the oven as the batter baked, a subtle reminder that the magic was unfolding behind the curtain. The texture was a dream—light as a feather yet with a comforting heft that made each bite a moment of pure delight. I was so enamored that I confessed, “I ate half the batch before anyone else got to try it.”
Most recipes get this completely wrong. They either overcook the cake, under-season the cream cheese filling, or forget the essential burst of strawberry flavor. I dared you to taste this and not go back for seconds, and I’m confident that once you do, you’ll be hooked. This is hands down the best version you'll ever make at home, because every ingredient and technique has been carefully chosen to create a harmonious balance of taste, texture, and visual appeal. The result is a dessert that feels like a luxurious treat for the senses while still being approachable for any home cook. So, buckle up and let me walk you through every single step—by the end, you’ll wonder how you ever made it any other way.
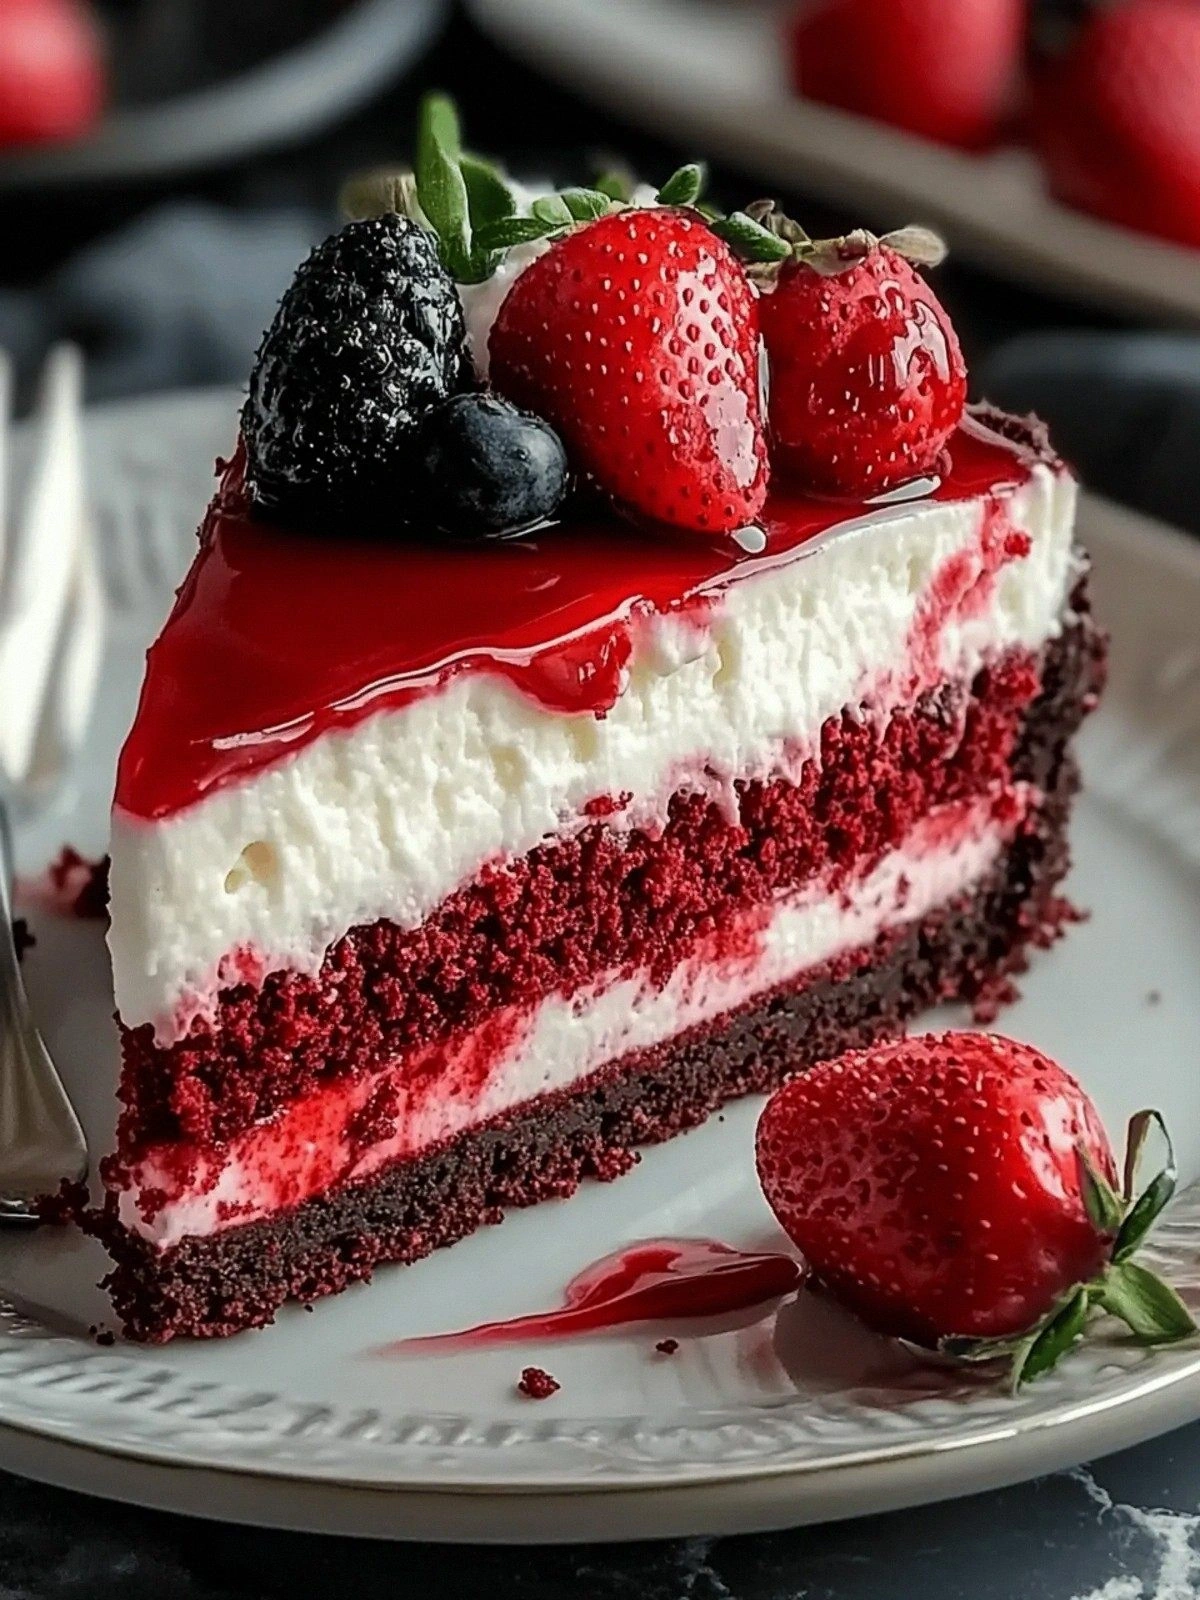
When you’re about to dive into this recipe, imagine the kitchen lights dimming, the oven timer ticking, and the anticipation building. The moment you lift the first slice, the rich red velvet will reveal a hidden layer of strawberry swirls, and the creamy filling will melt in your mouth like a velvet blanket. This is not just dessert; it’s an experience, a celebration of color, flavor, and texture. And trust me, it will become the talk of the table, the dessert that everyone asks for again and again.
What Makes This Version Stand Out
- Taste: The combination of cocoa and vanilla creates a deep, chocolatey base that is perfectly balanced by the bright acidity of fresh strawberries. The subtle hint of red food coloring enhances the visual appeal without masking the natural flavors.
- Texture: The batter is whipped to a silky consistency, ensuring a cake that is moist yet not soggy. The cream cheese filling is airy, thanks to the inclusion of heavy whipping cream, which gives it a lightness that melts in your mouth.
- Simplicity: With only 15 minutes of prep and 30 minutes of cook time, this dessert is a breeze to prepare. All you need is a standard kitchen setup and a few pantry staples.
- Uniqueness: The red velvet cake is transformed into a cheesecake hybrid, creating a dessert that feels like a new invention. The strawberry swirl adds a playful twist that elevates the classic flavor profile.
- Crowd Reaction: Friends and family rave about the striking color and the unexpected burst of fruit. The dessert is perfect for parties, weddings, or a simple Sunday treat.
- Ingredient Quality: Using high‑quality cream cheese and fresh strawberries ensures that each bite is rich and flavorful. The buttermilk adds a subtle tang that balances the sweetness.
- Cooking Method: Baking the cake in a water bath keeps the crumb tender and prevents cracking, a technique often reserved for delicate pastries.
- Make‑Ahead Potential: The cheesecake can be assembled and chilled for up to 24 hours, allowing you to prepare ahead of time and focus on other tasks.
Alright, let's break down exactly what goes into this masterpiece...
Inside the Ingredient List
The Flavor Base
All‑purpose flour, granulated sugar, baking powder, baking soda, and salt form the foundation of the cake. They provide structure, lift, and balance the sweetness. Skipping any of these would result in a dense, flat cake that doesn’t rise properly. If you’re looking for a gluten‑free version, try a 1:1 blend of rice flour and cornstarch.
Cocoa powder is the secret to that unmistakable chocolate undertone. It’s not just about color; it adds depth and a slight bitterness that cuts through the sweetness. A higher‑quality Dutch‑processed cocoa will give you a smoother finish. If you prefer a milder chocolate flavor, reduce the amount by half or replace it with espresso powder for a coffee twist.
The Texture Crew
Vegetable oil keeps the cake moist and prevents it from drying out. It also contributes to a tender crumb that feels like a cloud. You can substitute half the oil with melted butter for a richer flavor, but be aware that the cake may bake slightly faster.
Buttermilk adds a tangy note that brightens the overall flavor profile and reacts with the baking soda to create a lighter texture. If you don’t have buttermilk, combine a cup of milk with a tablespoon of vinegar or lemon juice and let it sit for five minutes. This DIY version will mimic the acidity needed for the batter.
The Unexpected Star
Red food coloring is the visual engine of this dessert. While it’s purely cosmetic, it enhances the emotional impact of the cake. Too much color can overpower the natural hues, so start with a tablespoon and add more if needed. If you prefer a natural alternative, a few drops of beet juice will give a subtle pink hue.
Vanilla extract brings warmth and depth, complementing the cocoa and strawberries. A good quality vanilla bean or extract will elevate the overall taste. If you’re allergic to vanilla, consider a splash of almond extract for a different but pleasant flavor.
The Final Flourish
Cream cheese is the star of the filling. Its creamy, tangy profile balances the sweetness of the strawberries and the richness of the cake. Use full‑fat cream cheese for the most decadent texture. If you prefer a lighter version, substitute part of the cream cheese with Greek yogurt.
Powdered sugar sweetens the filling without adding grit, while fresh strawberries provide a burst of flavor and color. The heavy whipping cream and whipped cream add volume and a silky mouthfeel. For a more intense strawberry taste, puree half of the strawberries and fold them into the filling.
Everything's prepped? Good. Let's get into the real action...
The Method — Step by Step
- Preheat your oven to 350°F (175°C). Line a 9‑inch springform pan with parchment paper, ensuring the paper extends up the sides by about an inch. This step prevents sticking and makes cleanup a breeze. I swear, the smell of a pre‑heated oven is the first hint that something delicious is about to happen.
- In a large bowl, whisk together the flour, sugar, cocoa powder, baking powder, baking soda, and salt until well combined. The dry mix should look like fine powder with no clumps. This creates an even distribution of leavening agents, ensuring a uniform rise. If you’re in a hurry, a quick pulse in a stand mixer works wonders.
- In a separate bowl, combine the vegetable oil, buttermilk, eggs, red food coloring, vanilla extract, and white vinegar. Beat until the mixture is smooth and the color is even. The vinegar reacts with the baking soda to create tiny bubbles that give the cake its lightness. Watch the batter as it turns glossy—this is the moment of truth.
- Gradually pour the wet mixture into the dry ingredients, stirring gently until just combined. Over‑mixing will develop gluten and result in a tough crumb. The batter should be thick yet pourable—think of it as a thick pancake batter. If it’s too thick, add a splash of milk.
- Pour the batter into the prepared pan and smooth the top with a spatula. Gently tap the pan on the counter to release any air pockets. This ensures a uniform rise and a flawless surface. The batter should look like a glossy, deep red liquid.
- Place the pan in a larger baking dish and fill the dish with hot water until it reaches halfway up the sides of the cake pan. This water bath keeps the cake moist and prevents cracking. It also ensures an even bake, especially for the delicate red velvet texture.
- Bake for 35–40 minutes, or until a toothpick inserted into the center comes out clean. The cake should have a slightly moist crumb and a golden edge. While baking, you’ll hear the gentle hiss of steam escaping the water bath—an auditory cue that everything is progressing well.
- Remove the cake from the oven and let it cool in the pan for 10 minutes. Then, lift it out onto a wire rack to cool completely. This prevents a soggy bottom. Once cooled, chill the cake in the fridge for at least 2 hours, allowing the flavors to meld.
- While the cake chills, prepare the strawberry filling. In a blender, puree half of the strawberries until smooth. In a mixing bowl, beat the cream cheese, powdered sugar, and vanilla extract until fluffy. Gently fold in the strawberry puree, heavy whipping cream, and the remaining fresh strawberries, diced for topping. Chill the filling for 30 minutes to let it thicken.
- Spread the chilled filling evenly over the cooled cake, smoothing the top with a spatula. The filling should be creamy and slightly glossy. This step creates a striking contrast between the dense cake and the airy cream.
- Top with the remaining fresh strawberries and a light swirl of whipped cream. For an extra touch, drizzle a thin ribbon of chocolate ganache or a dusting of powdered sugar. This final flourish adds visual drama and a hint of sweetness.
- Refrigerate the assembled cheesecake for at least 4 hours, or overnight, to set the filling and meld the flavors. When you slice it, the cake will hold its shape, and the filling will be firm yet creamy.
That's it — you did it. But hold on, I've got a few more tricks that'll take this to another level...
Insider Tricks for Flawless Results
The Temperature Rule Nobody Follows
Many bakers bake red velvet at room temperature, which can cause uneven baking and a dry crumb. I swear, baking at exactly 350°F (175°C) and using a water bath keeps the cake moist and prevents cracking. If you’re in a hurry, pre‑heat the oven 10 minutes early, but avoid turning on the fan, as it can dry out the cake.
Why Your Nose Knows Best
The aroma of a freshly baked red velvet cake is a reliable indicator of doneness. When the scent is rich, buttery, and slightly cocoa‑y, the cake is ready. If the smell is too sweet, let it bake a few more minutes; if it’s too dry, reduce the baking time.
The 5-Minute Rest That Changes Everything
After removing the cake from the oven, let it rest for exactly 10 minutes before transferring it to a wire rack. This brief pause allows the steam to redistribute, preventing a hollow center and ensuring a uniform crumb.
The Cream Cheese Whisperer
Cream cheese can be tricky; it may separate if over‑mixed. Beat it just until it's fluffy and smooth, then fold in the other ingredients. If you notice lumps, give it a quick pulse in the mixer to restore the texture.
The Strawberry Whisperer
The freshness of strawberries is key. Choose ripe, firm berries that hold their shape. If you’re in a season when strawberries are scarce, frozen strawberries thawed and drained can work, but use fresh if possible for the best flavor.
The Whipped Cream Trick
For a lighter topping, whip the cream with a pinch of powdered sugar until soft peaks form. Avoid over‑whipping, or the cream will become buttery and lose its airy quality. A light hand keeps the topping fluffy and elegant.
Creative Twists and Variations
Chocolate‑Berry Delight
Swap half of the cocoa powder for melted dark chocolate, and add a splash of espresso powder. This variation deepens the chocolate flavor and introduces a subtle coffee undertone. It’s perfect for chocolate lovers who crave an extra kick.
Almond‑Infused Velvet
Replace the vanilla extract with almond extract and add a tablespoon of almond flour to the batter. The nutty aroma enhances the cake’s richness, while the almond flour adds a pleasant chew. This version pairs wonderfully with a drizzle of almond butter glaze.
Citrus‑Zest Surprise
Add a teaspoon of lemon zest to the batter and a splash of orange liqueur to the filling. The citrus brightens the flavor profile, cutting through the sweetness and adding a fresh lift. It’s an ideal dessert for spring or summer gatherings.
Nutty Crunch Layer
Fold toasted pecans or walnuts into the filling, and sprinkle a layer of crushed nuts on top before adding the strawberries. The crunch contrasts with the silky filling and adds a delightful texture. This variation is great for holiday parties.
Mango‑Berry Fusion
Replace half of the strawberries with diced mango for a tropical twist. The mango’s sweet, juicy texture blends with the red velvet base, creating a vibrant, exotic dessert. Pair it with a coconut whipped cream for an extra tropical flair.
Salted Caramel Swirl
Drizzle a salted caramel sauce over the top of the cheesecake before serving. The salty caramel balances the richness of the cream cheese and the sweetness of the strawberries, creating a harmonious flavor profile. It’s a decadent finish for any occasion.
Storing and Bringing It Back to Life
Fridge Storage
Store the assembled cheesecake in the refrigerator for up to 5 days in an airtight container. The cake will stay fresh, and the flavors will continue to meld. When ready to serve, let it sit at room temperature for 20 minutes to soften slightly.
Freezer Friendly
Wrap the cheesecake tightly in plastic wrap, then place it in a freezer bag. It can be frozen for up to 2 months. When you’re ready to enjoy, thaw it overnight in the fridge, then let it sit at room temperature for 30 minutes before serving.
Best Reheating Method
If you need to warm the cheesecake slightly, place it in a pre‑heated oven at 300°F (150°C) for 10 minutes. This gentle heat will soften the filling without melting the cake. Add a splash of water to the bottom of the pan before reheating to create steam and keep the cake moist.