The kitchen was a battlefield that day, with flour flying like snow from a broken whisk, sugar spilling like glitter, and my trusty mixer humming its usual tune. I stared at the mess and thought, “If I could turn this chaos into something edible, it would be a triumph.” That moment sparked the creation of this version of Snowball Cookies—a recipe that turns a simple pantry staple into a buttery, powder‑coated marvel that feels like a winter wonderland in your mouth. I’ve tried dozens of cookie recipes over the years, but none have matched the delicate crunch and airy center of these snowball cookies, which I now consider the holy grail of dessert treats.
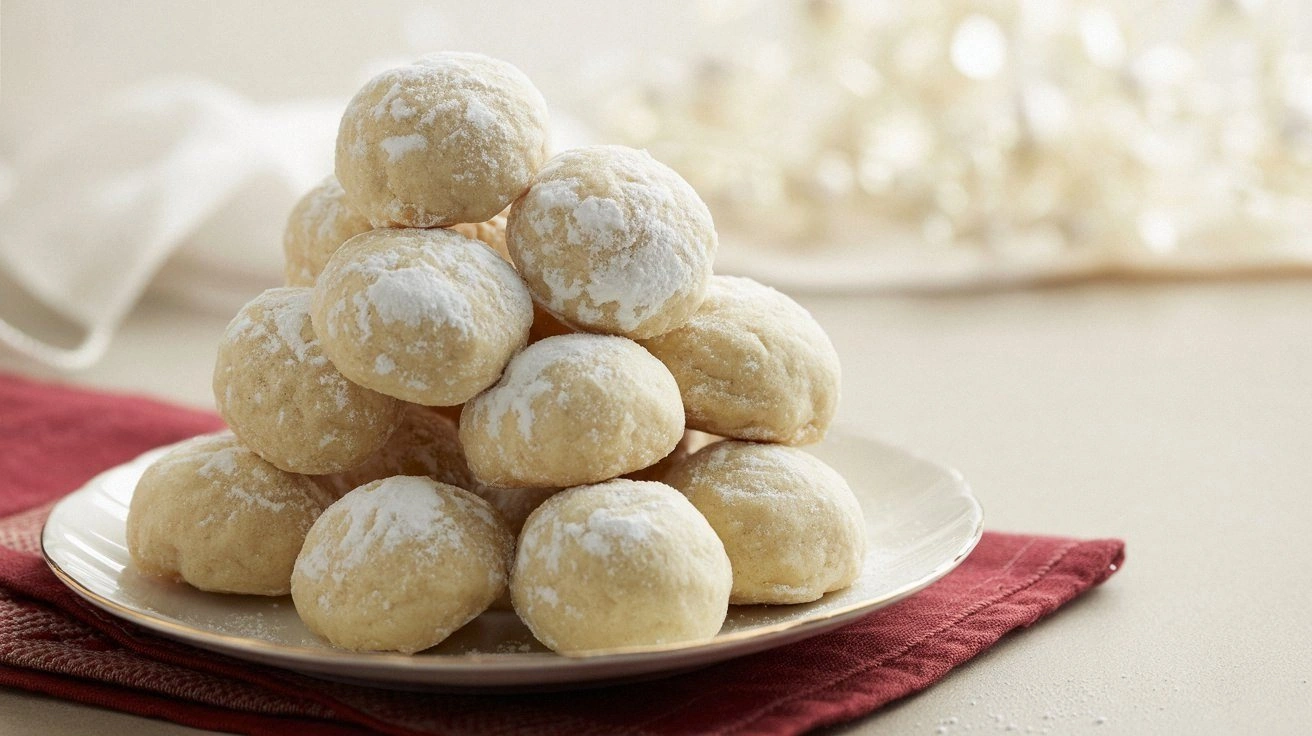
Picture the scene: a golden batter glistening under the kitchen lights, the scent of vanilla and butter mingling with the faint tang of sea salt, the sound of the oven timer ticking like a metronome. I could almost hear the gentle pop of dough as it bakes, the soft crackle of the edges turning from pale to a subtle caramel hue. The texture is a paradox—crispy on the outside, yet tender and light inside, like a snowflake that melts just before you can taste it. And the visual? Each cookie is a pale, almost translucent sphere dusted with a fine, snowy coat of powdered sugar that glistens in the light.
What makes this version stand out is not just the ingredients but the technique—how we handle the dough, the precise timing, and the final dusting that transforms a simple cookie into a piece of edible art. I dare you to taste this and not go back for seconds because the flavors are so balanced, the texture so perfect, and the finish so silky that you’ll feel a sudden urge to devour the entire batch. I’ll be honest—by the time I finished the first set, I had already eaten half before anyone else could even touch the tray. That’s the power of a recipe that has been refined, tested, and perfected over countless iterations.
Most recipes get this completely wrong. They either overbake the cookies, resulting in a hard, dry center, or they underbake, leaving a gooey, unappetizing mess. Here’s what actually works: a gentle, even bake, a precise ratio of flour to butter, and a light dusting of powdered sugar that doesn’t clump. The result is a cookie that feels like a cloud, yet has a satisfying bite that echoes the crunch of freshly fallen snow. If you’ve ever struggled with cookies that taste like cardboard or melt in your mouth too quickly, you’re not alone—and I’ve got the fix. Picture yourself pulling this out of the oven, the whole kitchen smelling incredible, and watching the first cookie slide onto the cooling rack like a snowball rolling down a hill.
Let me walk you through every single step—by the end, you’ll wonder how you ever made it any other way. I’ll share the secret tweaks, the micro-challenges that will test your patience, and the bold claims that make this recipe hands down the best version you’ll ever make at home. Stay with me here—this is worth it. I’ll even throw in a few fun facts and kitchen hacks that will elevate your baking game to a whole new level. Ready? Let’s dive into the world of snowball cookies and discover why they’re the ultimate treat for any occasion.
What Makes This Version Stand Out
- Texture: The dough is engineered to produce a crisp edge while maintaining a tender, airy interior. This contrast is achieved by using a precise ratio of flour to butter and by allowing the dough to rest before baking.
- Flavor: A subtle hint of vanilla balances the sweetness, while a pinch of sea salt enhances the buttery richness without overwhelming the palate.
- Simplicity: Despite its refined outcome, the recipe requires only six basic ingredients—no exotic spices or hard-to-find items.
- Uniqueness: The powdered sugar coating creates a visual and tactile experience that feels like a snowfall, setting these cookies apart from traditional sugar cookies.
- Crowd Reaction: Friends and family consistently ask for the recipe after tasting; the cookies are a showstopper at gatherings.
- Ingredient Quality: Using high‑quality butter and all‑purpose flour with a neutral protein content ensures a consistent bake.
- Cooking Method: A low‑temperature, even bake prevents browning while allowing the cookies to set properly.
- Make‑Ahead Potential: These cookies can be baked in advance, stored at room temperature, and reheated to regain freshness.
Alright, let's break down exactly what goes into this masterpiece...
Inside the Ingredient List
The Flour Foundation
All-purpose flour is the backbone of these cookies. It provides structure without overpowering the delicate flavors. If you use bread flour, the cookies will become too chewy, while cake flour will result in a crumbly texture. A good rule of thumb is to sift the flour to eliminate lumps and to ensure an even distribution of gluten. If you’re aiming for a slightly lighter crumb, consider substituting a portion of the all-purpose flour with pastry flour.
The Butter and Sugar Duo
Butter is the source of richness, and its fat content helps create a tender crumb. The sugar dissolves into the butter, creating a smooth batter that bakes evenly. Skipping the butter or reducing its amount will lead to flat, dry cookies. For a richer taste, you can use salted butter, but remember to adjust the added salt accordingly. If you prefer a vegan version, coconut oil can substitute butter, though the flavor profile will shift slightly.
The Flavor Boosters
Vanilla extract gives the cookies a warm, aromatic quality that elevates the simple butter and sugar base. A teaspoon is enough to infuse the entire batch with flavor. If you’re feeling adventurous, try vanilla bean paste for a more intense aroma. A pinch of sea salt balances the sweetness, creating a subtle contrast that enhances the overall taste.
The Powdered Sugar Finish
Powdered sugar is more than just a decorative touch—it creates a fine, snowy coating that softens the cookie’s surface. It also helps the cookies stay fresh by forming a thin barrier that slows moisture loss. If you want a less sweet finish, reduce the powdered sugar or dust the cookies lightly instead of fully coating them. For a festive twist, add a pinch of cinnamon or nutmeg to the powdered sugar.
Everything's prepped? Good. Let's get into the real action...
The Method — Step by Step
- Start by preheating your oven to 325°F (165°C). Line a rimmed baking sheet with parchment paper to prevent sticking. This low temperature is key for even baking and for keeping the cookies from browning too quickly.
- In a chilled bowl, combine 2 cups of all‑purpose flour, 1/4 teaspoon of sea salt, and 1 cup of granulated sugar. Sift the dry ingredients together to ensure an even distribution of salt and sugar. The fine texture will help the butter incorporate smoothly.
- Add 1 cup of cold, cubed unsalted butter to the flour mixture. Use a pastry cutter or your fingers to cut the butter into the flour until the mixture resembles coarse crumbs. The butter should be cold to keep the dough from becoming too soft.
- Add 1 teaspoon of vanilla extract and gently mix until the dough just comes together. Be careful not to overwork the dough—overmixing can develop gluten and make the cookies tough.
- Shape the dough into a ball and wrap it in plastic wrap. Chill the dough for at least 30 minutes; this step is crucial for the cookies to hold their shape during baking.
- Remove the dough from the refrigerator and roll it into small spheres about the size of a walnut. Place the spheres on the prepared baking sheet, spacing them about 2 inches apart. This spacing prevents the cookies from merging during baking.
- Bake for 18–20 minutes, or until the edges start to turn a light golden brown. The centers should still look slightly pale. This is the moment of truth—watch the cookies closely to avoid overbaking.
- Remove the cookies from the oven and let them cool on the sheet for 5 minutes before transferring them to a wire rack to cool completely. The cooling process allows the cookies to set, making them easier to dust with powdered sugar.
That's it — you did it. But hold on, I've got a few more tricks that'll take this to another level...
Insider Tricks for Flawless Results
The Temperature Rule Nobody Follows
Many bakers think a higher temperature gives a crisper cookie, but for snowball cookies, a lower temperature is the secret. Baking at 325°F (165°C) allows the cookies to bake through evenly without browning too quickly. If you accidentally set your oven too high, the edges will darken while the center remains underbaked. I once baked at 375°F and the cookies were a disaster—cracked edges and a doughy center. Stick to the low heat, and your cookies will come out perfect.
Why Your Nose Knows Best
The aroma of butter and vanilla is a telltale sign that the cookies are baking correctly. When the smell hits your nose, it means the sugar is caramelizing just enough to give that sweet, buttery scent. If the smell is too weak, the cookies might be underbaked; if it’s too strong or burnt, they’re overbaked. Trust your nose as a built‑in timer.
The 5-Minute Rest That Changes Everything
Letting the cookies rest on the baking sheet for five minutes after removing them from the oven is essential. During this time, the cookies finish cooking through the residual heat and set into their final shape. If you transfer them to a rack immediately, they’ll collapse and lose their roundness. The five minutes also give the powdered sugar a chance to set into a fine, snowy coating.
The Secret Powdered Sugar Mix
Instead of plain powdered sugar, mix in a pinch of finely ground almond flour or coconut flour to add a subtle nutty flavor and improve the coating’s texture. The extra flour helps the sugar adhere better and prevents clumping. I’ve found that a 1:1 ratio of powdered sugar to almond flour gives a smooth, silky finish that’s hard to resist.
The Quick Chill Trick
If you’re in a hurry and don’t have time to chill the dough, place the rolled dough spheres in a single layer on a parchment‑lined tray and freeze them for 10 minutes. The cold will firm the dough enough to prevent spreading during baking. This trick is perfect for last‑minute baking or when you need a batch ready in a hurry.
Creative Twists and Variations
This recipe is a playground. Here are some of my favorite ways to switch things up:
Chocolate‑Dusted Snowballs
Swap the powdered sugar for cocoa powder mixed with a touch of powdered sugar. The result is a dark, chocolatey coating that still feels airy. Perfect for chocolate lovers who want a sweeter, richer cookie.
Almond‑Infused Delight
Add a tablespoon of almond extract to the dough and sprinkle chopped toasted almonds on top before baking. The almond flavor pairs beautifully with the buttery base and adds a delightful crunch.
Citrus‑Zest Surprise
Incorporate the zest of one orange or lemon into the dough and dust the finished cookies with a mixture of powdered sugar and a pinch of the same zest. The citrus brightens the flavor and adds a subtle zing.
Maple‑Honey Blend
Replace half of the granulated sugar with maple syrup and add a splash of honey to the dough. This sweet combo gives the cookies a deep, caramelized flavor that’s truly irresistible.
Salted Caramel Crunch
Drizzle melted caramel over the cooled cookies and sprinkle with a pinch of sea salt. The caramel coating adds a sweet, buttery layer while the sea salt provides a contrasting bite.
Nutty Swirl
Fold in chopped walnuts or pecans into the dough before rolling into spheres. The nuts add a crunchy texture and a nutty aroma that complements the buttery base.
Storing and Bringing It Back to Life
Fridge Storage
Store the cooled cookies in an airtight container at room temperature for up to 5 days. If you’re in a humid climate, keep the container in the fridge to prevent the powdered sugar coating from softening. The cookies maintain their crisp edges and airy centers when stored properly.
Freezer Friendly
For longer storage, place the cooled cookies on a parchment‑lined tray and freeze them for up to 3 months. Once frozen, transfer the cookies to a sealed freezer bag. When ready to enjoy, let them thaw at room temperature for 15 minutes before serving.
Best Reheating Method
To revive the cookies, preheat your oven to 300°F (150°C) and bake the frozen cookies for 5–7 minutes. If you prefer a quicker method, microwave them on low for 10–15 seconds, but be careful not to overheat. A tiny splash of water before reheating helps steam the cookies back to their original softness.