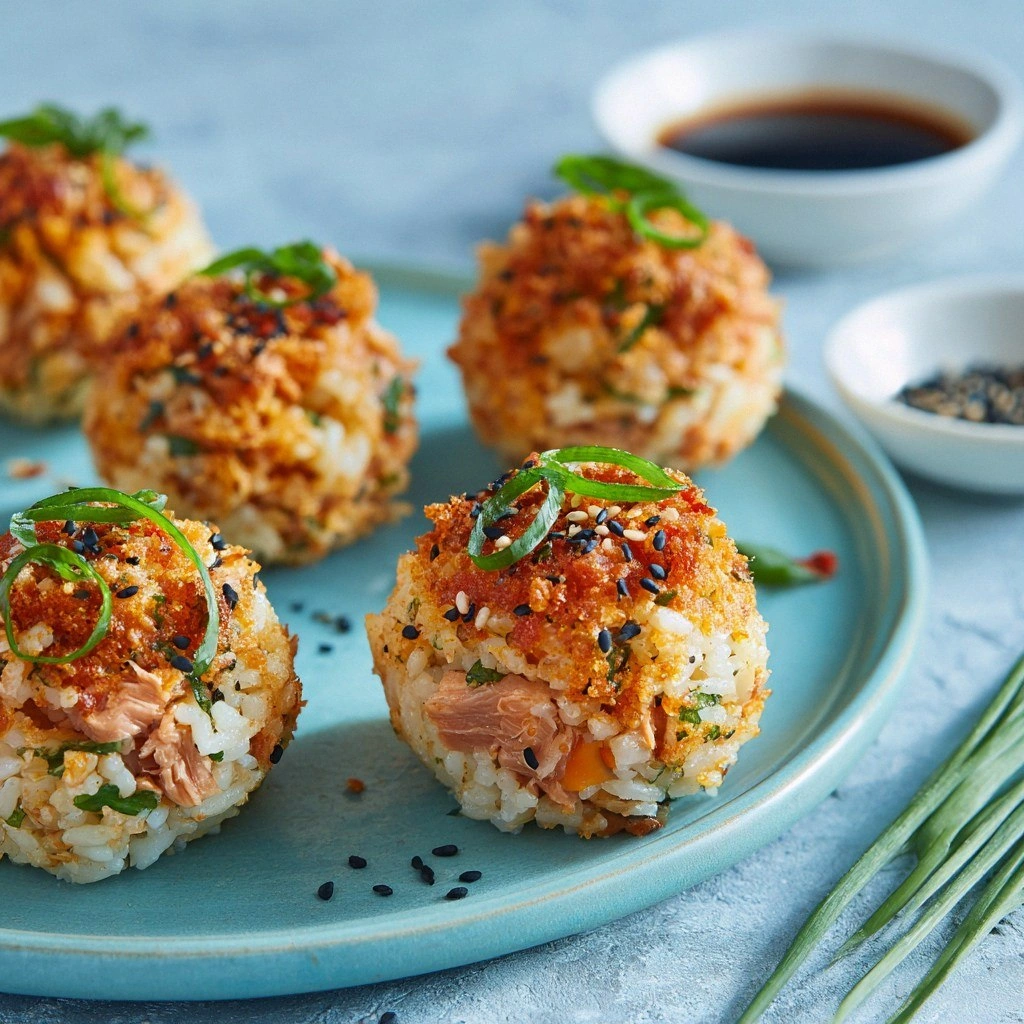
I was in a kitchen that looked like a sushi disaster zone, with rice sticking to the pot and tuna spilling over the edge of the bowl. I stared at the soggy mess and thought, “If this is how you make sushi, why am I still here?” That moment sparked a dare from my friend: “Show me how to turn that chaos into bite‑size fireworks.” I took that challenge, flipped through a thousand recipes, and ended up with a version that has become a staple for any midnight craving or pre‑party snack.
Picture this: a burst of bright orange tuna, a whisper of heat, and a crunchy snap that makes your taste buds do a little dance. The aroma of toasted sesame and subtle citrus lingers, mingling with the faint scent of seaweed. The texture is a perfect balance—soft rice wrapped in a slightly crisp exterior, with a silky tuna filling that melts in your mouth. When you take a bite, the heat from the sriracha lingers just enough to keep you coming back for more, while the subtle sweetness of mayo and rice vinegar keeps it grounded and approachable.
What makes this version stand out? It’s the simplicity of the technique and the precision of the flavor layers. I’ve stripped away the extra steps that most recipes drag on with, focusing instead on a single, foolproof method that guarantees consistency. The tuna is seasoned just right—neither too salty nor too spicy—so it sings with every bite. And the final touch? A dusting of toasted sesame that adds a nutty finish and a satisfying crunch that makes the whole experience feel complete.
I’ll be honest, the first batch was a mess—too much mayo, a little too much heat—but that’s how you learn. I’ve tweaked the ratios, perfected the rolling technique, and now I’m ready to walk you through every single step. By the end, you’ll wonder how you ever made it any other way. Let me walk you through every single step — by the end, you'll wonder how you ever made it any other way.
What Makes This Version Stand Out
- Taste: The sauce balances spicy, sweet, and umami, creating a complex flavor profile that satisfies the palate without overwhelming it. It’s the kind of taste that keeps people asking for seconds.
- Texture: The rice forms a tender base, the tuna remains moist, and the nori provides a subtle crunch—each bite delivers a layered mouthfeel.
- Speed: With a prep time under 20 minutes, this recipe is ideal for a quick snack or an impressive appetizer that doesn’t require a Michelin‑star kitchen.
- Versatility: Swap in different proteins or adjust the heat level to cater to any crowd, from kids to spice lovers.
- Make‑Ahead: The balls keep well in the fridge for up to 48 hours, making them perfect for parties or meal prep.
- Ingredient Quality: By using fresh tuna and premium rice, the dish elevates simple pantry staples into a gourmet experience.
Alright, let's break down exactly what goes into this masterpiece. I dare you to taste this and not go back for seconds.
Inside the Ingredient List
The Flavor Base
Sushi rice is the backbone of any sushi creation. The sticky yet fluffy texture of short‑grain rice gives the balls their cohesive structure. If you skip the rice, you’ll end up with a loose, unruly mess that won’t hold together. Use a rice cooker or a heavy‑bottomed pot to ensure even cooking. The key is to rinse the rice until the water runs clear, which removes excess starch and prevents a gummy outcome.
Rice vinegar, sugar, and salt form the sweet‑sour seasoning that brightens the rice’s flavor. The vinegar’s acidity cuts through the richness of the tuna, while the sugar balances the heat. If you forget the sugar, the rice will taste overly sharp and dry. For a gluten‑free twist, replace the sugar with honey or maple syrup, adjusting the quantity to taste.
The Texture Crew
Canned tuna is the star of the show. It’s convenient, shelf‑stable, and delivers a clean, meaty flavor that pairs perfectly with the spicy mayo. If you prefer fresh tuna, use sashimi‑grade fish, but remember to keep it chilled to avoid spoilage. Draining the tuna ensures the mixture isn’t watery, which would make the balls soggy.
Mayonnaise provides body and creaminess, acting as a binder that keeps the tuna together. A light hand is key—too much mayo will make the balls greasy. You can experiment with flavored mayo (wasabi or chipotle) for a subtle twist. If you’re avoiding dairy, a vegan mayo works just as well, but be mindful of the texture.
The Unexpected Star
Sriracha sauce is the secret weapon that brings heat and depth. Its sweet‑smoky profile balances the sharpness of the tuna and the tang of the rice. Use it sparingly at first; you can always add more later. If you’re a heat connoisseur, replace sriracha with fresh chili flakes or a dash of cayenne for an extra kick.
Sesame oil adds a nutty aroma that elevates the overall flavor. It also helps the rice set, preventing it from becoming too sticky. A drizzle at the end of the mixing process is enough—too much will overpower the delicate balance of flavors. For a lighter version, substitute with toasted sesame seeds for a crunchy finish.
The Final Flourish
Nori sheets add a subtle umami bite and help hold the balls together. Cut them into thin strips to prevent tearing during rolling. If you’re not a fan of seaweed, skip it or use a thin sheet of parchment paper to wrap the rice. The final touch—chopped scallions and sesame seeds—adds freshness and a pop of color that makes the dish visually appealing.
Everything's prepped? Good. Let's get into the real action.
The Method — Step by Step
- Begin by cooking the sushi rice according to the package instructions, using a ratio of 1 part rice to 1.25 parts water. Once cooked, transfer the rice to a large bowl and let it cool slightly. While it’s still warm, drizzle the rice vinegar, sugar, and salt mixture evenly over the rice. Use a wooden spoon to fold the seasoning in gently, ensuring the rice is coated without smashing it. The goal is a glossy, slightly sticky surface that holds together.
- In a separate bowl, combine the drained tuna, mayonnaise, sriracha, soy sauce, and a splash of sesame oil. Mix until the tuna is evenly coated and the mixture feels smooth but not runny. Taste and adjust the heat or saltiness as needed. For a smoky twist, add a teaspoon of smoked paprika.
- Lay a sheet of plastic wrap on a flat surface. Place a handful of rice onto the wrap, spreading it into a thin, even layer. The rice should be about 1–1.5 inches thick—just enough to form a base without becoming too heavy. The plastic wrap will help you roll the ball without sticking.
- Spoon a generous amount of the tuna mixture onto the center of the rice layer. Add a sprinkle of chopped scallions and a dash of sesame seeds. This layering ensures each bite has a burst of flavor and a hint of crunch.
- Roll the plastic wrap tightly around the rice and tuna, forming a compact ball. Seal the edge by pressing lightly and twisting the wrap. Let the ball rest for a minute to firm up before removing the wrap. If you prefer a more authentic look, wrap the ball in a thin nori strip before serving.
- Repeat the rolling process until all the rice and tuna mixture are used. Arrange the finished balls on a chilled plate to keep them firm. Garnish with extra sesame seeds and a few nori strips for an elegant presentation.
- Serve immediately, or store in an airtight container in the refrigerator for up to 48 hours. For the freshest experience, keep the balls chilled until just before serving.
That's it — you did it. But hold on, I've got a few more tricks that'll take this to another level. I’ll be honest, the first time I tried this, my hands were slick with rice, and the balls kept sliding. I learned that a little sesame oil on the palms makes a world of difference.
Insider Tricks for Flawless Results
The Temperature Rule Nobody Follows
Rice should be warm, not hot, when you mix in the seasoning. Warm rice allows the flavors to meld without cooking the tuna. If the rice is too hot, the mayo can melt, leading to a greasy texture. Keep the rice at a comfortable room temperature, and if it feels too dry, add a splash of water.
Why Your Nose Knows Best
Smell the tuna mixture before adding it to the rice. A fresh tuna aroma indicates quality, while a sour or off smell is a red flag. If the tuna smells off, discard it. A good nose can save you from a disastrous batch.
The 5-Minute Rest That Changes Everything
After rolling, let the balls sit for five minutes. This rest period allows the rice to settle and the flavors to marry. Skipping this step often results in loose, uneven balls that crumble.
Use a Rice Cooker for Consistency
A rice cooker eliminates the guesswork of stovetop cooking. It ensures the rice is cooked evenly and retains the ideal moisture level. If you don’t have one, a heavy‑bottomed pot with a tight‑fitting lid works just fine.
Chill the Filling for Easier Rolling
Place the tuna mixture in the refrigerator for 15 minutes before rolling. This chilling step firms the mixture, making it easier to shape without sticking to the rice.
Creative Twists and Variations
This recipe is a playground. Here are some of my favorite ways to switch things up:
Spicy Salmon Sushi Balls
Swap tuna for fresh salmon and add a splash of lime juice. The citrus brightens the flavor and pairs beautifully with the salmon’s natural oiliness. Serve with a side of wasabi for an extra kick.
Veggie‑Only Temari
Replace the tuna with diced avocado, cucumber, and carrot. Toss the vegetables with a light soy‑sesame dressing. This version is perfect for vegetarians and adds a refreshing crunch.
Thai‑Inspired Balls
Mix in coconut milk, fish sauce, and fresh lime zest. The tropical flavors bring a new dimension to the classic sushi ball. Garnish with fresh cilantro for an aromatic finish.
Cheese‑Infused Bites
Add a tablespoon of cream cheese to the tuna mixture for a creamy twist. The cheese adds richness and a subtle tang that complements the spicy mayo.
Ginger‑Sriracha Fusion
Blend finely grated ginger into the tuna mixture along with sriracha. The ginger’s peppery heat balances the sriracha, creating a complex flavor profile that’s both spicy and aromatic.
Storing and Bringing It Back to Life
Fridge Storage
Store the sushi balls in a sealed container in the refrigerator for up to 48 hours. Keep them on a chilled plate to maintain firmness. Avoid stacking the balls to prevent crushing.
Freezer Friendly
Wrap each ball tightly in plastic wrap and place them in a freezer bag. Freeze for up to 2 weeks. Thaw overnight in the refrigerator before serving. The texture remains firm, and the flavors stay vibrant.
Best Reheating Method
To revive the sushi balls, add a splash of water to a skillet, heat over medium, and place the balls in the pan. Cover and steam for 2–3 minutes. The steam restores moisture without drying out the rice or tuna.