I still remember the day my neighbor dropped off a grocery bag the size of a toddler filled with zucchini she'd grown in her backyard. I stood there holding this green monster bounty, wondering if she secretly hated me. What on earth was I supposed to do with seventeen pounds of zucchini before they turned into mush on my counter? That night, I started researching like my life depended on it, and somewhere between zucchini bread recipes that would feed a small army and a questionable chocolate-zucchini cake, I stumbled upon the holy grail of summer preservation: sweet zucchini relish. Let me tell you, this discovery changed my entire perspective on the humble summer squash.
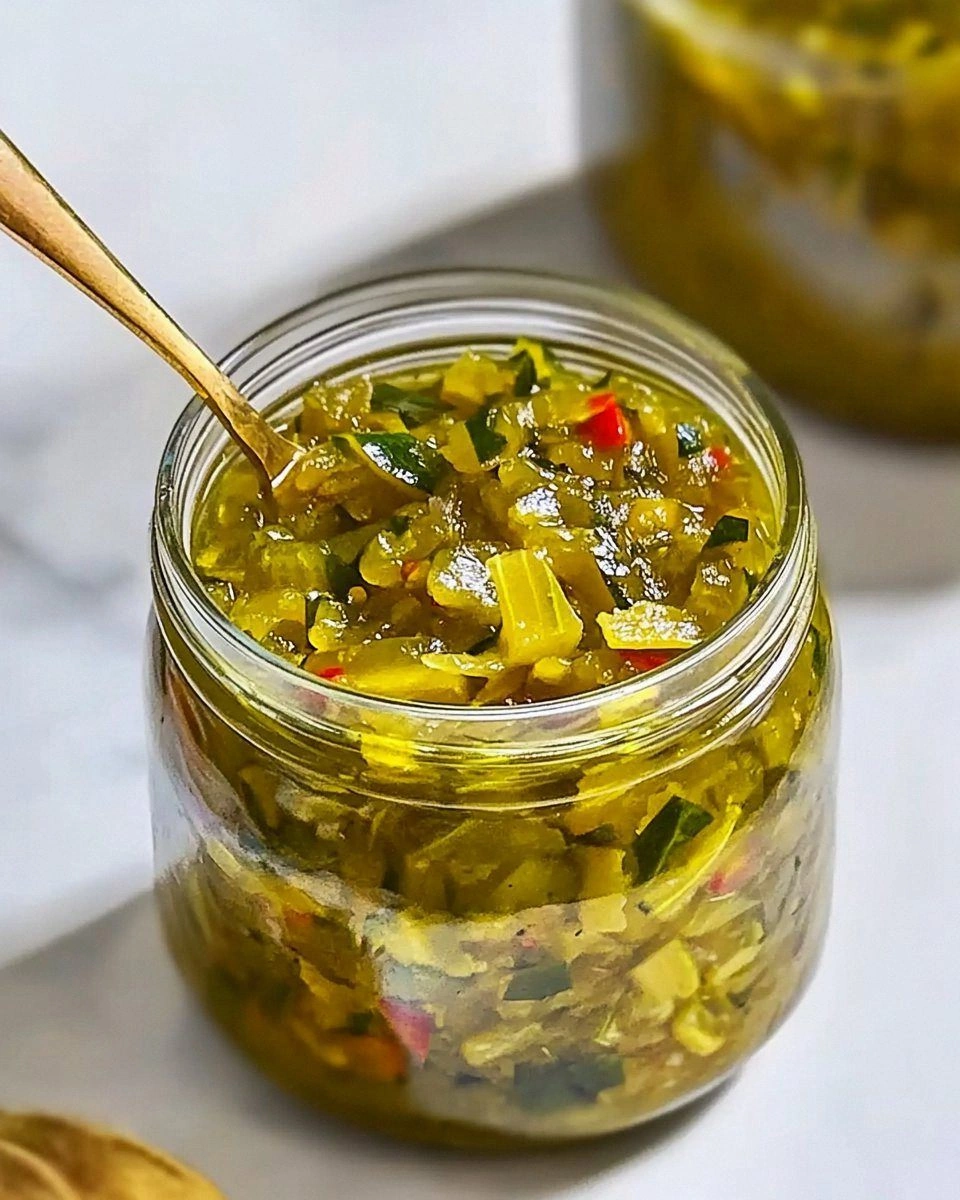
Most people think of relish as that neon green hot-dog topping that comes from a plastic squeeze bottle, but once you taste this golden, jewel-toned sweet zucchini relish, you'll understand why I now pray for overzealous gardeners to unload their bumper crops on me. The transformation is nothing short of magical — shredded zucchini, swimming in a bath of tangy vinegar, warm spices, and just enough sweetness to make your taste buds dance. The first time I cracked open a jar after letting it mellow for a week, I caught myself eating it straight from the spoon like some kind of relish-deprived maniac. My family staged an intervention when they found me standing at the fridge at midnight, absent-mindedly scooping it onto everything from scrambled eggs to vanilla ice cream (don't knock it till you try it).
What makes this version completely different from any other relish you've tasted is the way we coax out the zucchini's natural sweetness while taming that sometimes aggressive grassy flavor that puts people off. Through a simple salt-drawing technique that I learned from my grandmother's ancient church cookbook, we transform what could be a watery, bland condiment into something that makes professional chefs ask for the recipe. The texture hits that perfect sweet spot — tender enough to spoon easily but with enough body to give you satisfying little bites in every mouthful. And the flavor? Imagine if bread-and-butter pickles had a sophisticated cousin who studied abroad and came back with complex stories of turmeric and mustard seed adventures.
Stay with me here — this is worth it. By the time we finish, you'll not only have mastered the art of transforming summer's most prolific vegetable into a pantry staple that'll make you the hero of every backyard barbecue, but you'll also understand the science behind why this particular combination of ingredients creates something far greater than the sum of its parts. Let me walk you through every single step — by the end, you'll wonder how you ever made it any other way.
What Makes This Version Stand Out
Before we dive into the chopping and simmering, let me explain why this isn't just another relish recipe collecting digital dust in your bookmarks folder. This is the version that converted my pickle-hating nephew into a relish fanatic and had my condiment-snob cousin begging for jars to give as Christmas gifts. The difference lies in the details that most recipes gloss over, resulting in a watery, one-dimensional spread that tastes like sugared vinegar with vegetable bits floating in it.
Flavor Complexity: While most recipes rely on a simple combination of vinegar, sugar, and basic pickling spices, we build layers of flavor using a technique called blooming spices — toasting whole seeds in oil until they pop and release their essential oils. This creates a depth that makes people pause mid-bite, trying to identify the warm, toasty notes that make this relish addictive. The turmeric doesn't just provide color; we use it strategically to balance the sweetness and add an earthy backbone that keeps the relish from tasting like candy.
Perfect Texture: Nobody wants to spread relish and have it slide off their burger like green slime. Our method of salting and draining the zucchini removes excess moisture while maintaining a pleasant crunch. The result is a relish that clings to food instead of pooling sadly on the plate. Each spoonful delivers a satisfying mix of tender zucchini bits, crisp onion, and bell pepper that provides textural interest without overwhelming the palate.
Balanced Sweetness: Many recipes go overboard with sugar, creating something closer to zucchini jam than relish. We use a combination of white and brown sugar, with the brown sugar providing caramel notes that complement the vinegar's acidity. The sweetness enhances rather than masks the vegetables' natural flavors, creating a harmonious balance that works equally well on grilled meats, sandwiches, or as a glaze for roasted vegetables.
Make-Ahead Magic: Here's where this recipe really shines — it actually improves with age. While you can certainly dig in after the initial 24-hour rest, the flavors meld and deepen over weeks, even months. I recently found a jar hidden behind some pickles that had been aging for eight months, and it was like discovering liquid gold. The transformation from bright and zippy to complex and sophisticated makes this the perfect make-ahead condiment for gift-giving or emergency flavor-boosting needs.
Zero Waste Hero: Those enormous baseball-bat zucchinis that everyone jokes about? They're perfect for this recipe. The oversized seeds and tough skin that make them terrible for other preparations get removed anyway, so you can finally use up those garden monsters instead of sneaking them onto neighbors' porches under cover of darkness. Even better, the recipe scales beautifully, so you can process five pounds or fifty pounds with equal success.
Canning Confidence: Unlike many refrigerator pickle recipes that leave you worried about botulism, this relish is properly acidified for safe water-bath canning. The combination of vinegar, sugar, and salt creates an environment where harmful bacteria can't survive, giving you shelf-stable jars that'll last for a year in your pantry. There's something deeply satisfying about lining up gleaming jars of homemade relish, knowing you've captured summer's abundance for winter enjoyment.
Alright, let's break down exactly what goes into this masterpiece...
Inside the Ingredient List
Understanding why each ingredient matters transforms you from a recipe follower into a kitchen wizard who can adapt and troubleshoot with confidence. Every component in this relish plays multiple roles, creating a symphony of flavors that'll have you wondering why you ever settled for store-bought condiments. Let me walk you through each group so you understand not just what to add, but why it matters and what happens if you decide to get creative with substitutions.
The Flavor Foundation
Zucchini forms the backbone of our relish, but not just any zucchini will do. You want firm, fresh specimens without soft spots or wrinkles. The size actually matters here — those massive zucchini that got away from you in the garden are perfect because they've developed a stronger flavor that stands up to the pickling process. If all you have are small, tender zucchini, that's fine too, but you'll want to salt them a bit longer to draw out excess moisture and concentrate their mild flavor. Skip the spongy, old zucchini that's been languishing in your crisper drawer; it'll turn to mush and give your relish an unpleasant musty taste.
Onions provide the aromatic base that makes this relish savory enough to serve with dinner instead of just brunch. Yellow onions are my go-to because they balance sweetness and pungency perfectly, but red onions add a gorgeous pop of color if you want visual appeal. The key is dicing them small enough that they distribute evenly throughout the relish but not so tiny that they disappear entirely. If you're sensitive to onions, try soaking the diced pieces in ice water for ten minutes before adding them to the mix — this tames their bite while maintaining their essential onion-ness.
Bell peppers bring more than just color to the party. Green peppers add a slightly bitter edge that keeps the relish from becoming cloyingly sweet, while red or yellow peppers contribute natural sweetness and visual appeal. I like using a mix for the most complex flavor profile, but use what you have or what your family prefers. The secret is roasting the peppers briefly under the broiler until the skin blisters and blackens in spots; this adds a subtle smoky depth that takes the relish from good to unforgettable.
The Tangy Team
Vinegar is the unsung hero of any pickled product, and this relish is no exception. I use a combination of apple cider vinegar for its fruity complexity and white vinegar for its clean, sharp bite. The two balance each other beautifully, creating an acidity that preserves the vegetables while adding brightness to every bite. Don't even think about reducing the vinegar amount — it's crucial for both flavor and food safety. If you must adjust, you can play with different vinegar varieties like white wine or rice vinegar, but keep the total acidity level the same.
Salt does far more than just season the relish — it's essential for drawing moisture out of the vegetables, creating the perfect texture. Kosher salt is my preference because its larger crystals dissolve evenly and don't contain anti-caking agents that can make your relish cloudy. The initial salting step might seem excessive, but trust the process. Those two hours of salt-drawing time concentrate the zucchini's flavor while removing excess water that would otherwise dilute your beautiful relish into a sad, watery mess.
The Spice Squad
Mustard seeds provide tiny pops of nutty, earthy flavor that make each bite interesting. I use a combination of yellow and brown mustard seeds for the best flavor complexity. Yellow seeds are milder and add a pleasant crunch, while brown seeds pack more heat and pungency. Don't substitute ground mustard — it dissolves into the liquid and creates a muddy, overly sharp flavor that overwhelms the delicate balance we're creating. The seeds stay intact, releasing their flavor slowly as you chew.
Celery seed might seem like an odd addition, but it's the secret ingredient that makes people ask "what's in this?" in the best possible way. It adds an earthy, slightly bitter note that grounds the sweetness and makes the relish taste more sophisticated. If you don't have celery seed, you can use a small amount of finely minced celery leaves, but the seed's concentrated flavor is really what makes this special. Don't skip it unless you absolutely must — your relish will taste flat and one-dimensional without this crucial background note.
Turmeric does more than turn everything it touches a gorgeous golden hue. It adds an earthy, slightly bitter complexity that balances the sweetness and makes the relish taste more grown-up. The key is adding it at the right time — too early and it becomes bitter, too late and it tastes raw. I bloom it briefly in hot oil with the other spices to unlock its full flavor potential and eliminate any chalky aftertaste.
The Sweetness Balancers
White sugar provides clean sweetness that lets the vegetable flavors shine through, while brown sugar adds caramel notes and a hint of molasses that makes the relish taste more complex. The combination creates a sweetness that's multi-dimensional rather than just sugary. You can adjust the ratio to your taste — more brown sugar for a deeper, more caramel-like flavor, or more white for a brighter, cleaner sweetness. Just don't reduce the total sugar amount too much, as it helps with preservation as well as flavor.
Sometimes I'll add a tablespoon of honey for extra complexity, especially if I'm making this as gifts. The honey adds floral notes that make people wonder what makes this version special. Maple syrup works too, adding a subtle smoky sweetness that pairs beautifully with grilled meats. These additions are optional but can take your relish from excellent to extraordinary when you're trying to impress.
Everything's prepped? Good. Let's get into the real action...
The Method — Step by Step
Now we're getting to the good part where vegetables transform into liquid gold through the magic of heat, acid, and patience. This process might seem lengthy, but most of it is hands-off time where the salt does its work or the relish simmers away while you binge-watch your favorite show. Each step builds on the last, creating layers of flavor that make this relish absolutely irresistible. Don't rush any steps — this is where we separate the good relish from the legendary stuff that people hoard and hide from family members.
-
Start by washing your zucchini thoroughly, even if you grew them yourself and know they're organic. Those little prickles on the skin can harbor dirt, and nobody wants gritty relish. Trim the ends and any blemishes, but leave the skin on for color and nutrients. Using the large holes of a box grater or the shredding disc of your food processor, shred the zucchini into a large, non-reactive bowl. You should have about 8 cups of shredded zucchini for a standard batch, but don't stress if you're a cup short or over — this recipe is forgiving. Add the diced onions and bell peppers now, mixing them gently with your hands to distribute evenly.
The size of your shred matters more than you'd think. Too fine and you'll end up with mushy relish that disappears into whatever you're serving it on. Too coarse and it won't have that spoonable quality that makes relish so versatile. I aim for shreds about the size of matchsticks — substantial enough to provide texture but small enough to blend well with the other vegetables. If you're using those giant zucchini, remove the seeds first by cutting them in half lengthwise and scooping out the spongy center with a spoon.
Now for the magic step that separates amateur relish from professional quality: salt your vegetables generously and let them sit. I use about 1/4 cup of kosher salt for 8 cups of vegetables, sprinkling it evenly and tossing to coat. This isn't just for seasoning — the salt draws out excess moisture that would otherwise dilute your relish into a watery mess. Cover the bowl with a clean kitchen towel and let it sit at room temperature for at least 2 hours, or up to 4 hours if you have the time. You'll be amazed at how much liquid accumates in the bottom of the bowl.
-
After the salting period, it's time to squeeze out all that excess moisture. This step is crucial for achieving the perfect texture, so don't skip it or get lazy. Working in batches, grab handfuls of the salted vegetables and squeeze them firmly over the sink or a bowl. You're not trying to wring them completely dry — just remove enough moisture so they're no longer dripping wet. The vegetables should feel firm and compact after squeezing, almost like they've been partially cooked. Save this vegetable liquid for your compost pile or to add to vegetable broth later.
Here's where many recipes go wrong — they skip the squeezing step and end up with watery, diluted relish that separates in the jar. The salt has done its job of breaking down cell walls and drawing out moisture, but you need to physically remove that liquid for the best results. If your hands get tired (they will), use a clean kitchen towel to wring out larger batches. Just don't use your best linen towel unless you want it permanently stained with turmeric.
Once squeezed, spread the vegetables out on clean kitchen towels and let them air dry while you prepare the pickling liquid. This brief drying period helps ensure your relish won't be watery and gives you time to gather and measure your spices. The vegetables should look significantly reduced in volume — you'll have about half as much as you started with, which is exactly what you want. This concentration of flavor is what makes this relish so intensely delicious.
-
Time to bloom your spices, which is chef-speak for toasting them in oil to unlock their full flavor potential. Heat a large, heavy-bottomed pot over medium heat and add a tablespoon of neutral oil like canola or grapeseed. Once the oil shimmers, add your mustard seeds and wait for them to start popping — this sounds like tiny fireworks and smells absolutely incredible. Add the celery seed and turmeric, stirring constantly for about 30 seconds until fragrant. This brief toasting removes any raw spice taste and adds depth that you can't achieve by just dumping everything in together.
The timing here is everything — too short and your spices taste flat and dusty, too long and they turn bitter and acrid. You want to toast them just until they smell nutty and aromatic, which happens quickly. If you're new to blooming spices, err on the side of under-toasting rather than over-toasting. You can always add a pinch more later, but you can't un-burn spices that have turned bitter and black.
Immediately add your drained vegetables to the pot once the spices are fragrant. The hot oil helps the vegetables absorb the spice flavors while preventing the turmeric from turning bitter. Stir well to coat everything evenly with the oil and spices — your kitchen should smell like a spice market at this point. Cook for about 5 minutes, stirring occasionally, until the vegetables start to soften and the onions become translucent. This initial cooking helps meld the flavors and gives your relish a head start on the pickling process.
-
Now we add the liquids that will transform our spiced vegetables into proper relish. Pour in your vinegar mixture — I combine apple cider vinegar with white vinegar for the best balance of flavor and acidity. Add the sugars, salt, and any additional seasonings like red pepper flakes for heat or a bay leaf for extra complexity. The liquid should just barely cover the vegetables; if it doesn't, add a splash more vinegar rather than water, which would dilute the acidity needed for safe preservation.
Bring the mixture to a boil over medium-high heat, stirring occasionally to dissolve the sugar and prevent sticking. Once boiling, reduce the heat to maintain a gentle simmer — you want lazy bubbles, not a rolling boil that will turn your vegetables to mush. The relish needs to simmer for about 30-40 minutes, stirring occasionally, until it thickens and the vegetables become tender but still retain some texture. Your kitchen will smell absolutely incredible during this time.
About halfway through cooking, taste your relish and adjust the seasoning. This is your chance to balance the sweet and sour elements to your preference. If it's too sweet, add a splash more vinegar. Too tart? A bit more sugar will balance it out. Remember that the flavors will continue to develop and meld as the relish cools and ages, so aim for slightly more intense flavors than you want in the final product. The relish should be thick enough to mound on a spoon but still spoonable — think Greek yogurt consistency rather than jam.
-
While your relish simmers, prepare your canning jars and equipment if you plan to preserve your relish. Even if you're just making a refrigerator batch, properly sterilized jars prevent unwanted bacteria from spoiling your hard work. Wash jars in hot, soapy water and rinse well, then place them in a pot of water and bring to a simmer. Keep them hot until you're ready to fill them — thermal shock from hot relish hitting cold glass can cause jars to crack, creating a spectacular mess and potentially dangerous situation.
Don't forget about your lids and rings! These need to be clean but don't require the same level of sterilization as the jars since they'll only contact the surface of the relish. Place them in a small saucepan of water and heat just until steaming — boiling can damage the sealing compound and prevent proper sealing. Some newer lid manufacturers say this step isn't necessary, but I still do it out of habit and for peace of mind. Better safe than sorry when it comes to preserving your delicious relish.
As your relish approaches doneness, prepare a water bath canner if you're preserving the full batch. Fill your canner about halfway with water and bring it to a simmer. You'll need enough water to cover the jars by at least an inch, but don't fill it completely yet — you'll be adding the filled jars, which will displace quite a bit of water. Having everything ready before your relish finishes cooking prevents the panic of trying to sterilize equipment while hot relish waits and potentially overcooks.
-
The relish is ready when it has thickened slightly and the vegetables are tender but still have some texture. A good test is to drag your spoon across the bottom of the pot — the relish should part briefly, revealing the pot bottom before slowly flowing back together. Another indicator is sheen: properly cooked relish has a glossy appearance rather than looking dull and watery. The color should be a deep, golden amber with flecks of green and red from the vegetables. Turn off the heat and let the relish rest for about 5 minutes; this brief rest prevents the vegetables from floating to the top of the jars during processing.
Working quickly but carefully, ladle the hot relish into your prepared jars, leaving about 1/2 inch of headspace at the top. This space allows for expansion during processing and creates the vacuum seal that keeps your relish safe. Use a clean, damp paper towel to wipe the jar rims — any relish on the rim can prevent proper sealing. Place the lids on the jars and screw on the rings until they're fingertip-tight; overtightening can prevent air from escaping during processing, leading to seal failure.
Process the jars in your water bath canner for 10 minutes (adjusting for altitude if necessary), then remove them carefully and place them on a towel-covered counter to cool. As they cool, you'll hear satisfying "ping" sounds as the lids seal — music to any canner's ears! Let the jars cool completely for 12-24 hours before testing the seals and storing them. Any jars that don't seal properly can be refrigerated and used within a month, so don't panic if one or two fail to seal.
That's it — you did it. But hold on, I've got a few more tricks that'll take this to another level...
Insider Tricks for Flawless Results
After making batch after batch of this relish (and yes, eating most of it straight from the jar), I've discovered some game-changing techniques that elevate this from excellent to absolutely transcendent. These aren't the kind of tips you'll find in most recipes — they're the hard-won wisdom that comes from slightly overcooking a batch, forgetting an ingredient, or experimenting on a whim and stumbling upon brilliance. Trust me on these — your taste buds will thank you.
The Temperature Rule Nobody Follows
Here's the thing about making relish that separates the pros from the amateurs: temperature control matters more than you think. When you're simmering your relish, keep the heat low enough that you see gentle bubbles breaking the surface, not a vigorous boil that throws vegetable bits everywhere. This gentle heat allows the vegetables to cook evenly without turning to mush, while the liquid reduces slowly and concentrates flavors. If you crank the heat to speed things up, you'll end up with scorched relish stuck to the bottom of your pot and vegetables that disintegrate into an unappetizing sludge.
The same principle applies when you're processing your jars. Start with hot relish in hot jars, then lower them into simmering (not boiling) water. The gradual temperature change prevents thermal shock that can crack jars and waste all your hard work. Once all jars are in the canner, then bring it up to a full boil for processing. This patience pays off with perfectly sealed jars and no heartbreaking explosions of shattered glass and wasted relish.
Why Your Nose Knows Best
Don't underestimate the power of your sense of smell when making this relish. The toasting spices should smell warm and nutty, never acrid or burnt. When you add the vegetables, they should smell fresh and slightly sweet, never sulfurous or off. As the relish simmers, your kitchen should fill with an aroma that's tangy, sweet, and complex — if it smells flat or one-dimensional, you probably need to adjust your seasoning. I've learned to trust my nose completely, and it's saved me from many batches that could have been disasters.
The relish is ready when your kitchen smells like the best deli you've ever visited, with layers of spice, vinegar, and sweetness mingling in the air. If you're unsure whether the relish is properly reduced, smell it — properly cooked relish has an intense, concentrated aroma that makes your mouth water. Undercooked relish smells watery and weak, while overcooked relish smells sharp and bitter. Your nose knows, so listen to it.
The 5-Minute Rest That Changes Everything
After your relish finishes simmering, resist the urge to immediately jar it up. Let it rest off the heat for about 5 minutes, stirring occasionally. This brief rest allows the vegetables to absorb some of the liquid back, creating a better texture and preventing them from floating to the top of your jars. It also lets the temperature come down slightly, which reduces the risk of thermal shock when you ladle it into jars. This tiny patience investment pays huge dividends in the final product.
During this rest, you'll notice the relish thickening slightly as the vegetables continue to absorb liquid and the pectin in the vegetables has a chance to activate. It's like the difference between eating immediately after cooking versus letting a stew rest — the flavors meld and the texture improves dramatically. Use this time to prepare your canning area and double-check that your jars are ready to go.
Creative Twists and Variations
This recipe is a playground. Here are some of my favorite ways to switch things up:
Smoky Chipotle Version
Add a single chipotle pepper in adobo sauce, minced finely, to the spice-blooming step. The smoke and heat transform this into a relish that's incredible on grilled meats or stirred into mayonnaise for a sandwich spread with serious attitude. The chipotle's complexity plays beautifully with the sweet-tart base, creating something that tastes like it came from a gourmet restaurant. Start with half a pepper if you're heat-sensitive — you can always add more, but you can't take it out once it's in there.
Tropical Pineapple Zucchini Relish
Replace half the bell pepper with finely diced fresh pineapple for a tropical twist that's incredible on fish tacos or grilled chicken. The pineapple's natural enzymes help break down the zucchini slightly, creating an even more tender texture. Add a pinch of allspice and nutmeg to complement the tropical flavors. This version is particularly stunning when you use yellow zucchini and red bell pepper for a sunset-colored relish that looks as amazing as it tastes.
Indian-Inspired Curry Relish
Bloom curry powder, cumin seeds, and a pinch of asafoetida with the other spices for an Indian-inspired version that's incredible mixed into rice or as a condiment for curry dishes. Add a handful of golden raisins during the last 10 minutes of cooking for little bursts of sweetness. The curry spices transform this from a standard American condiment into something that tastes like it came from a Mumbai street vendor's secret recipe collection.
Honey-Ginger Asian Fusion
Replace the brown sugar with honey and add a thumb-sized piece of fresh ginger, grated finely. A splash of rice vinegar in place of some of the white vinegar gives it a more delicate acidity. This version is incredible on grilled salmon or mixed into stir-fries for a quick flavor boost. The ginger adds a warming heat that builds slowly, while the honey provides complex floral notes you can't get from regular sugar.
Fire-Roasted Vegetable Relish
Char your bell peppers and onions under the broiler or on a grill before dicing them for a smoky depth that's incredible on burgers or mixed into potato salad. The fire-roasting adds a complex, almost meaty flavor that makes this vegetarian condiment taste incredibly rich and satisfying. A touch of smoked paprika enhances the fire-roasted flavor without overwhelming the fresh vegetables.
Mediterranean Herb Garden
Add fresh oregano, basil, and thyme during the last 5 minutes of cooking for a Mediterranean version that's incredible on lamb or mixed into Greek yogurt for a quick dip. A splash of red wine vinegar in place of some of the white vinegar complements the herbs beautifully. This version tastes like summer in the Mediterranean, with herbaceous notes that make you want to book a flight to Greece immediately.
Storing and Bringing It Back to Life
Proper storage is what separates the canning pros from the amateurs who end up with spoiled food and broken hearts. Whether you're stashing jars in your pantry or hoarding them in the fridge, these techniques ensure your relish stays vibrant, safe, and delicious for months to come. I've learned these lessons through trial, error, and the occasional tragic loss of a precious jar to improper storage.
Fridge Storage
Opened jars of relish will keep for up to 6 weeks in the refrigerator, though honestly, mine never lasts that long. Always use a clean spoon when serving to prevent introducing bacteria that could cause spoilage. If you notice any mold, off smells, or fermentation bubbles, discard the entire jar immediately — when in doubt, throw it out. For best quality, store opened jars towards the front of your fridge where the temperature is most consistent, rather than in the door where temperature fluctuations are more extreme.
Unopened jars that didn't seal properly during canning can be stored in the refrigerator for up to 2 months. Test the seal by pressing the center of the lid — if it pops up and down, it didn't seal and needs refrigeration. These refrigerator jars are perfect for testing your recipe before committing to a full canning session, or for gifting to friends who will use them quickly. Just be sure to label them clearly with the date and "refrigerate" so nobody accidentally stores them at room temperature.
Freezer Friendly
While you can freeze this relish, the texture changes slightly upon thawing — the vegetables become softer and the liquid may separate slightly. For best results, freeze in small portions (like ice cube trays) so you can thaw just what you need. Frozen relish is perfect for cooking into sauces or mixing into cooked dishes where the texture change won't matter. Use within 6 months for best quality, and thaw in the refrigerator overnight rather than at room temperature for food safety.
If you know you'll be freezing some, undercook it slightly so the vegetables retain more texture after freezing and thawing. Leave about 1/2 inch of headspace in freezer containers to allow for expansion, and use freezer-grade containers rather than regular jars, which can crack at freezer temperatures. Thawed relish works beautifully stirred into soups, mixed into meatloaf, or as a cooking ingredient where the softer texture is actually an advantage.
Best Reheating Method
While relish is typically served cold or at room temperature, sometimes you want to warm it slightly to serve with hot dishes. The key is gentle heating that doesn't cook the vegetables further or drive off the volatile aromatics that make the relish so flavorful. Place the desired amount in a small saucepan with a teaspoon of water, cover, and warm over very low heat, stirring occasionally. The water creates steam that gently warms the relish without scorching it.
A microwave works too — just use 50% power in 15-second bursts, stirring between each burst. The goal is just to take the chill off, not heat it thoroughly. Warmed relish is incredible spooned over grilled meats or stirred into hot pasta, where the gentle heat helps release the aromatics and meld flavors with the hot food. Never boil relish after it's been canned — you'll destroy the fresh flavors and turn the vegetables to mush.