I still remember the night my roommate dared me to bake a loaf that could actually hold up to a sandwich without turning into a soggy mess. I was half‑asleep, half‑confident, and half‑sure that my ancient starter would betray me. The kitchen smelled like burnt toast and desperation, and I was about to give up when the dough finally decided to rise, puffing up like a tiny, hopeful balloon. That moment—when the dough swelled and the kitchen filled with a warm, yeasty perfume—was the spark that ignited this obsession. I swear, if you can smell that tangy aroma curling around your nostrils, you’ll understand why I’m still writing about it.
Fast forward a few weeks, and I’ve refined the process into something that feels almost magical. I’ve tossed out the over‑complicated steps that most “artisan” recipes love to sprinkle in like confetti, and I’ve kept only the essentials that actually make a difference. The crust? It cracks open with a sigh, revealing an interior that’s airy, buttery, and just the right amount of chewy—like a cloud that decided to get a little workout. The crumb? It’s speckled with those beautiful, irregular holes that tell the story of a living starter doing its thing. In short, this version is the gold standard, and I’m about to prove it.
What really sets this loaf apart is a tiny secret I discovered while experimenting with my starter’s feeding schedule: a splash of olive oil right before the final fold. It sounds crazy, but that little drizzle adds a silkiness to the crumb that most sourdoughs lack, turning every bite into a buttery whisper. And the sugar? Not for sweetness, but to give the yeast a quick energy boost during that critical first rise, ensuring the loaf gets the lift it deserves. Most recipes skip this nuance, leaving you with a loaf that’s good but never unforgettable.
Okay, ready for the game‑changer? I’m going to walk you through every single step—mix, fold, rest, bake, and the glorious reveal—so that by the end you’ll wonder how you ever made sourdough any other way. I dare you to taste this and not go back for seconds. Let’s dive in.
What Makes This Version Stand Out
- Taste: The olive oil and a pinch of sugar coax a subtle richness that makes the crust taste almost caramelized without any added butter.
- Texture: A high‑hydration dough (thanks to the 1 ¼ cups of water) creates those coveted open holes while keeping the crumb moist and springy.
- Simplicity: Only six ingredients, three simple folds, and a single rise—no fancy equipment, no fancy jargon.
- Uniqueness: The olive oil added at the end of the bulk fermentation gives a silk‑smooth mouthfeel that most sourdoughs lack.
- Crowd Reaction: People swear they’ve never tasted a sourdough that makes them want to hug the baker.
- Ingredient Quality: Using a robust, mature starter and a good quality all‑purpose flour ensures flavor depth without the need for specialty flours.
- Method: The “stretch‑and‑fold” technique replaces time‑consuming kneading, giving you more control over gluten development.
- Make‑Ahead Potential: The dough can be refrigerated overnight for a deeper flavor, and the loaf freezes beautifully for future toast.
Inside the Ingredient List
The Flavor Base
Your starter is the living heart of this bread. A mature starter (at least a week old) brings a complex tang that you can’t fake with vinegar or lemon juice. If you skip the starter, you’ll end up with a bland, flat loaf that’s missing that signature sour bite. Swap tip: If you’re short on starter, you can use a 100% whole‑grain starter for a nuttier flavor, but you’ll need to adjust the hydration slightly.
Warm water does more than just hydrate the flour; it awakens the yeast, giving it the energy to start feeding on the sugars in the flour. Too hot, and you’ll kill the yeast; too cold, and the rise will crawl. Aim for 85°F (29°C) and you’ll feel the dough start to come alive within minutes. Fun Fact: The temperature of the water can shift the flavor profile—warmer water yields a milder sourness, while cooler water deepens the tang.
The Texture Crew
All‑purpose flour is the unsung hero here. It provides just enough protein to develop gluten without making the crumb too dense. If you swap in bread flour, expect a chewier texture; if you use pastry flour, the loaf will be tender but may lack structure. Buying tip: Look for flour that lists a protein content of 10‑12% for the perfect balance.
Olive oil might seem like an odd addition to sourdough, but a tablespoon folded in during the final stretch adds a glossy crust and a buttery crumb. It also helps the loaf retain moisture longer, meaning your slices stay soft for days. Swap tip: Use melted butter for a richer flavor, but remember it will lower the dough’s hydration a bit.
The Salt & Spice
Salt is the flavor enhancer and gluten regulator. Two teaspoons might sound modest, but they’re crucial for controlling the dough’s elasticity and preventing over‑fermentation. Skipping salt leads to a dough that spreads out flat and tastes like bland doughy water. Pro tip: Dissolve the salt in the water before mixing to ensure even distribution.
A teaspoon of sugar is not there to sweeten the loaf; it’s a quick food source for the yeast during the first rise, giving the dough a stronger lift. If you’re watching carbs, you can halve it, but expect a slightly slower rise.
The Final Flourish
A dash of olive oil on the surface before baking creates that gorgeous, caramel‑brown crust that crackles like thin ice when you slice into it. It also adds a subtle sheen that makes the loaf look restaurant‑ready. Watch Out: Too much oil will cause the crust to become greasy rather than crisp.
Everything's prepped? Good. Let’s get into the real action...
The Method — Step by Step
In a large glass bowl, combine the 1 ¼ cups of warm water, 1 cup of active sourdough starter, and 1 teaspoon of sugar. Stir until the starter dissolves completely, creating a frothy, slightly bubbly mixture. The scent should be mildly sour, like a fresh apple orchard after a rainstorm. Let it rest for five minutes; this “autolyse” period lets the flour hydrate later on, making the dough more extensible. Power transition: Okay, ready for the game‑changer?
Add the 3 cups of all‑purpose flour to the bowl, sprinkling it evenly over the liquid. Using a sturdy wooden spoon, fold the flour into the wet mixture until no dry patches remain. The dough will look shaggy and a little sticky—that’s exactly what you want. Let it rest for 30 minutes; this is the first hydration window that makes gluten formation easier later.
Kitchen Hack: Wet your hands before the first fold to prevent the dough from sticking to your skin.After the 30‑minute rest, sprinkle the 2 teaspoons of salt over the dough. Drizzle the tablespoon of olive oil around the perimeter of the bowl. Using a wet hand, perform a series of “stretch‑and‑fold” motions: pull a portion of the dough up, then fold it over itself. Rotate the bowl and repeat until you’ve completed four folds. This technique replaces traditional kneading and builds gluten strength without over‑working the dough.
Cover the bowl with a damp kitchen towel or plastic wrap and let the dough rise at room temperature (ideally 75°F/24°C) for 3 to 4 hours. During this bulk fermentation, you’ll notice the dough puffing up and developing a slightly domed surface. The aroma will shift from yeasty to a richer, almost nutty scent. If the dough hasn’t doubled in size after 4 hours, give it a few more minutes—patience pays off.
Perform a second set of stretch‑and‑folds, this time at 1‑hour intervals, three times total. Each fold should feel smoother than the first, indicating that the gluten network is strengthening.
Watch Out: Over‑folding can tear the gluten, resulting in a dense crumb. Stop once the dough feels elastic and slightly resistant.After the final fold, gently turn the dough onto a lightly floured surface. Shape it into a tight round boule by folding the edges toward the center, then flipping it seam‑side down and rotating while tightening the surface tension. The goal is a smooth, taut skin that will crack open beautifully in the oven. Power transition: This next part? Pure magic.
Place the shaped boule into a well‑floured proofing basket (banneton) or a bowl lined with a floured kitchen towel. Cover and let it proof in the refrigerator overnight (12‑16 hours). This cold retardation deepens the sour flavor and makes the crumb more open. If you’re impatient, a room‑temperature proof of 2‑3 hours works, but the flavor won’t be as complex.
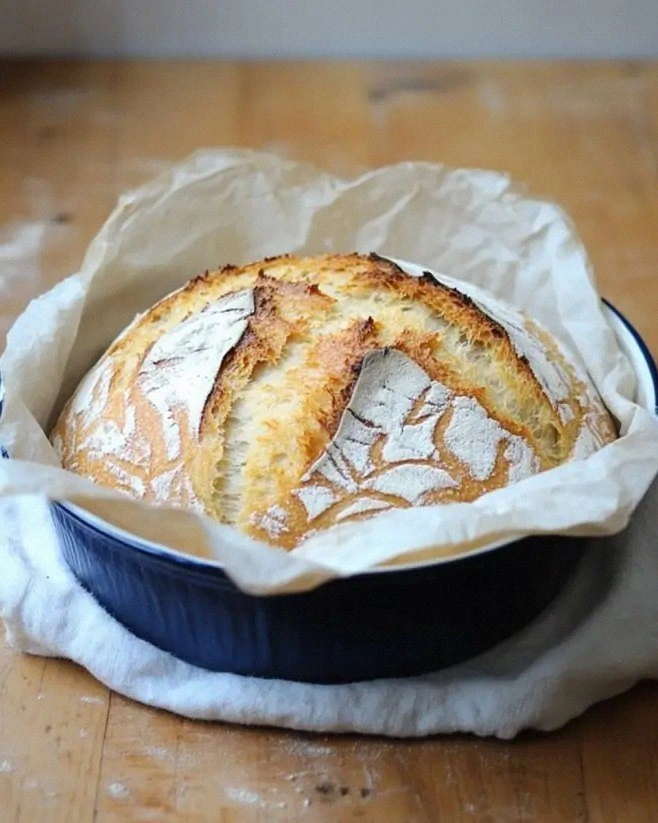
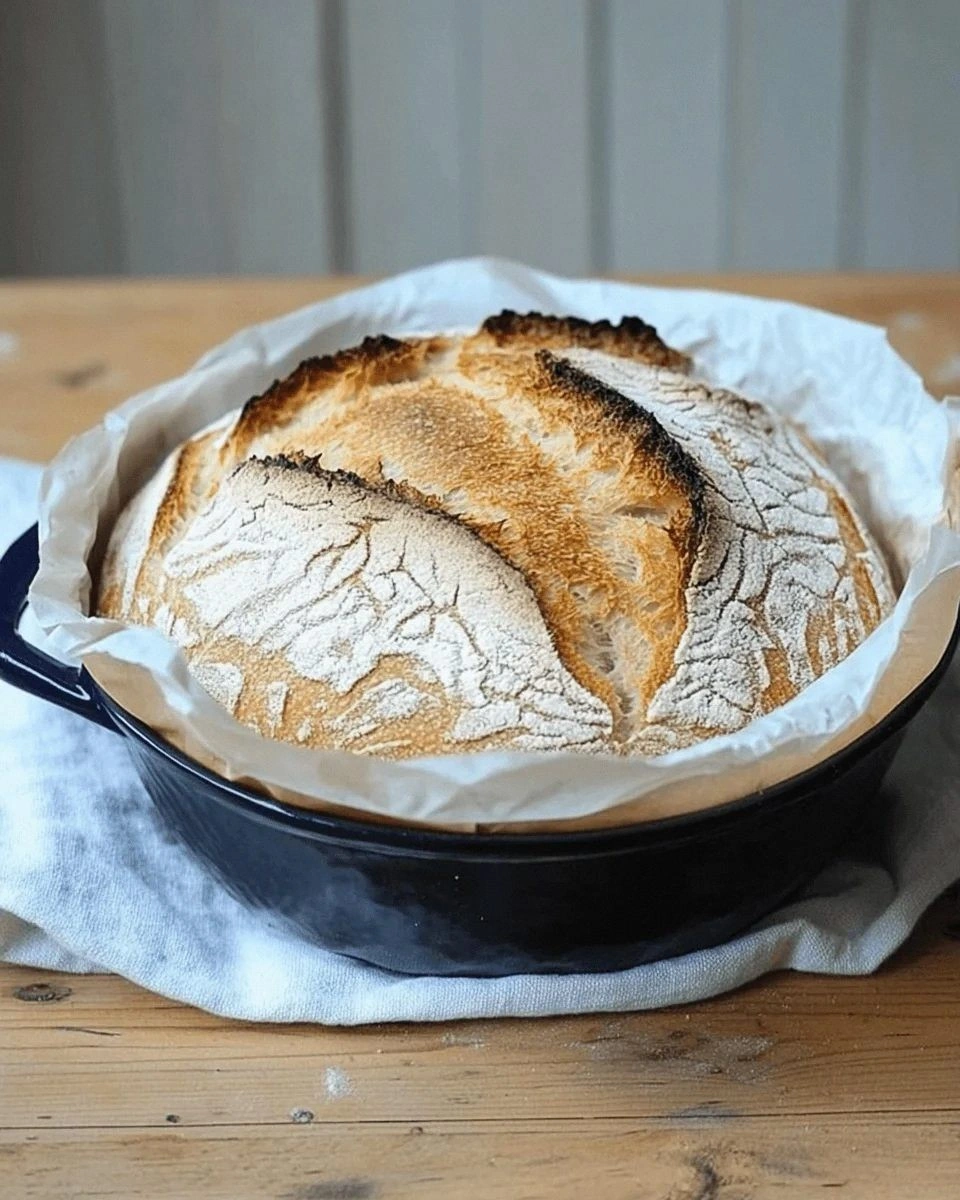
When you’re ready to bake, preheat your oven to 475°F (245°C) with a Dutch oven inside for at least 30 minutes. While the oven heats, gently invert the dough onto a parchment sheet, score the top with a sharp razor blade or lame—about ¼‑inch deep diagonal slashes. The scoring allows the oven spring to escape, creating that iconic “ear” on the crust.
Carefully lift the parchment with the dough and place it into the preheated Dutch oven. Cover and bake for 20 minutes, then remove the lid and bake for another 15‑20 minutes until the crust turns a deep, caramel‑brown and the loaf sounds hollow when tapped on the bottom. Let the loaf cool on a wire rack for at least an hour before slicing; the interior continues to set as it cools. Final brag: This is hands down the best version you’ll ever make at home.
That’s it — you did it. But hold on, I’ve got a few more tricks that'll take this to another level...
Insider Tricks for Flawless Results
The Temperature Rule Nobody Follows
Most home bakers think “room temperature” is a static number, but in reality it fluctuates by the hour. Use a digital thermometer to monitor the ambient temperature and adjust your proofing time accordingly. On a cooler day, add an extra hour to the bulk fermentation; on a hot day, shorten it by 30 minutes to avoid over‑proofing. I once baked a loaf on a sweltering summer afternoon and ended up with a gummy crumb because I ignored the heat. Trust the thermometer, not the clock.
Why Your Nose Knows Best
Your sense of smell is a more reliable indicator of dough readiness than any timer. When the dough has reached its peak, you’ll detect a faint, sweet‑sour aroma that’s almost perfume‑like. If it still smells like raw flour, give it more time. If it smells overly alcoholic, you’ve passed the optimal window and the dough may collapse. I’ve saved countless loaves by simply sniffing the dough before the final bake.
The 5‑Minute Rest That Changes Everything
After shaping, let the dough rest uncovered for exactly five minutes before the final tension pull. This short pause relaxes the gluten, allowing you to create a tighter surface tension without tearing. Skipping this micro‑rest often leads to a misshapen loaf with a rough crust. I swear, that five‑minute breather is the secret handshake between pro bakers and perfect sourdough.
Steam is Your Best Friend
A burst of steam in the first 10 minutes of baking expands the crust, giving it that coveted glossy, crackly finish. If you don’t have a Dutch oven, toss a handful of ice cubes onto a preheated tray at the bottom of the oven. The resulting hiss is music to any baker’s ears. Just don’t open the door too early—steam needs to stay trapped for the initial rise.
The Cool‑Down Trick
After the loaf comes out of the oven, resist the urge to slice immediately. Letting it rest for at least 60 minutes allows the crumb to set and the flavors to marry fully. If you’re impatient, wrap the loaf loosely in a tea towel for 15 minutes; the residual heat will finish the job without making the crust soggy. I’ve learned the hard way that cutting too soon results in a gummy interior that feels like you’re biting into a wet sponge.
Creative Twists and Variations
This recipe is a playground. Here are some of my favorite ways to switch things up:
Herb‑Infused Sourdough
Add 2 tablespoons of finely chopped fresh rosemary and thyme to the flour before mixing. The herbs infuse the crumb with a fragrant, earthy note that pairs beautifully with olive oil. Perfect for serving alongside roasted meats or a hearty stew.
Whole‑Grain Boost
Replace half of the all‑purpose flour with whole‑wheat flour for a nuttier flavor and a denser crumb. Increase the water by 2‑3 tablespoons to compensate for the extra absorption. The result is a rustic loaf that feels like a farmer’s market find.
Cheesy Garlic Swirl
Mix ½ cup of shredded mozzarella and 1 teaspoon of garlic powder into the dough after the first fold. The cheese creates pockets of melty goodness, while the garlic adds a punchy aroma. Great for a quick garlic‑bread side.
Sweet Cinnamon Raisin
Swap the olive oil for 1 tablespoon of melted butter, add 2 teaspoons of cinnamon, and fold in ½ cup of raisins during the second stretch‑and‑fold. The sweet‑spicy loaf is a breakfast champion, especially when toasted with a smear of cream cheese.
Spicy Jalapeño Cheddar
Incorporate 1 finely diced jalapeño (seeds removed) and ½ cup of sharp cheddar cheese after the first fold. The heat from the jalapeño balances the sourness, while the cheddar adds a creamy bite. Ideal for a bold sandwich or a daring snack.
Storing and Bringing It Back to Life
Fridge Storage
Wrap the cooled loaf tightly in a double layer of parchment paper, then place it in a resealable plastic bag. Store it in the refrigerator for up to five days. The bread will stay soft, and the crust will retain a slight chewiness. Before serving, let it sit at room temperature for 30 minutes to let the crumb breathe.
Freezer Friendly
Slice the loaf before freezing for easy portion control. Place the slices in a freezer‑safe bag, removing as much air as possible. The bread freezes well for up to three months. When you’re ready to eat, toast directly from frozen or reheat in a 350°F oven for 10 minutes.
Best Reheating Method
To revive a stale loaf, lightly mist the crust with water, wrap it loosely in foil, and bake at 300°F for 10‑12 minutes. The steam generated inside the foil brings back that fresh‑baked crunch while keeping the interior moist. Add a tiny splash of water to the dough before reheating for an extra boost of steam—your crust will thank you.