Picture this: the kitchen is a battlefield, pots clanging, and the clock ticking faster than my heart rate. I was halfway through a disastrous pancake batch when a friend dared me to create something that could actually compete with the fluffiest cloud bread I've ever tasted. I grabbed a bowl, a whisk, and an entire pantry of surprises. The result? A cloud bread that feels like a soft, buttery cloud but packs a protein punch that would make a bodybuilder blush. If you thought cloud bread was just a gimmick, stick around, because this version is going to rewrite everything you thought you knew about airy, low‑calorie carbs.
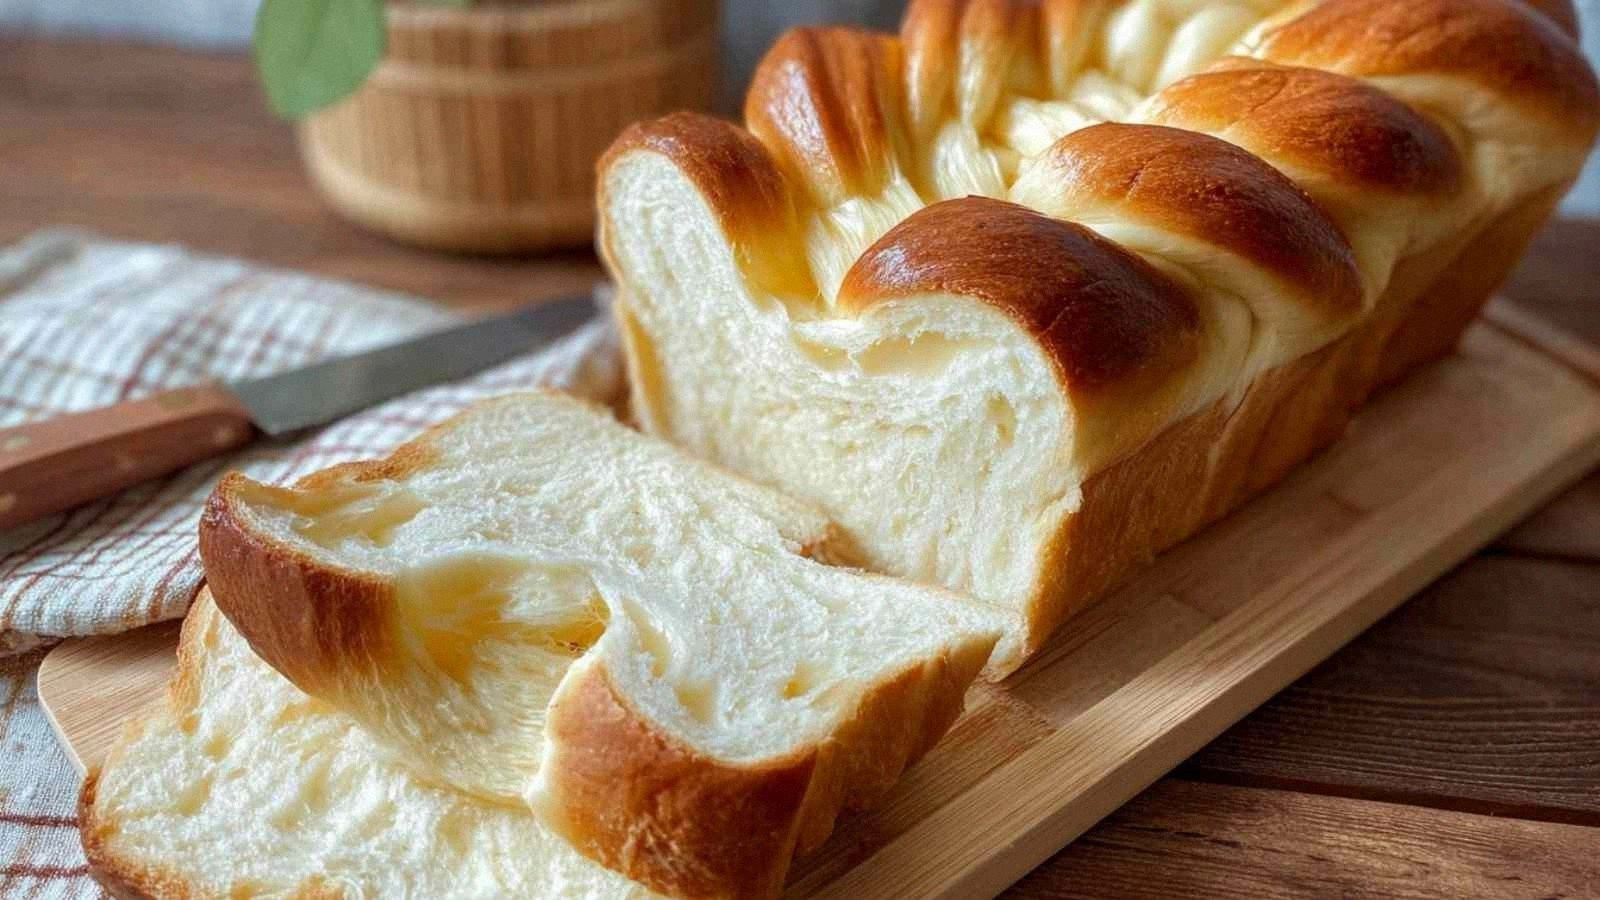
The first time I tasted the finished loaf, the aroma alone was enough to make my mouth water. A faint vanilla whisper danced with the sharp tang of vinegar, while the cottage cheese’s creamy undertone promised a silky bite. The texture was a paradox—light as a feather yet sturdy enough to hold a handful of fresh berries or a spoonful of peanut butter. My eyes widened when I saw the golden crust, crisp like a freshly baked biscuit, and the inside exploded into a cloud of soft, almost invisible crumbs. I swear, that moment was pure culinary revelation.
What sets this recipe apart from the endless variations flooding the internet is the deliberate balance of flavor, nutrition, and convenience. Instead of relying on heavy flour or artificial sweeteners, I used cottage cheese and two types of protein powder to create a dense yet airy structure that doesn’t collapse. Allulose sneaks in just enough sweetness without the sugar crash, and a dash of baking powder gives a gentle lift that feels like a secret ingredient from a top chef. The result is a loaf that looks like a cloud but tastes like a savory, protein‑rich breakfast that will have you questioning why you ever settled for ordinary toast. This is hands down the best version you'll ever make at home.
And there’s a twist you won’t see in most recipes: a splash of white vinegar that balances the richness and keeps the crumb tender. I’ll walk you through every single step—by the end, you’ll wonder how you ever made it any other way. I dare you to taste this and not go back for seconds, because the flavor will haunt your palate in the best way possible. The anticipation of that first bite is worth every whisk, every beat, and every second spent waiting for the oven to do its magic. So grab your ingredients, preheat that oven, and let’s dive into the cloud‑making adventure.
What Makes This Version Stand Out
- Flavor: The subtle vanilla and vinegar create a layered taste that feels both sweet and savory, a rare combination in cloud bread.
- Texture: The cottage cheese and dual protein powders yield a crumb that is airy yet resilient, preventing the dreaded “spongy” outcome.
- Nutrition: With 25 grams of protein per serving, this loaf turns a simple breakfast into a protein powerhouse, ideal for muscle recovery.
- Simplicity: No flour, no heavy batter, just a handful of ingredients that you can find in any kitchen, making prep a breeze.
- Versatility: Serve it sweet with fruit or savory with avocado and smoked salmon—this bread adapts to any craving.
- Make‑ahead: The loaf freezes well; a quick reheating step restores its fluffiness, saving you time on busy mornings.
- Unique Technique: Folding the whisked egg whites into the cottage cheese mixture creates a “cloud” effect that is both visually stunning and structurally sound.
Alright, let's break down exactly what goes into this masterpiece...
Inside the Ingredient List
The Flavor Base
Vanilla extract is the first secret weapon that gives the bread its sweet undertone. A teaspoon of pure vanilla is enough to infuse the entire batch with a warm, comforting aroma that lingers long after the first bite. White vinegar, though often overlooked, plays a crucial role in balancing the richness of the cottage cheese and eggs. A half‑teaspoon of vinegar reacts with the baking powder to create tiny bubbles, giving the bread a subtle lift. Skipping either ingredient will leave the loaf flat and bland; the harmony between sweet and tang is what elevates this recipe.
The Texture Crew
Cottage cheese is the backbone of the crumb, providing moisture and a mild, milky flavor that keeps the bread tender. When fresh, cottage cheese can be a bit lumpy, so I always strain it through a fine mesh to remove excess whey; this ensures a smoother batter. Eggs supply the protein structure that holds the loaf together; the yolks add richness while the whites add lift when beaten to stiff peaks. Whey protein powder contributes additional protein and helps bind the batter, while egg white protein powder lightens the mix without adding fat. Baking powder is the leavening agent that creates the airy pockets, and a quarter teaspoon of salt sharpens every flavor note. Together, these ingredients form a batter that rises like a cloud yet stays sturdy enough to hold toppings.
The Unexpected Star
Allulose is the sweetener that keeps this bread low on calories yet still satisfying. Unlike regular sugar, allulose is a rare sugar that the body metabolizes minimally, so you get the sweetness without the spike. It also helps the batter set, giving the loaf a pleasant snap when you bite into it. If you’re allergic to dairy, a dairy‑free cottage cheese works, but the texture may shift slightly. Swapping allulose for a natural sweetener like monk fruit is possible, but the overall flavor profile will change.
The Final Touch
Every ingredient plays a pivotal role, but the finishing touch is the folding technique. After whisking the eggs and proteins, I gently fold them into the cottage cheese mixture, ensuring the air stays trapped. This step is where the cloud magic happens; the batter remains light and airy, preventing the dreaded “mushy” texture that plagues many cloud bread attempts. If you rush this step, the batter will become heavy, and the loaf will collapse.
Everything's prepped? Good. Let's get into the real action...
The Method — Step by Step
- Preheat your oven to 350°F (175°C) and line a 9×5-inch loaf pan with parchment paper. The parchment prevents sticking and makes cleanup a breeze. As the oven heats, you’ll notice the air inside the kitchen becoming charged with anticipation. The scent of vanilla will start to mingle with the buttery aroma of the upcoming loaf. This is the moment of truth, and you’re about to witness magic.
- In a large mixing bowl, combine the cottage cheese, whey protein powder, and egg white protein powder. Use a hand mixer to blend until the mixture is smooth and free of lumps. The texture should resemble a thick custard; this consistency is key for the next step. If you see any pockets of whey, give the mixture another quick blend. This step ensures every bite is creamy.
- Whisk the eggs and vanilla extract together until the mixture is glossy. The eggs act as the binder, while vanilla adds a sweet, aromatic note. Pour this liquid into the cottage cheese mixture and stir gently. The batter will look slightly runny, but that’s normal. The mixture should feel light yet cohesive.
- Fold in the baking powder and salt with a spatula. This is where the leavening magic begins; the batter should start to puff slightly as you fold. The salt will enhance every flavor, so don’t skip it. Be gentle to preserve the airy structure. At this point, the batter should feel like a soft cloud.
- Add the allulose and white vinegar, stirring until the batter is uniform. The vinegar’s acidity reacts with the baking powder to create tiny bubbles, giving the loaf a delicate lift. The allulose ensures a touch of sweetness without extra calories. The batter should now have a smooth, glossy sheen. This is the point where the loaf starts to feel like a dream.
- Pour the batter into the prepared loaf pan, smoothing the top with a spatula. The batter should fill the pan to about an inch from the rim. Place the pan in the preheated oven and bake for 30 minutes. As the bread bakes, the crust will turn a golden amber, and the inside will puff up like a cloud. The aroma will fill the kitchen, making it hard to resist.
- After 30 minutes, check the loaf by inserting a toothpick into the center. If it comes out clean, the bread is done; if it’s still wet, bake for an additional 5 minutes. The loaf should feel firm to the touch, yet the inside remains soft. Let the bread cool in the pan for 10 minutes before transferring it to a wire rack to cool completely. This resting period allows the crumb to set.
- Slice the loaf with a serrated knife, and serve immediately with your favorite toppings. Try fresh berries, a dollop of Greek yogurt, or a drizzle of honey for a sweet version. For a savory twist, add sliced avocado, smoked salmon, or a sprinkle of sea salt. The possibilities are endless, and each bite is a reminder of how simple ingredients can create extraordinary results. Enjoy the moment, and savor every bite.
That's it — you did it. But hold on, I've got a few more tricks that'll take this to another level...
Insider Tricks for Flawless Results
The Temperature Rule Nobody Follows
Many bakers think the oven temperature is flexible, but a 350°F oven is critical for even rising. If you bake at a lower temperature, the loaf will rise slowly and may collapse; if you bake too high, the outside will burn while the inside remains undercooked. I always use an oven thermometer to double‑check the actual temperature. This small step saves you from a ruined loaf and ensures the crumb stays light and airy.
Why Your Nose Knows Best
As soon as the loaf starts to bake, the scent will travel through the kitchen like a siren’s call. Trust that aroma; it’s a reliable indicator that the bread is doing its job. If you can’t smell the buttery vanilla and subtle tang, the loaf might still be baking. Wait a few more minutes and you’ll hear the gentle crackle of the crust forming.
The 5‑Minute Rest That Changes Everything
After removing the loaf from the oven, let it rest in the pan for 10 minutes before transferring it to a wire rack. This short rest allows the steam to redistribute, preventing a hollow center. Skipping this step often results in a crumb that feels dry and uneven. The rest period also makes slicing easier, as the loaf holds its shape better.
Keep the Pan Covered While Cooling
Covering the loaf with a clean kitchen towel during the first 5 minutes of cooling traps steam, which keeps the crumb moist. Once the towel is removed, the crumb will set perfectly. If you skip the towel, the top can crack and the inside may feel dry. This simple trick ensures each slice is as fluffy as the last.
Use a Non‑Stick Loaf Pan
A good non‑stick pan eliminates the need for extra parchment, saving you time and reducing waste. The loaf slides out effortlessly, and the edges stay crisp. If you’re using a glass pan, be sure to line it with parchment to avoid sticking. The choice of pan can make a noticeable difference in texture and appearance.
Creative Twists and Variations
This recipe is a playground. Here are some of my favorite ways to switch things up:
Berry‑Burst Cloud
Fold fresh blueberries or sliced strawberries into the batter before baking. The fruit will burst in the center, adding a juicy surprise. Pair this with a drizzle of honey or a dollop of Greek yogurt for a sweet breakfast.
Herbed Savory Cloud
Stir in chopped fresh herbs such as chives, parsley, or dill. The herbs infuse the loaf with a fresh, green note that pairs wonderfully with smoked salmon or a poached egg. Serve with a sprinkle of sea salt for an extra zing.
Chocolate Chip Cloud
Swirl in a handful of dark chocolate chips or cacao nibs before baking. The chocolate adds a rich depth that balances the mild cottage cheese flavor. This version is perfect for a dessert‑style breakfast.
Spicy Jalapeño Cloud
Dice a small jalapeño and fold it into the batter. The heat will linger in the crumb, creating a subtle kick. Top with avocado slices for a creamy contrast.
Nutty Protein Cloud
Add a tablespoon of almond butter or peanut butter to the batter for a nutty undertone. The added fat keeps the loaf moist and gives it a richer flavor profile. This variation is great for a post‑workout snack.
Ginger‑Zest Cloud
Grate a teaspoon of fresh ginger into the batter. The ginger’s bright, peppery flavor complements the vanilla, creating a balanced, aromatic loaf. Pair with a citrusy yogurt for a refreshing twist.
Storing and Bringing It Back to Life
Fridge Storage
Wrap the cooled loaf tightly in plastic wrap or aluminum foil and store it in the refrigerator for up to three days. The moisture from the wrap prevents the bread from drying out. When ready to eat, slice directly from the fridge and enjoy the fresh, slightly chilled flavor.
Freezer Friendly
Slice the loaf before freezing; this makes thawing easier. Place the slices in a single layer on a baking sheet, freeze until solid, then transfer them to a freezer bag. The bread can be stored for up to two months. Thaw at room temperature for 20 minutes before reheating.
Best Reheating Method
Reheat frozen or chilled slices in a toaster oven at 350°F for 5–7 minutes, or in a microwave on medium power for 30–45 seconds. Add a tiny splash of water before reheating; the steam helps restore the loaf’s original fluffiness. For a crispier crust, finish the loaf in a skillet over medium heat for a minute on each side.