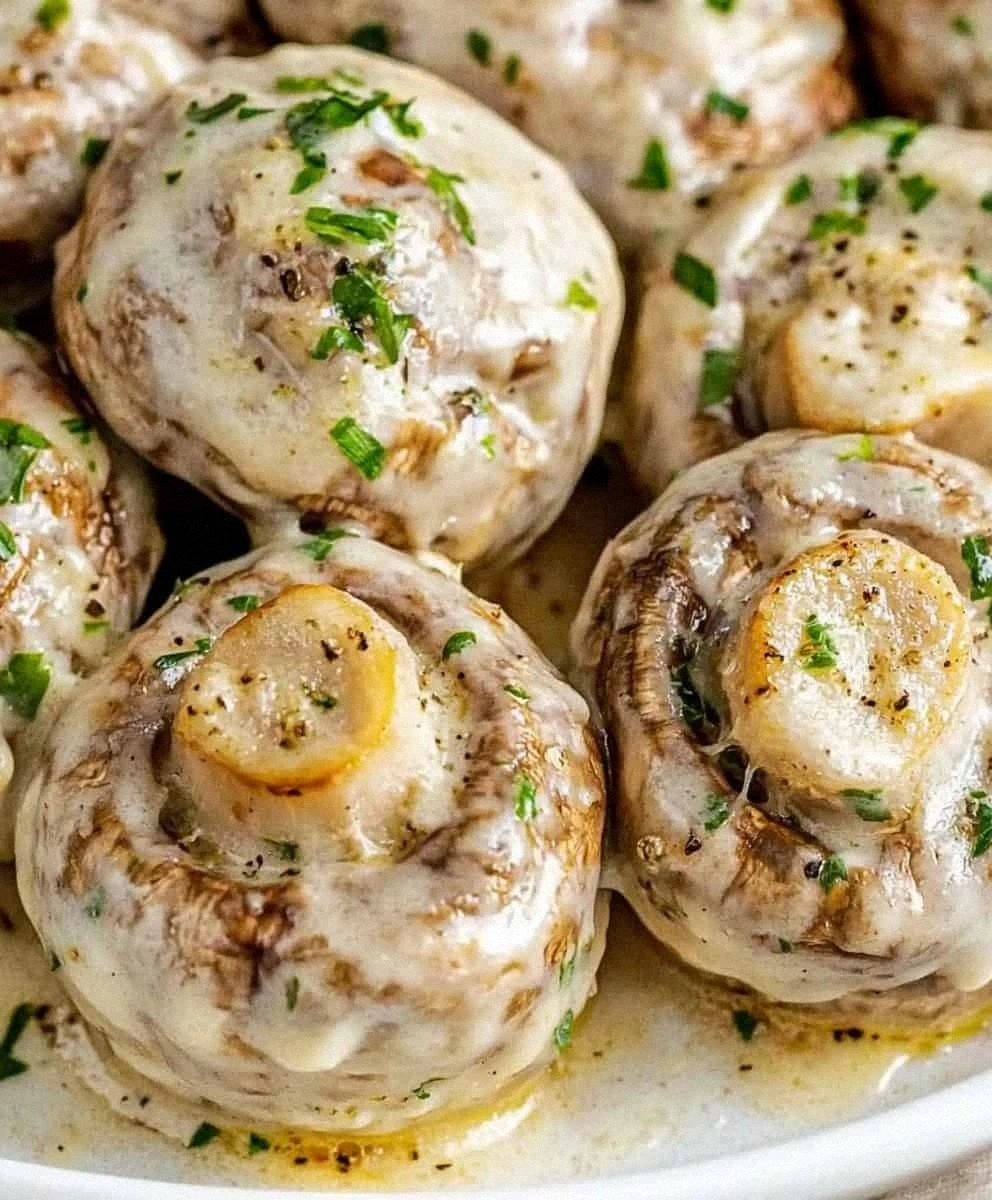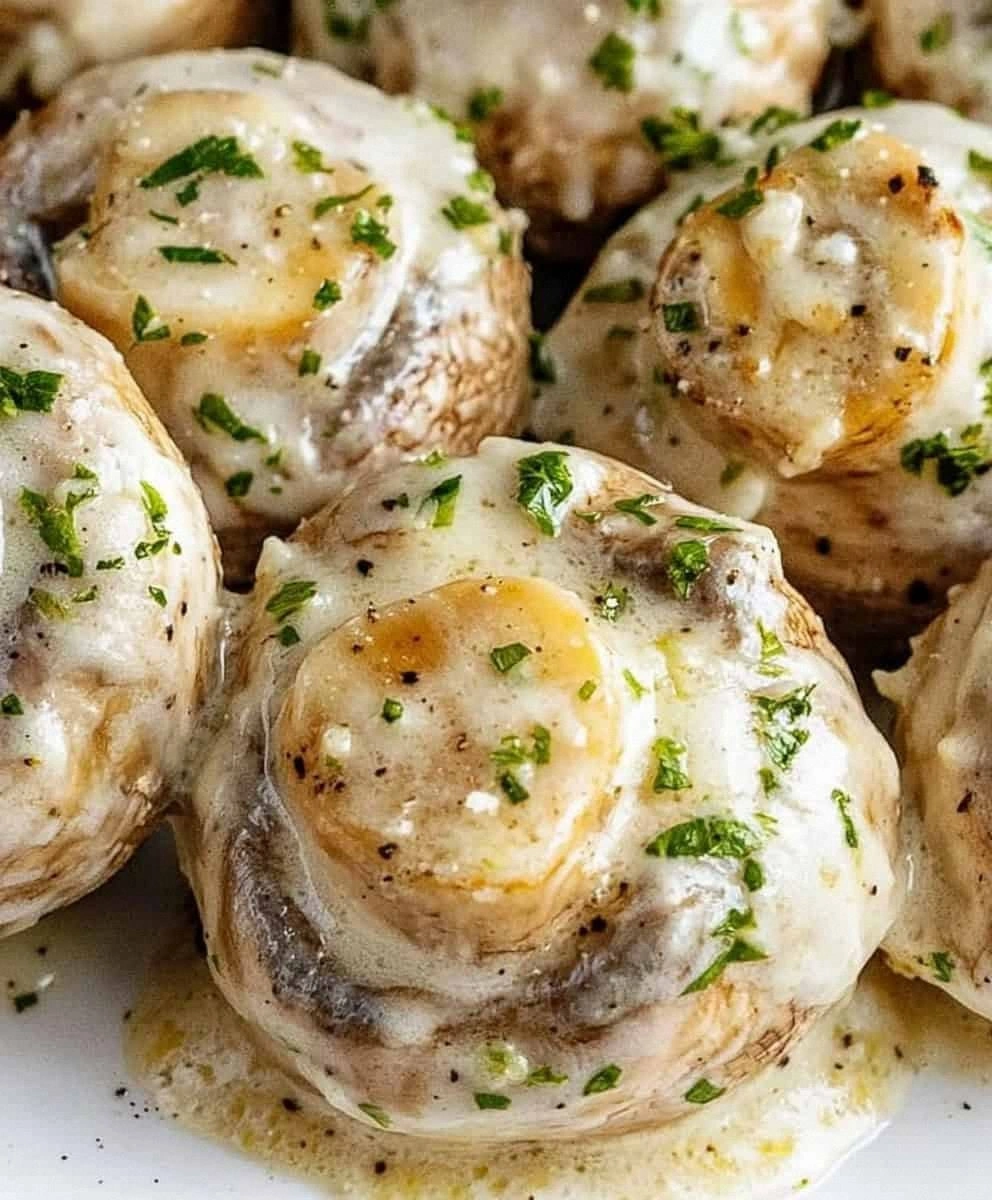
I burned three pans of mushrooms before I finally cracked the code. The first batch? Soggy, gray, and tasting like wet cardboard. The second? Charred on the outside, raw in the middle, and somehow both burnt and bland. But the third — oh, the third — was the moment everything changed. The mushrooms hit the hot butter and garlic like fireworks, sizzling and dancing in the pan, releasing that earthy perfume that makes you close your eyes involuntarily. By the time the Parmesan melted into golden threads and the herbs hit their stride, I was already reaching for a second helping before the first had even cooled.
Picture this: It's 11:47 PM on a Tuesday, you're standing in your kitchen wearing mismatched socks, and you've got a half-empty bottle of wine calling your name. You need something that feels indulgent but takes less effort than ordering takeout. These garlic Parmesan mushrooms? They're the answer to every late-night craving, every "what do I serve these people who just showed up unannounced" panic, every "I want to feel like I'm eating at a fancy restaurant but I'm in my sweatpants" moment. The aroma alone will make your neighbors jealous — trust me, mine actually knocked on my door asking what I was making.
Most recipes get this completely wrong. They'll tell you to dump everything in at once, creating a watery mess that tastes like disappointment. They'll have you using garlic powder instead of fresh garlic (the audacity!), or they'll skip the crucial step of letting the mushrooms actually brown. Listen, I've made every mistake possible so you don't have to. This version creates mushrooms that are caramelized and golden at the edges, swimming in a buttery garlic sauce that coats each piece like liquid gold, with Parmesan that melts into every crevice and fresh herbs that make the whole thing sing.
Here's the thing that'll hook you: these mushrooms taste like they came from a fancy steakhouse, but they require exactly one pan, six ingredients you probably already have, and about fifteen minutes of your time. The transformation is so dramatic that you'll question every mushroom you've ever eaten before. That sizzle when they hit the pan? Absolute perfection. The way the garlic perfumes your entire kitchen? Pure magic. Let me walk you through every single step — by the end, you'll wonder how you ever made it any other way.
What Makes This Version Stand Out
Okay, ready for the game-changer? This isn't just another mushroom recipe floating around the internet. This is the mushroom recipe that's going to ruin all other mushrooms for you, and I mean that in the best possible way.
- Butter-Basted Brilliance: Instead of oil, we use butter for a richer, more luxurious flavor that clings to every mushroom. The milk solids in the butter brown beautifully, creating nutty, complex flavors that oil simply can't match.
- The Golden Browning Rule: We let these beauties actually brown — like, really brown — until the edges caramelize and develop that deep, savory flavor that makes you want to face-plant into the pan. Most recipes rush this part and end up with sad, steamed mushrooms.
- Fresh Garlic Timing: We add the garlic at exactly the right moment so it perfumes the butter without turning bitter. Too early and it burns, too late and it's raw and harsh. We nail that sweet spot.
- Parmesan Integration: The cheese gets added off-heat so it melts into a creamy blanket rather than seizing up into rubbery clumps. This creates little pockets of umami that burst in your mouth with each bite.
- Herb Strategy: Dried herbs go in early to bloom in the fat, while fresh herbs finish the dish for brightness. It's a two-punch approach that creates layers of flavor most recipes miss entirely.
- Make-Ahead Magic: These actually taste better if you make them ahead and reheat them gently. The flavors meld and intensify overnight, making them perfect for meal prep or entertaining.
- Crowd Reaction Guarantee: I've served these to self-proclaimed mushroom haters who went back for thirds. They're that good. The combination of butter, garlic, and cheese is basically culinary catnip for humans.
Alright, let's break down exactly what goes into this masterpiece...
Inside the Ingredient List
Every ingredient here pulls its weight and then some. There's no filler, no "maybe I'll add this if I have it" — each component is essential to creating the mushroom experience that'll haunt your dreams (in the best way possible).
The Flavor Base
Let's start with the mushrooms themselves because this is where most people go wrong. You want fresh, firm mushrooms that feel heavy for their size. If they feel slimy, have dark spots, or smell like the produce section's back room, keep walking. I prefer a mix of button and cremini for the perfect balance of mild and earthy flavors. The button mushrooms absorb all that buttery garlic goodness like little sponges, while the cremini add a deeper, more complex flavor that makes people ask "what's your secret?"
The butter is non-negotiable. I know, I know — olive oil is healthier. But here's the thing: butter contains milk solids that brown and create incredible nutty flavors. When you heat butter to just the right temperature, those solids caramelize and create a flavor that's impossible to replicate with oil. Plus, butter creates this luxurious mouthfeel that makes these mushrooms taste like they came from a fancy French restaurant rather than your kitchen.
The Aromatic Powerhouse
Fresh garlic is absolutely essential here. Not garlic powder, not jarred minced garlic, not those sad little granules that taste like disappointment. Real, honest-to-goodness garlic that you peel and mince yourself. When garlic hits hot butter, it releases compounds that create that intoxicating aroma that makes people wander into your kitchen asking what's for dinner. The timing is everything here — add it too early and it burns, turning bitter and acrid. Add it too late and it's raw and harsh, like a slap of garlic breath.
The Herb Dynamic Duo
Dried thyme and oregano might seem humble, but they're the backbone of depth in this dish. Dried herbs have a more concentrated, earthy flavor than fresh ones, and they bloom beautifully in hot fat. The thyme adds woodsy, slightly floral notes that complement the earthiness of the mushrooms perfectly. Oregano brings a touch of bitterness and complexity that keeps the dish from being one-note. Together, they create this Mediterranean vibe that makes you want to sip wine and speak with your hands.
The Heat Factor
Red pepper flakes are optional but highly recommended. Not enough to make you reach for a glass of milk — just enough to wake up your taste buds and make the other flavors pop. It's like turning up the contrast on a photo. The heat should be subtle, a gentle warmth that builds slowly and makes you wonder why you can't stop eating these mushrooms. If you're serving to kids or spice-averse adults, you can skip it, but you'll miss that extra dimension that makes people close their eyes when they taste it.
The Cheese Situation
Parmesan is where the magic happens, but here's the key: it has to be real Parmigiano-Reggiano, not the stuff in the green can. Real Parmesan melts into creamy, nutty perfection that clings to every mushroom. It creates these little pockets of umami that burst in your mouth like savory candy. The pre-grated stuff contains cellulose to prevent clumping, which means it won't melt properly and will give you a grainy, sad texture. Buy a wedge and grate it yourself — your taste buds will thank you.
The Fresh Finish
Parsley isn't just for color — it adds a bright, fresh flavor that cuts through all that richness. Use flat-leaf (Italian) parsley, not the curly stuff that tastes like green confetti. The parsley should be added at the very end so it stays vibrant and fresh-tasting. It's like adding a squeeze of lemon — it wakes everything up and makes the dish feel complete rather than heavy.
Everything's prepped? Good. Let's get into the real action...

The Method — Step by Step
- Start with a cold pan — yes, cold. This is the moment of truth where most recipes go wrong. Add your butter to a heavy-bottomed skillet and place it over medium heat. As the butter melts, it will foam and sputter. Let it happen. You're waiting for the moment when the foaming subsides and the butter starts to smell nutty and golden. This takes about 2-3 minutes, and your kitchen will start to smell like you're baking shortbread cookies. That's when you know the butter is ready to receive its mushroom destiny.
- Now add your mushrooms, but here's the key — don't crowd the pan! If you're making a double batch, do it in two batches. Crowded mushrooms release their liquid and steam instead of browning, and you'll end up with rubbery, gray disappointment. The mushrooms should sit in a single layer with some space between them. Let them cook undisturbed for the first 3 minutes. I know it's tempting to stir, but resist! This is where the magic happens, where those beautiful caramelized edges develop that make restaurant mushrooms so addictive.
- After 3 minutes, give them a gentle toss with a wooden spoon. You'll notice the bottoms are golden and caramelized — that's exactly what we want! Continue cooking for another 4-5 minutes, stirring occasionally, until most of the mushrooms are golden-brown and have shrunk down. They should smell incredible at this point, like earth and butter and something deeply savory. The pan might look dry, but that's perfect. The mushrooms have given up their liquid and are now concentrating their flavor.
- Clear a space in the center of the pan and add your minced garlic, dried thyme, and oregano. Let the garlic sizzle in the butter for just 30 seconds — you're looking for it to turn fragrant but not brown. As soon as you can smell that incredible garlic aroma, stir everything together. The herbs will bloom in the fat, releasing their essential oils and creating this incredible Mediterranean perfume that'll have you questioning why you don't cook mushrooms every single day.
- Add the red pepper flakes now if you're using them. Stir for another 30 seconds, letting the heat wake up the spices. The oil in the pan should be turning golden and glossy, coating every mushroom piece. This is when your kitchen starts to smell like you're in a trattoria in Rome, where the air is thick with garlic and herbs and possibility. Don't walk away from the stove here — things move quickly from perfect to burnt in the blink of an eye.
- Remove the pan from heat completely. This next part? Pure magic. Sprinkle the Parmesan cheese over the mushrooms and let it sit for 30 seconds without stirring. The residual heat will start melting the cheese, creating these little pockets of creamy, nutty goodness. Then gently fold everything together. The cheese will melt into the butter and mushroom juices, creating this luxurious sauce that coats every piece like velvet. If you added the cheese while the pan was still on the heat, it would seize up and get grainy — off-heat is the secret to silky, smooth perfection.
- Season with salt and freshly ground black pepper. Start conservative — you can always add more, but you can't take it away. Taste a mushroom (careful, they're hot!). It should taste rich and savory, with the Parmesan adding depth and the herbs providing complexity. The mushrooms should be tender but not mushy, with some pieces having those gorgeous caramelized edges that add texture and concentrated flavor.
- Transfer to a serving dish and shower with fresh parsley. The parsley isn't just for color — it adds a bright, fresh note that cuts through all that richness. Serve immediately while they're hot and the cheese is still creamy and melty. These are best enjoyed with good bread to sop up every last drop of that incredible garlic butter sauce, or tossed with pasta, or honestly, just eaten straight from the pan with a fork while standing at your kitchen counter.
That's it — you did it. But hold on, I've got a few more tricks that'll take this to another level...
Insider Tricks for Flawless Results
The Temperature Rule Nobody Follows
Here's the thing that separates restaurant-quality mushrooms from home-cooking disappointment: temperature control. You want your pan hot enough to create that beautiful caramelization, but not so hot that the butter burns. The sweet spot is medium heat, but here's the kicker — every stove is different. My medium might be your medium-low. The mushrooms should sizzle enthusiastically when they hit the pan, but they shouldn't sound like they're being deep-fried. If they're sputtering and jumping out of the pan, your heat's too high. If they're just sitting there looking sad and releasing liquid, it's too low. Adjust as you go, and remember that patience pays off in flavor dividends.
Why Your Nose Knows Best
Forget timers — your nose is the best kitchen tool you have. When the butter starts to smell nutty and golden, it's ready for the mushrooms. When the mushrooms start to smell like concentrated earth and butter, they're browning perfectly. When the garlic hits and your kitchen suddenly smells like you've been transported to an Italian grandmother's kitchen, you've nailed the timing. A friend tried making these while talking on the phone and completely missed all these olfactory cues — ended up with a pan of garlic charcoal that made her apartment smell like burnt popcorn for three days. Don't be like Sarah. Pay attention to the aroma symphony happening in your pan.
The 5-Minute Rest That Changes Everything
Here's where patience becomes a superpower. After you finish cooking, let the mushrooms rest for exactly 5 minutes before serving. During this time, the flavors meld and intensify, the sauce thickens slightly, and the temperature drops to that perfect "I can actually taste the flavors instead of burning my tongue" level. This rest also allows the Parmesan to fully integrate into the sauce, creating this cohesive, luxurious coating that clings to every mushroom. I know it's tempting to dive right in, especially when your kitchen smells like heaven, but those five minutes transform good mushrooms into legendary mushrooms.
The Pan Selection Secret
Your choice of pan matters more than you think. A heavy-bottomed skillet is ideal because it distributes heat evenly and retains temperature well. Cast iron is the gold standard — it gives you those incredible caramelized edges and holds heat like a champion. Stainless steel works too, but avoid non-stick pans for this recipe. Non-stick prevents that beautiful browning we're after, giving you pale, steamed mushrooms that taste like disappointment. Non-stick is great for eggs, terrible for achieving mushroom nirvana.
The Size Consistency Factor
This might seem obsessive, but cutting your mushrooms to uniform size is the difference between amateur and pro results. If some pieces are huge and others are tiny, you'll end up with raw centers and burnt edges, or perfectly cooked small pieces and tough, undercooked large ones. I quarter medium mushrooms and halve large ones, keeping everything roughly the same size. It's an extra 30 seconds of prep that ensures every bite is perfectly cooked. Plus, they look more appealing when they're all the same size — we eat with our eyes first, even when we're standing at the kitchen counter in our pajamas.
Creative Twists and Variations
This recipe is a playground. Here are some of my favorite ways to switch things up:
The French Onion Version
Add a thinly sliced onion to the pan with the mushrooms for that incredible French onion soup vibe. The onions caramelize alongside the mushrooms, creating this sweet-savory combination that's absolutely killer over steak or mashed potatoes. Top with extra Parmesan and broil for 2 minutes to get that bubbly, golden crust that makes French onion soup so addictive.
The Creamy Dream Variation
Stir in 2 tablespoons of heavy cream with the Parmesan for an indulgent, creamy version that transforms into the most incredible pasta sauce. The cream lightens everything up and creates this silky coating that's absolutely divine with wide egg noodles or crusty bread for dipping. This version is dangerous — I once ate an entire pound of mushrooms this way and had zero regrets.
The Smoky Bacon Upgrade
Cook 2 slices of bacon first, then use the rendered fat plus butter for cooking the mushrooms. Crumble the crispy bacon over the top at the end. The smoky bacon fat adds incredible depth, and the crispy bacon pieces provide textural contrast that takes this from side dish to main event. Fair warning: this version causes serious addiction and may result in you making it every single week.
The Mediterranean Escape
Swap the oregano for Herbes de Provence and add a handful of sun-dried tomatoes with the garlic. Finish with a squeeze of lemon juice and some toasted pine nuts. Suddenly you're transported to a seaside café in Provence, where the air smells like lavender and the wine flows freely. This version pairs beautifully with grilled fish or chicken.
The Spicy Asian Fusion
Replace the oregano with Chinese five-spice powder and add a tablespoon of soy sauce with the garlic. Finish with sliced scallions instead of parsley and a drizzle of sesame oil. The result is this incredible umami bomb that works amazingly over rice or as a topping for ramen. The fusion shouldn't work, but it absolutely does — like culinary magic.
The Breakfast Champion
Add these mushrooms to scrambled eggs or fold them into an omelet with some fontina cheese. The garlicky, cheesy mushrooms transform basic eggs into a breakfast that tastes like you're dining at a bed and breakfast in the countryside. I've been known to make a double batch just to ensure leftovers for morning eggs — they're that good.
Storing and Bringing It Back to Life
Fridge Storage
These mushrooms actually improve overnight — the flavors meld and intensify like they're having a party in your fridge. Store them in an airtight container for up to 4 days. The key is to let them cool completely before refrigerating, otherwise condensation forms and waters down that beautiful sauce. I like to use glass containers because they don't absorb garlic odors, and you can reheat them directly in the container. Pro tip: make a double batch on Sunday and enjoy them all week long over pasta, rice, or just straight from the container when you're feeling rebellious.
Freezer Friendly
You can freeze these mushrooms, but with one important caveat: the texture changes slightly. They become softer, more like creamed mushrooms, which actually works beautifully for pasta sauces or as a topping for bruschetta. Freeze in portion-sized containers for up to 3 months. Thaw overnight in the fridge, then reheat gently with a splash of cream or broth to bring back the saucy consistency. The flavor remains incredible — it's like having a secret stash of mushroom gold in your freezer for emergency comfort food situations.
Best Reheating Method
Skip the microwave — it'll turn your beautiful mushrooms into rubbery disappointments. Instead, reheat them gently in a pan over medium-low heat with a splash of water or broth. The water creates steam that warms them through without drying them out, and the residual heat brings back that silky sauce consistency. Add a tiny pat of butter and some fresh parsley at the end to refresh the flavors. They'll taste almost as good as the day you made them, which is saying something because day-one mushrooms are pretty spectacular.