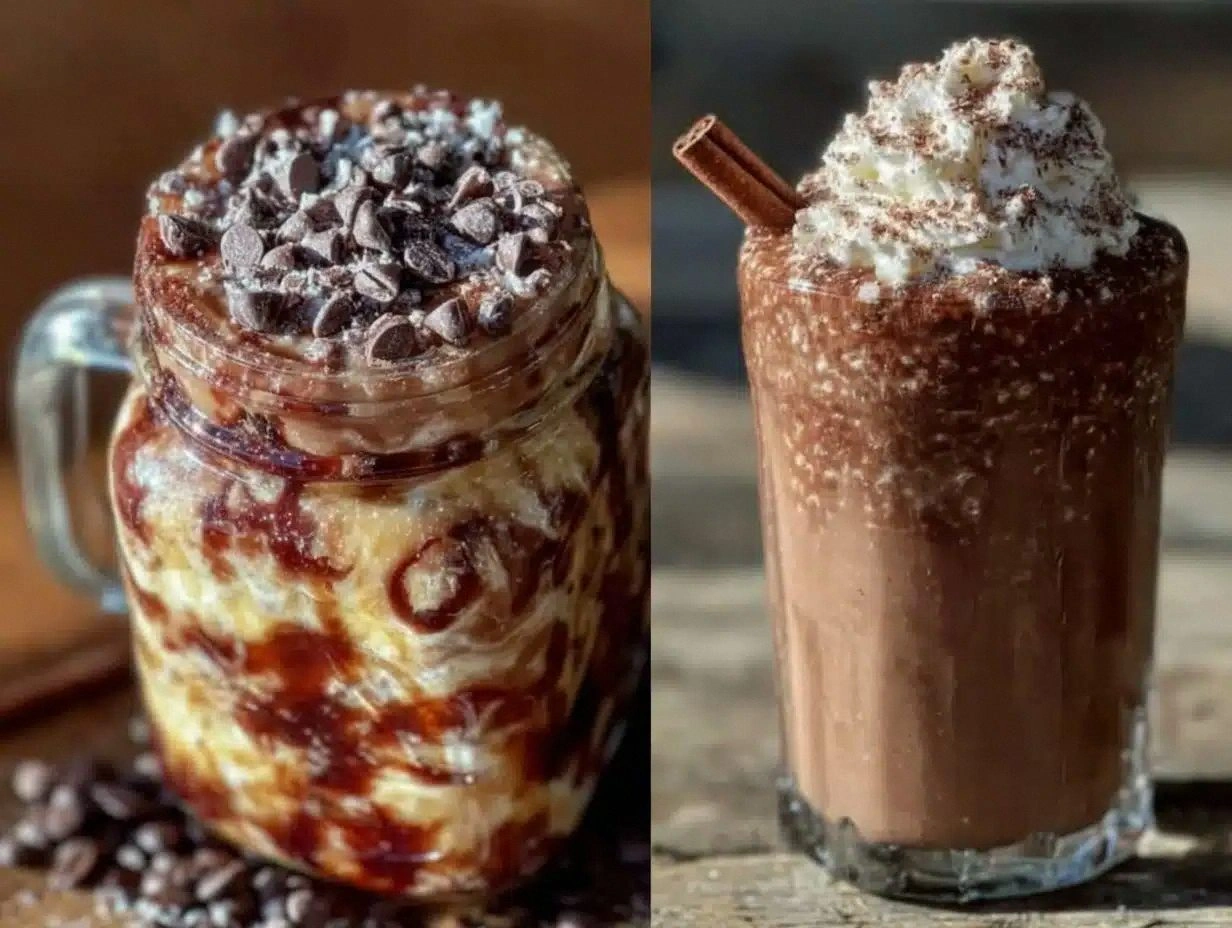
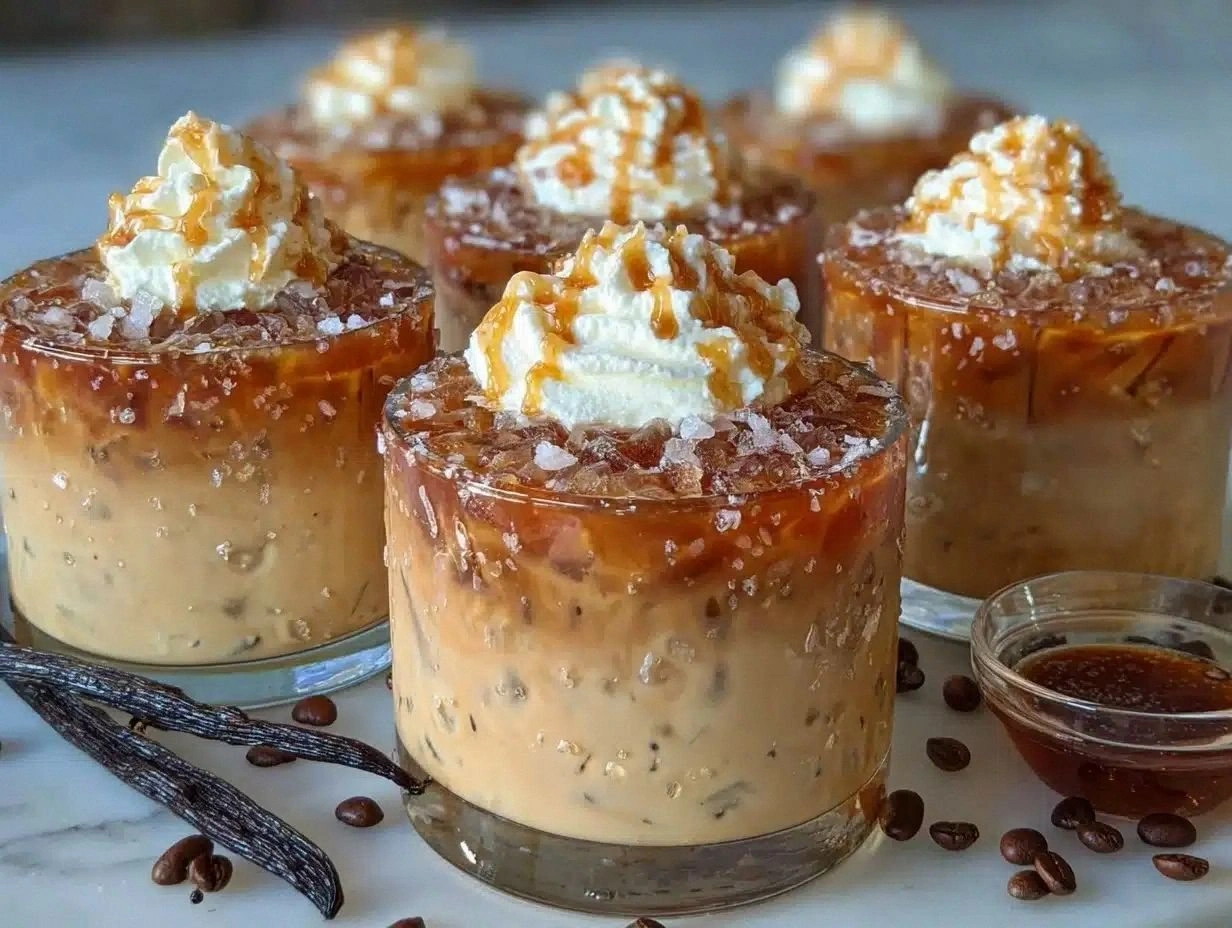
Picture this: it’s a sweltering Saturday afternoon, the kind where the sun feels like a relentless spotlight on your kitchen counter, and you’ve just spilled a whole pot of hot coffee on your favorite shirt. I was standing there, coffee dripping onto my sneakers, cursing the universe, and suddenly a thought struck me like a bolt of espresso‑charged lightning – what if I could turn that disaster into a chilled masterpiece that would make even the most stubborn coffee snob swoon? That very moment birthed the “Irresistible Iced Vanilla Latte” you’re about to master, a drink so smooth it practically glides over your tongue like a silk scarf on a summer breeze.
First, let’s set the scene. The kitchen is alive with the hum of the refrigerator, the clink of ice cubes as they tumble into a tall glass, and the faint, seductive aroma of vanilla dancing through the air. The cold brew sits in a sleek pitcher, dark as midnight, while the milk swirls in a separate jug, promising a velvety texture that will cradle the coffee’s boldness. When you finally pour that chilled concoction together, you’ll hear a gentle fizz as the ice meets the liquid, a sound that says, “We’re about to create something unforgettable.” And when you take that first sip? Expect a wave of caramel‑sweet vanilla that kisses the robust coffee, followed by a creamy finish that lingers like a perfect summer memory.
Most iced latte recipes out there either skimp on flavor, drown the coffee in sugar, or require a barista‑level espresso machine that most home cooks simply don’t have. I’ve tried them all – the store‑bought versions that taste like watered‑down soda, the DIY attempts that end up bitter and icy, and even the “quick‑mix” hacks that leave you with a watery disappointment. This version, however, flips the script: it uses high‑quality cold brew for depth, a homemade vanilla syrup that’s richer than any commercial brand, and a precise ice‑to‑liquid ratio that keeps every sip perfectly balanced. The secret? A simple “milk‑first” technique that creates a micro‑foam even without a frother, and a dash of optional whipped cream that adds a cloud‑like crown of indulgence.
Now, I’m not just blowing smoke – I dare you to taste this and not go back for seconds. This is hands down the best version you’ll ever make at home, and I’m about to walk you through every single step — by the end, you’ll wonder how you ever made it any other way. Ready for the game‑changer? Let’s dive in.
What Makes This Version Stand Out
- Taste: The marriage of smooth cold brew and buttery vanilla syrup creates a flavor profile that’s both bold and sweet without ever feeling cloying.
- Texture: Crushed ice meets silky milk, delivering a mouthfeel that’s as refreshing as a plunge pool on a hot day.
- Simplicity: No espresso machine, no fancy frother – just a pitcher, a whisk, and a handful of common kitchen tools.
- Uniqueness: The “milk‑first” pour creates a natural foam that mimics café‑style latte art, a trick most home recipes overlook.
- Crowd Reaction: Serve it to a group and watch eyes widen; it’s the kind of drink that sparks conversation and Instagram stories alike.
- Ingredient Quality: Using store‑bought cold brew of a reputable brand guarantees consistent flavor, while a homemade vanilla syrup adds a personal touch.
- Method: The step‑by‑step layering ensures every component stays at the perfect temperature, preserving that café‑like chill.
- Make‑Ahead Potential: The base can be pre‑mixed and stored, making it a breeze to serve at brunches, picnics, or office gatherings.
Alright, let's break down exactly what goes into this masterpiece...
Inside the Ingredient List
The Flavor Base
Cold Brew Coffee: This is the backbone of our latte. Cold brew is brewed with coarsely ground beans steeped in cold water for 12‑18 hours, extracting a smooth, low‑acid profile that’s perfect for iced drinks. If you skip it and use regular brewed coffee, you’ll end up with a bitter, watery mess that can’t hold up against the milk and vanilla. For the best results, choose a cold brew that’s labeled “smooth” or “low‑acid,” and give it a quick stir before measuring. Pro tip: Store‑bought cold brew can be found in the refrigerated section; just give it a gentle shake to recombine any settled grounds.
The Sweet Symphony
Vanilla Syrup: High‑quality vanilla syrup is the sweet whisper that turns a regular latte into a dessert‑like experience. Commercial syrups often contain artificial flavors that mask the coffee’s natural notes. Making your own is a breeze: combine equal parts sugar and water, simmer until dissolved, then stir in a generous splash of pure vanilla extract. If you’re short on time, look for a brand that lists real vanilla bean or extract as the primary flavoring. Skipping the syrup entirely will leave the latte tasting flat; a pinch of salt can help balance sweetness if you’re cutting back.
The Creamy Crew
Milk: Whole milk delivers the creamiest texture, creating that coveted micro‑foam when whisked vigorously. Dairy‑free lovers can swap in oat milk for a naturally sweet, barista‑grade alternative, or almond milk for a lighter feel. The key is to use milk that’s cold and fresh; warm milk will melt the ice too quickly, diluting the flavor. If you forget to chill your milk, pop it in the freezer for 10 minutes – it’ll be perfect for the pour.
The Frosty Foundation
Ice: Lots of it. Crushed ice is ideal because it melts slower than cubes, keeping the latte chilled without watering it down. If you only have regular ice cubes, give them a quick blitz in a blender or use a sturdy bag to crush them manually. Skipping the ice or using too little will result in a lukewarm drink that loses its refreshing punch. For a truly café‑style presentation, fill the glass to the brim and let the ice peek out like a frosty crown.
The Final Flourish
Optional Whipped Cream: This is the indulgent finishing touch that transforms the latte into a treat worthy of a celebration. A dollop of lightly sweetened whipped cream adds a velvety layer that slowly melds with the coffee, creating a dreamy swirl. If you’re watching calories, skip it or use a light‑whipped alternative. Forgetting this step isn’t a crime, but you’ll miss out on that Instagram‑worthy “cloud” effect that makes the drink pop.
Everything's prepped? Good. Let's get into the real action...
The Method — Step by Step
Start by gathering all your ingredients and tools: a large pitcher, a whisk or handheld frother, a sturdy glass, and a measuring cup. This preparation stage is crucial; it prevents you from scrambling mid‑process and ensures every component stays cold. I always line my countertop with a damp towel so any spills are instantly contained – trust me, you’ll thank yourself later. Take a deep breath, because the first step sets the tone for the entire latte.
Measure out 2 cups of cold brew coffee and pour it into the pitcher. Give it a gentle stir to break up any thin film that may have formed on top. At this point, the coffee should smell earthy with a faint hint of chocolate, a sign that the extraction was spot‑on. If the aroma feels muted, you may have a weak brew – consider adding a splash more coffee concentrate for that extra kick.
Kitchen Hack: Before adding any sweetener, whisk the cold brew for 15 seconds to incorporate a tiny amount of air. This creates a subtle foam that will later mingle with the milk, giving you that café‑style head. The foam should look like a thin, glossy film on the surface – if it disappears, keep whisking a few more seconds.
Now, pour in ½ cup of vanilla syrup. Watch as the syrup swirls into the coffee, creating a marbled effect that’s both beautiful and promising. The mixture should turn a warm amber color, and the vanilla scent will become unmistakable. Stir gently clockwise for an even distribution; over‑mixing can cause the syrup to break down and lose its silky texture.
- Once the coffee and syrup are perfectly blended, set the pitcher aside while you prepare the milk.Watch Out: Adding ice too early will dilute the coffee and syrup, resulting in a weak flavor. Hold off on the ice until the milk is ready.
Take 2 cups of cold milk and pour it into a separate jug. Using a whisk or a handheld frother, vigorously whisk the milk for about 30 seconds. The goal is to create a light, velvety froth that sits on top – this is the secret to achieving that café‑like texture without an espresso machine. The milk should double in volume and develop tiny bubbles that sparkle like sunrise on water.
Kitchen Hack: If you don’t have a frother, shake the milk vigorously in a sealed jar for 45 seconds. The result is surprisingly similar, and the jar doubles as a portable frothing tool for on‑the‑go gatherings. After shaking, tap the jar gently on the counter to settle any large bubbles.
Fill each serving glass about three‑quarters full with crushed ice. The ice should be piled high, creating a “mountain” that will slowly melt, balancing the drink’s temperature. As you add the ice, listen to the satisfying clink – that’s the sound of refreshment in the making.
Now comes the fun part: pour the coffee‑vanilla mixture over the ice, letting it cascade down the sides of the glass. The liquid should hit the ice with a gentle hiss, a sound that tells you the temperature is just right. Follow immediately with the frothed milk, pouring it in a slow, steady stream to create a layered effect. The milk will sit atop the coffee, and the foam will crown the drink like a silky halo.
Finish with an optional dollop of whipped cream if you’re feeling extra indulgent. Sprinkle a pinch of vanilla bean powder or a drizzle of extra syrup for visual flair. Serve with a straw and a smile – this is the moment of truth, and the first sip should hit you with a balanced blend of bold coffee, sweet vanilla, and creamy milk that’s as refreshing as a dip in a pool on a scorching day.
That's it — you did it. But hold on, I've got a few more tricks that'll take this to another level...
Insider Tricks for Flawless Results
The Temperature Rule Nobody Follows
Keep all ingredients chilled right up until the moment you combine them. Warm milk or coffee will melt the ice too fast, resulting in a watery latte. I always store my milk and cold brew in the freezer for 5 minutes before use – just enough to make them frosty without freezing. This tiny temperature tweak ensures each sip stays perfectly balanced from the first to the last.
Why Your Nose Knows Best
Before you even taste, trust your sense of smell. A properly brewed cold brew will release a deep, nutty aroma with hints of chocolate; if it smells flat, it’s likely under‑extracted. Similarly, the vanilla syrup should have a warm, sweet scent that isn’t overpowering. If either component smells off, adjust the ratios – a little extra syrup can rescue a weak coffee, while a splash more coffee can balance an overly sweet base.
The 5‑Minute Rest That Changes Everything
After whisking the milk, let it sit for exactly five minutes. This brief rest allows the micro‑foam to stabilize, giving you a smoother pour and a thicker head. I once tried to skip this step during a rushed brunch, and the latte ended up flat and unappealing – a lesson learned the hard way.
Ice Shape Matters
Crushed ice provides a slower melt, but if you prefer cubes, use a silicone mold to create uniformly sized spheres. The larger surface area slows dilution, keeping the latte’s flavor intact longer. A friend tried using regular ice cubes and ended up with a watery mess after ten minutes – don’t be that friend.
Whipped Cream Without the Guilt
For a lighter topping, whip half‑and‑half with a teaspoon of powdered sugar and a dash of vanilla extract. This creates a fluffy, low‑fat cloud that still adds that luxurious mouthfeel. If you’re dairy‑free, coconut whipped cream works beautifully and adds a subtle tropical note.
Creative Twists and Variations
This recipe is a playground. Here are some of my favorite ways to switch things up:
Mocha Madness
Swap half of the vanilla syrup for chocolate syrup, and add a pinch of cocoa powder to the milk before whisking. The result is a decadent mocha‑vanilla hybrid that’s perfect for chocolate lovers.
Cinnamon Spice
Stir a teaspoon of ground cinnamon into the vanilla syrup and garnish the finished latte with a light dusting of cinnamon on the whipped cream. This adds a warm, comforting note that’s especially inviting on cooler evenings.
Nutty Delight
Replace half of the milk with hazelnut milk and drizzle a touch of hazelnut syrup over the top. The nutty undertones complement the coffee’s natural flavors and elevate the drink to a boutique café experience.
Fruit Fusion
Blend a handful of frozen berries into the cold brew before mixing with the syrup. The fruit’s tartness cuts through the sweetness, creating a vibrant, summer‑ready iced latte.
Alcoholic Twist
For an adult‑only version, add a shot of coffee liqueur or a splash of bourbon after the coffee‑vanilla blend. The spirit adds depth and a pleasant warmth that pairs beautifully with the coldness of the drink.
Plant‑Based Perfection
Use oat milk for a naturally sweet, creamy base, and swap the whipped cream for a dollop of coconut whipped topping. This keeps the latte entirely dairy‑free while still delivering that luxurious texture.
Storing and Bringing It Back to Life
Fridge Storage
Transfer any leftover latte (without ice) into an airtight glass jar and store it in the refrigerator for up to 48 hours. Give it a gentle shake before serving to recombine any settled layers. The flavor will stay vibrant, though the foam may diminish – a quick whisk revives it.
Freezer Friendly
If you want to prep in bulk, freeze the coffee‑vanilla mixture in portion‑size freezer bags. Thaw overnight in the fridge, then follow the standard milk‑whisking and ice‑adding steps. This method is perfect for large gatherings where you need a quick, consistent batch.
Best Reheating Method
When reheating, add a splash of cold water (about 1‑2 tbsp per cup) before microwaving for 30‑45 seconds. The water creates steam that restores the latte’s original silkiness without over‑cooking the milk. Stir gently and serve over fresh ice for a “like‑new” experience.