Picture this: I’m standing in a cramped kitchen, the smell of burnt onions still clinging to the air, and my friend has dared me to whip up a comforting shepherd’s pie in under 45 minutes. I’ve been chasing that elusive comfort‑food moment for years—those evenings when the world feels too loud and a warm, savory dish feels like a hug from a friend. I’ve tried the classic, the fancy, even the “healthy” versions, but each time something was missing: that buttery, golden crust that crackles like a fresh snowflake, that deep umami center that lingers on the tongue, and that subtle herbal whisper that ties everything together. That night, with the clock ticking, I decided it was time to reinvent the wheel.
I grabbed my skillet, set the stove to medium, and let the onions sizzle until they turned translucent and fragrant—an aroma that instantly pulled my mind back to childhood kitchens and late‑night cravings. The sizzling sound was like a drumbeat, telling me the foundation was solid. I added the garlic, watching it dance and release its sharp, sweet perfume, then tossed in the carrots and celery, their bright colors promising a burst of natural sweetness. With every stir, my kitchen felt less like a battlefield and more like a stage where flavor was the star.
When the meat hit the pan, I felt the heat rise and the aroma deepen into a rich, savory scent that made my mouth water. The meat browned quickly, forming a caramelized crust that locked in juices and flavor. I sprinkled in the tomato paste, watching it caramelize into a thick, dark sauce that smelled like roasted tomatoes and a hint of pepper. The broth and Worcestershire sauce poured in, creating a bubbling, glossy mixture that would become the soul of the pie. I added the thyme, rosemary, and bay leaf—herbs that would infuse the mixture with a fragrant, earthy depth that’s hard to replicate with spices alone.
Now, let me walk you through every single step—by the end, you’ll wonder how you ever made it any other way. I’ll reveal the secret ingredient that elevates this pie from comforting to unforgettable, the technique that guarantees a golden, crispy top, and the small, often overlooked tweaks that turn a good dish into a great one. Get ready to taste a dish that will become your new comfort food standard.
What Makes This Version Stand Out
Bold Flavor: The addition of Worcestershire sauce and fresh herbs creates a depth that traditional recipes lack. It’s a savory, umami-packed base that sings with every bite.
Golden Crust: A generous sprinkle of cheddar cheese on top before baking ensures a melty, golden finish that crackles like a crisp sunrise.
Texture Balance: The combination of tender meat, crisp vegetables, and creamy mashed potatoes creates layers that dance on the palate.
Time Efficiency: While it feels like a labor of love, the entire process takes just 45 minutes from start to finish.
Make‑Ahead Friendly: You can assemble the pie a day ahead and bake it fresh when you’re ready, saving you time on busy nights.
Kid‑Friendly: The mild spices and familiar flavors make it a hit with both kids and adults—no one will refuse a slice.
Versatile Base: Swap out ground beef for lamb, turkey, or even a hearty lentil mixture and it still shines.
Comfort Factor: The warm, hearty filling combined with the buttery mashed potato topping feels like a hug in every bite.
Alright, let’s break down exactly what goes into this masterpiece…
Inside the Ingredient List
The Flavor Base
Ground beef or lamb is the backbone of any shepherd’s pie. The fat content is crucial; a lean cut will leave you with a dry, bland center, while a slightly fattier cut provides moisture and a richer taste. If you’re using beef, aim for an 80/20 ratio; for lamb, 70/30 works wonders. The meat’s natural juices will mingle with the broth, creating a luscious sauce that coats the vegetables like velvet.
If you’re going plant‑based, a hearty lentil or textured vegetable protein (TVP) can mimic the texture. Just rehydrate the TVP in hot broth to bring out its full flavor.
The Vegetable Crew
Carrots, celery, and onions are the classic trio that adds sweetness, crunch, and depth. Dice them finely so they cook evenly and release their natural sugars. The diced carrots bring a subtle earthiness that pairs beautifully with the savory meat.
The garlic is the secret weapon for instant aroma. Mince it finely so it distributes evenly and doesn’t form clumps. When it hits the hot pan, it releases a sweet, mellow scent that lingers in the kitchen.
The Unexpected Star
Worcestershire sauce is the unsung hero of this recipe. It adds a complex, tangy depth that can’t be achieved with just salt and pepper. If you’re averse to the tang, try a splash of soy sauce for a similar umami kick.
The dried herbs—thyme, rosemary, and a bay leaf—infuse the filling with a fragrant, earthy aroma that elevates every bite. Fresh herbs give a bright note, but dried ones are more potent and last longer in the pan.
The Final Flourish
Mashed potatoes are the comforting, creamy topping that ties everything together. Use potatoes with a high starch content, like Russets, for a fluffy texture. Add a splash of milk and a pat of butter to create a silky mash that melts in your mouth.
Shredded cheddar cheese on top not only adds flavor but also creates a golden, bubbly crust that’s impossible to resist. If you prefer a sharper taste, sprinkle some aged cheddar or Gruyère.
Everything’s prepped? Good. Let’s get into the real action…
The Method — Step by Step
- Step 1: Sauté the aromatics. Heat olive oil in a large skillet over medium heat. Add diced onions and a pinch of salt, cooking until translucent and fragrant, about 3–4 minutes. Stir in minced garlic, letting it sizzle for 30 seconds before it turns golden. This is the moment your kitchen starts smelling like home. Don’t rush it; the onions must develop a subtle sweetness.
- Step 2: Brown the meat. Increase heat to medium‑high and add the ground beef or lamb. Break it up with a wooden spoon, seasoning with salt and pepper. Cook until browned and no longer pink, about 8–10 minutes. The meat should release a deep, savory aroma that makes you close your eyes in anticipation. Drain excess fat if you’re using a lean cut—this keeps the pie from becoming greasy.
- Step 3: Add vegetables. Toss in diced carrots and celery, stirring to combine. Cook for 5 minutes, letting the vegetables soften slightly but retain a hint of crunch. The mixture should look like a colorful, savory stew. If the pan feels dry, splash a tablespoon of broth to deglaze and lift the browned bits.
- Step 4: Introduce the umami. Stir in tomato paste, letting it caramelize for a minute before adding beef broth and Worcestershire sauce. The liquid should coat the mixture and create a glossy, thick sauce. Add dried thyme, rosemary, and a bay leaf. Let the flavors meld for 2 minutes, stirring occasionally.
-
Step 5: Simmer and reduce. Reduce heat to low, cover, and let the mixture simmer for 10 minutes. The sauce should thicken, and the vegetables should be tender. Watch Out: Be careful not to overcook the vegetables; they should still hold a slight bite to contrast the creamy mash. If they become mushy, the pie will lose its textural harmony.
- Step 6: Prepare the mash. While the filling simmers, peel and cube potatoes, then boil in salted water until fork‑soft. Drain and return to the pot. Add butter, milk, and a pinch of salt, mashing until silky smooth. For extra fluffiness, pulse the mash with a potato ricer. The mash should feel like a cloud that will embrace the savory filling.
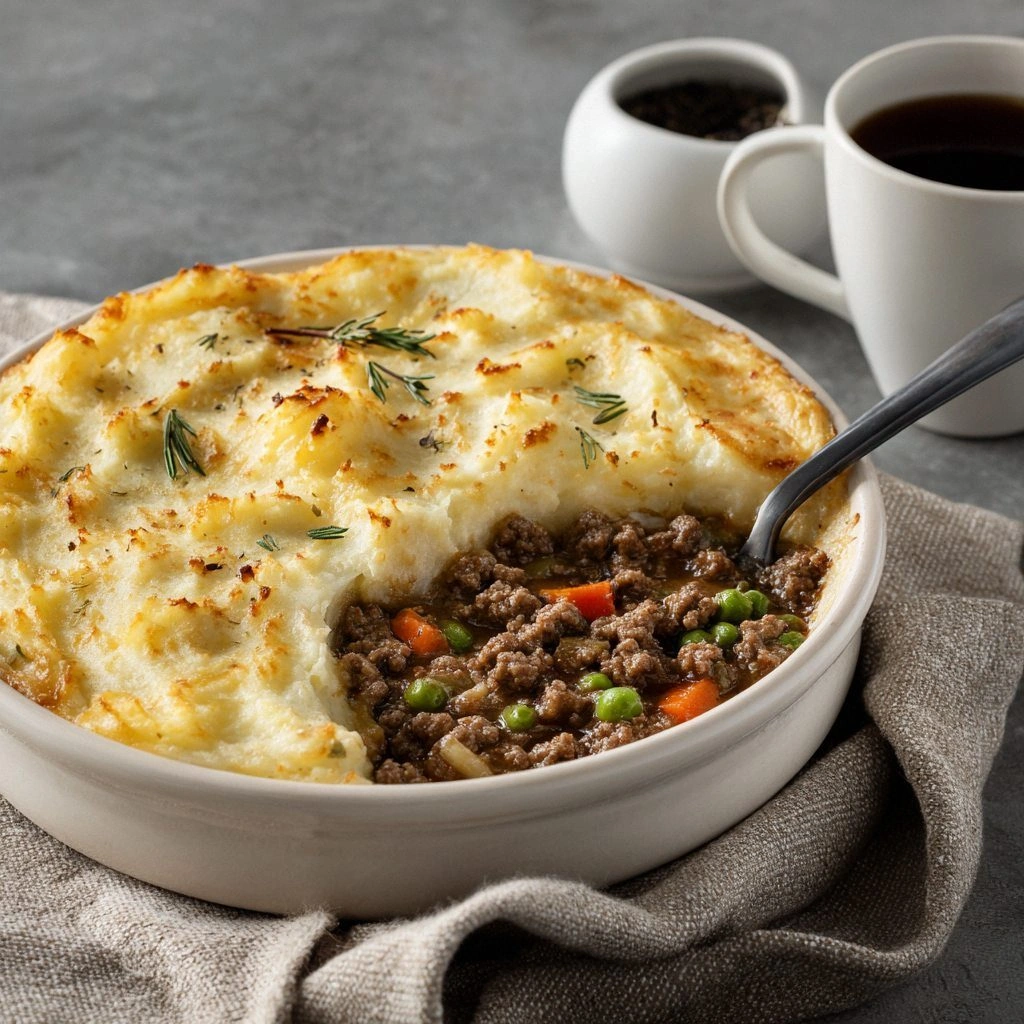
- Step 7: Assemble the pie. Transfer the meat mixture to a 9‑inch baking dish, spreading it evenly. Spoon the mashed potatoes over the top, using a spatula to create a smooth surface. Sprinkle shredded cheddar cheese across the mash, ensuring even coverage for a golden crust.
- Step 8: Bake to perfection. Preheat the oven to 375°F (190°C). Place the dish in the oven and bake for 20–25 minutes, or until the cheese is melted, bubbly, and slightly golden. The top should crackle just enough to give you that satisfying crunch. Remove from the oven and let rest for 5 minutes before serving. The steam will settle, making the pie easier to slice.
- Step 9: Serve and enjoy. Slice the pie like a pizza, allowing the layers to show. Serve hot, perhaps with a side of crisp salad or a spoonful of fresh herbs for an extra pop of color. Watch the smiles as your guests take that first bite—this is the moment you’ll remember for years.
- Step 10: Store or reheat. If you have leftovers, cover tightly and refrigerate for up to 3 days. Reheat in the oven at 350°F (175°C) for 10–12 minutes, or microwave on high for 2–3 minutes, adding a splash of water to keep the mash moist. The pie will taste just as fresh as when it first came out of the oven.
That’s it—you did it. But hold on, I’ve got a few more tricks that will take this to another level.
Insider Tricks for Flawless Results
The Temperature Rule Nobody Follows
Many cooks think a higher oven temperature always means a better crust, but that’s a myth. Baking at 375°F allows the cheese to melt evenly while the potatoes cook through without drying out. If you’re using a convection oven, lower the temperature by 25°F to avoid over‑browning.
Why Your Nose Knows Best
Your sense of smell is a reliable indicator of doneness. When the filling starts to bubble and the cheese is bubbling, your nose will tell you it’s almost ready. Don’t rely solely on the timer; trust that aromatic cue.
The 5‑Minute Rest That Changes Everything
Letting the pie rest for 5 minutes after baking isn’t just a courtesy—it lets the juices redistribute, ensuring each bite is moist and flavorful. It also makes slicing easier, as the filling firms up slightly.
Keep the Potatoes Light
Avoid over‑mashing the potatoes. A few lumps keep the texture airy and prevent the mash from becoming gummy. For an extra touch, fold in a handful of grated Parmesan for subtle nuttiness.
Use Fresh Herbs for a Burst
Finish the dish with a sprinkle of fresh parsley or thyme right before serving. The bright, herbal aroma cuts through the richness and adds a fresh pop of color.
Creative Twists and Variations
This recipe is a playground. Here are some of my favorite ways to switch things up:
Hearty Lentil Edition
Replace the ground meat with cooked lentils for a vegetarian version. Add a splash of balsamic vinegar to the filling for a tangy depth. The lentils hold up well under the mash, giving a satisfying bite.
Spicy Mexican Shepherd’s Pie
Swap the beef for ground turkey and add a diced jalapeño, cumin, and a pinch of chili powder. Top with crumbled cotija cheese instead of cheddar. The result is a zesty, comforting dish that feels like a taco pie.
Seafood Surprise
Use a mix of shrimp and scallops, sautéed with garlic and lemon zest. Replace the beef broth with a light fish stock. The citrus brightens the dish, making it a delightful seafood twist.
Root Vegetable Mash
Add roasted sweet potatoes or parsnips to the mash for a sweeter, earthy flavor. Sprinkle with a touch of maple syrup before baking for a caramelized finish.
Cheddar‑Chive Explosion
Layer the cheese with finely chopped chives before baking. The chives release a mild onion flavor that pairs beautifully with the cheddar, adding a fresh, green note.
Gluten‑Free Version
Use a gluten‑free flour blend to thicken the filling or a gluten‑free mashed potato mix. Ensure the broth and tomato paste are gluten‑free. The pie will still be hearty and comforting.
Storing and Bringing It Back to Life
Fridge Storage
Cool the pie completely before covering it tightly with plastic wrap or foil. Store in the refrigerator for up to 3 days. When ready to serve, reheat in a 350°F oven for 15 minutes, or microwave on medium for 3–4 minutes, adding a splash of water to keep the mash moist.
Freezer Friendly
Let the pie cool, then wrap it in foil and place in a freezer bag. Freeze for up to 2 months. When reheating, thaw overnight in the fridge, then bake at 350°F for 25 minutes. The texture will remain tender and the flavors intact.
Best Reheating Method
The oven is your best bet for restoring the crisp crust. Preheat to 350°F, then bake for 15–20 minutes. If you’re short on time, microwave on high for 2 minutes, then finish under the broiler for 1–2 minutes to revive the cheese.