I was in the middle of a late‑night midnight snack spree, rummaging through the pantry for something that could satisfy my sweet tooth and my Halloween vibe. I reached for a bag of Oreos, but the idea of just dunking them in chocolate felt too ordinary for the spooky season. So I decided to turn the classic cookie into a decadent truffle, coating it in white chocolate for a ghostly glow and topping it with candy eyes for that unmistakable Halloween twist. The result was a bite‑sized horror‑themed treat that was as delicious as it was eerie, and I could not wait to share every detail with you.
Picture this: a room bathed in dim light, the faint scent of melted chocolate mingling with the earthy aroma of crushed Oreos. Your ears catch the subtle crackle of the chocolate as it melts over a double boiler, the sound echoing like a distant thunderstorm. The texture of the cookie crumbs is almost velvety, while the creamy cream cheese base holds everything together like a secret pact between flavors. The first bite is a burst of sweet, slightly salty, and utterly comforting, with the candy eyes adding a playful crunch that punctuates the richness.
What sets this version apart from every other Oreo truffle recipe out there is the balance of contrast and harmony. The white chocolate coating offers a clean, silky finish that lets the dark cookie flavor shine, while the candy eyes and sprinkles bring color, texture, and a touch of mischief. It’s the kind of recipe that feels like a secret family tradition, yet you’re the first to discover it. And let me be honest—when you taste the first truffle, you’ll be tempted to keep going until you’ve devoured the entire batch.
I dare you to taste this and not go back for seconds. The combination of chocolatey crunch, creamy filling, and spooky decorations makes it an instant crowd‑pleaser. Picture yourself pulling these out of the fridge on Halloween night, the whole kitchen smelling incredible, and watching your friends’ faces light up as they bite into the first one. This is hands down the best version you'll ever make at home, and it’s simple enough that even a novice can pull it off.
What Makes This Version Stand Out
- Flavor: The deep chocolatey bite of Oreos is amplified by a creamy, tangy cream cheese center, creating a layered taste experience that keeps you coming back for more.
- Texture: The smooth, glossy white chocolate coating gives a satisfying snap that contrasts with the chewy cookie crumb, while the candy eyes add a playful crunch.
- Simplicity: No baking, no fancy equipment—just a double boiler, a bowl, and a handful of ingredients that most kitchens already stock.
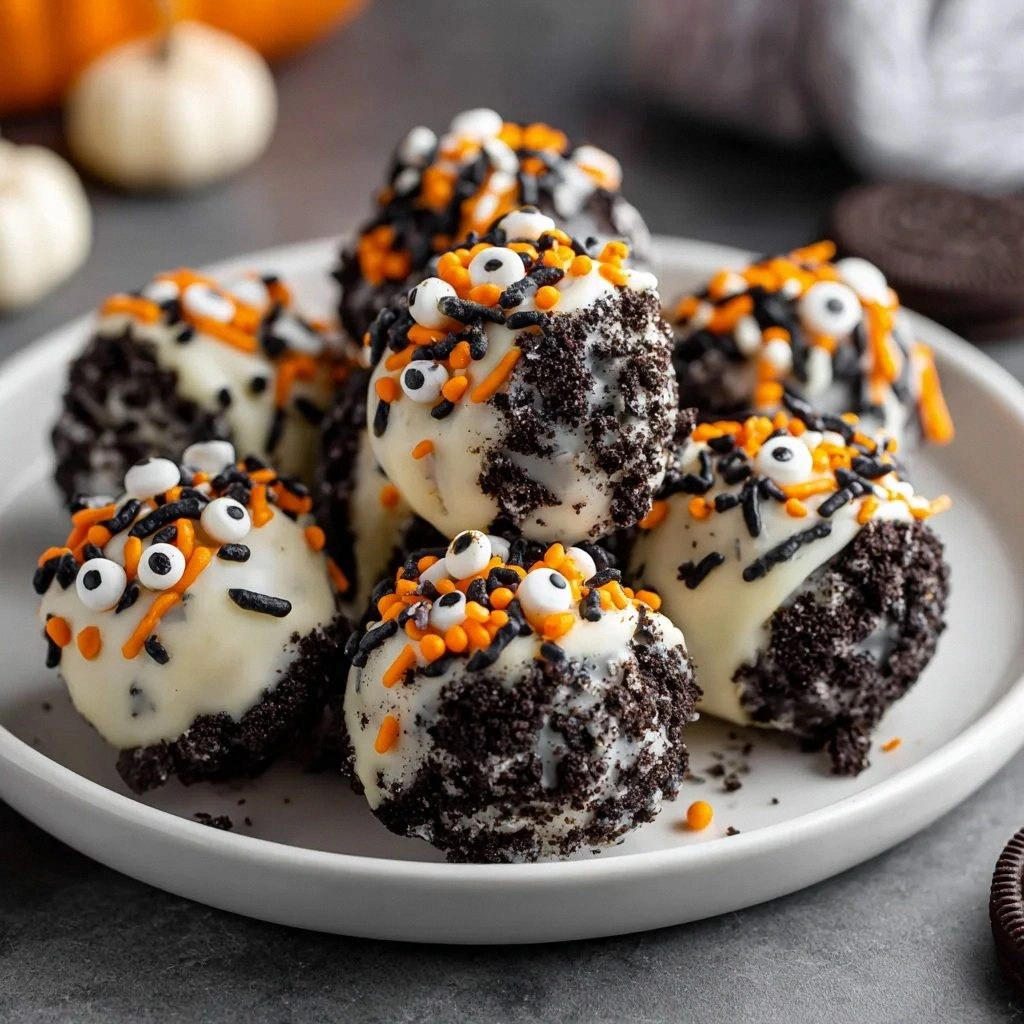
- Visual Appeal: The stark white coating against the dark Oreos, highlighted by black and orange sprinkles, makes each truffle a miniature piece of Halloween art.
- Crowd Reaction: Friends and family alike rave about how these truffles taste like a dessert and a treat all at once, making them perfect for parties.
- Make‑Ahead: The truffles can be prepared days in advance, chilled, and re‑coated with fresh chocolate, saving you time on the big night.
- Ingredient Quality: Using premium Oreos and high‑grade chocolate elevates the flavor profile, ensuring each bite is rich and satisfying.
- Versatility: Swap white chocolate for dark for a richer bite, or add a splash of espresso for an extra kick—this recipe adapts to your taste.
Alright, let's break down exactly what goes into this masterpiece…
Inside the Ingredient List
The Flavor Base
Oreo cookies are the star of the show, providing the classic chocolate crunch that makes these truffles unforgettable. If you use a different cookie, the flavor profile shifts dramatically; for instance, replacing Oreos with chocolate sandwich cookies will result in a sweeter, less complex taste. Always choose the original Oreo recipe, not the reduced‑fat or chocolate chip varieties, to maintain the authentic chocolatey depth. When crushing the cookies, aim for a fine consistency—too coarse, and the truffles will feel gritty; too fine, and they may bind too tightly, losing that satisfying chew.
The Texture Crew
Cream cheese is the binder that holds everything together. Its mild tang balances the sweetness of the Oreos and the richness of the chocolate. If you skip the cream cheese, the truffles will fall apart or become overly dry. For a lighter version, use low‑fat cream cheese, but be prepared for a slightly different mouthfeel. A small pinch of salt can enhance the flavors, but keep it minimal to avoid overpowering the delicate balance.
The Unexpected Star
White chocolate chips are the coating that gives these truffles their ghostly glow. They melt smoothly and set into a glossy finish that’s almost invisible, letting the cookie’s dark silhouette pop. If you prefer a richer, more intense chocolate flavor, swap the white chocolate for dark chocolate chips. The trade‑off is a slightly darker finish and a more pronounced cocoa bite. Remember to keep the chocolate at a low temperature to avoid scorching.
The Final Flourish
Candy eyes and black and orange sprinkles are the finishing touches that transform a simple truffle into a Halloween masterpiece. The candy eyes provide a playful crunch and a pop of color that kids love. Sprinkles add a subtle crunch and a festive look, making each truffle a visual treat. If you’re hosting a party, consider adding a few extra sprinkles for an extra burst of color. These decorations also help keep the truffles from sticking together in the fridge.
Everything's prepped? Good. Let's get into the real action…
The Method — Step by Step
- Crush the Oreos: Place 48 Oreo cookies in a large zip‑lock bag and crush them with a rolling pin until they resemble fine crumbs. The goal is a texture that feels like powdered sugar but still has small bits for that satisfying chew. If you prefer a smoother truffle, pulse the cookies in a food processor for 10–15 seconds. Let the crumbs cool to room temperature; this prevents the cream cheese from melting prematurely.
- Blend the Base: In a medium bowl, combine the Oreo crumbs with 8 ounces of softened cream cheese. Mix until the mixture is uniform and holds together when pressed between your fingers. The mixture should feel slightly moist but not runny. If it’s too dry, add a tablespoon of milk or heavy cream to bring it together.
- Form the Balls: Using a small cookie scoop or two teaspoons, scoop the mixture into 24 equal portions. Roll each portion between your palms to form a smooth sphere. The truffles should be firm enough to hold their shape but soft enough to bite into. Place them on a parchment‑lined tray and refrigerate for 30 minutes to firm up.
- Melt the Chocolate: Fill a small saucepan with 2 inches of water and bring to a gentle simmer. Place a heat‑proof bowl over the saucepan, ensuring the bottom of the bowl does not touch the water. Add 1 cup of white chocolate chips to the bowl and stir until fully melted and glossy. Keep the temperature below 120°F (49°C) to avoid seizing.
- Dip the Truffles: Remove the chilled truffles from the fridge. Hold each truffle by the base and dip it into the melted chocolate, swirling to coat completely. Let the excess chocolate drip off before placing the truffle back on the parchment. The coating should be a thin, even layer that sets quickly.
- Decorate: While the chocolate is still warm, press a candy eye into the center of each truffle. Sprinkle a handful of black and orange sprinkles over the top to add color and texture. This is the moment of pure magic—watch the white chocolate glaze set into a glossy finish.
- Set the Truffles: Place the decorated truffles on a wire rack set over a sheet of parchment to catch any drips. Allow them to set at room temperature for about 15 minutes, or refrigerate for 10 minutes to speed up the process. The truffles should be firm and ready to serve.
- Serve and Enjoy: Transfer the truffles to a serving platter or an airtight container. The truffles can be served immediately or stored in the fridge for up to a week. When you’re ready to eat, let them sit at room temperature for 5 minutes to soften slightly, then enjoy the perfect blend of sweet, salty, and spooky.
That's it — you did it. But hold on, I've got a few more tricks that'll take this to another level…
Insider Tricks for Flawless Results
The Temperature Rule Nobody Follows
The key to a flawless chocolate coating is temperature control. Even a slight temperature increase can cause the chocolate to seize, turning it into a lumpy mess. Use a digital thermometer to keep the chocolate below 120°F (49°C). If you notice any streaks or cloudiness, remove the bowl from the heat and stir vigorously to bring the temperature back down.
Why Your Nose Knows Best
Before you start, give the melted chocolate a sniff. A pleasant, sweet aroma indicates the chocolate is at the right temperature. A metallic or burnt smell means it’s overheating. Trust your nose; it’s the best indicator of chocolate health.
The 5‑Minute Rest That Changes Everything
After dipping the truffles, let them rest for exactly five minutes before adding decorations. This brief pause allows the chocolate to set enough to hold the candy eye in place, yet still be pliable enough to swirl sprinkles around. Skipping this step can cause the decorations to slide off.
Use a Double Boiler for Consistency
A double boiler is essential for melting chocolate without scorching. The gentle, indirect heat prevents the chocolate from reaching temperatures that cause it to seize. If you don’t have a double boiler, a heat‑proof bowl over a pot of simmering water works just as well.
Keep the Truffles Cool Until Serving
If you’re preparing the truffles ahead of time, keep them refrigerated until you’re ready to serve. This prevents the chocolate from melting and keeps the truffles firm. When you’re ready to eat, let them sit at room temperature for a few minutes to soften slightly for the perfect bite.
Creative Twists and Variations
This recipe is a playground. Here are some of my favorite ways to switch things up:
Dark Chocolate Ghouls
Swap the white chocolate for dark chocolate chips for a richer, more intense flavor. The dark coating will give the truffles a more ominous look and a deeper cocoa bite that pairs beautifully with the sweet Oreo base.
Minty Mummies
Add a few drops of peppermint extract to the cream cheese mixture for a cool, refreshing twist. The mint pairs unexpectedly well with the chocolate, giving the truffles a subtle aftertaste that lingers.
Nutty Nightmares
Chop a handful of toasted pecans or walnuts and fold them into the Oreo crumb mixture. The nuts add crunch and a buttery flavor that complements the creamy center.
Espresso Specters
Stir a tablespoon of espresso powder into the melted chocolate before dipping. The espresso gives the truffles a subtle coffee kick that balances the sweetness.
Caramelized Caramel
Drizzle a thin layer of caramel sauce over the coated truffles before the chocolate sets. The caramel adds a buttery sweetness that pairs wonderfully with the dark cookie base.
Vegan Version
Use dairy‑free cream cheese and vegan chocolate chips for a plant‑based version that still delivers on flavor. The texture stays creamy, and the chocolate still sets beautifully.
Storing and Bringing It Back to Life
Fridge Storage
Place the truffles on a parchment‑lined tray and cover with a damp paper towel. Store them in an airtight container in the refrigerator for up to seven days. The damp towel prevents the chocolate from drying out, keeping the truffles glossy.
Freezer Friendly
For longer storage, place the truffles on a parchment tray and freeze until solid. Once frozen, transfer them to a freezer bag. They can be kept for up to three months. When ready to serve, let them thaw at room temperature for 10 minutes.
Best Reheating Method
To restore the truffles to their original texture, place them in a single layer on a parchment sheet and microwave on low for 10–15 seconds. If the chocolate feels stiff, add a tiny splash of water before reheating; it will steam back to perfection without becoming soggy.