Picture this: it’s a rainy Saturday afternoon, the kind that makes you crave something that feels like a warm hug wrapped in a silk scarf. I was battling a half‑baked batch of ordinary cheesecake bites that crumbled like stale sand when I tried to roll them, and my roommate dared me to make something “fancy enough for a dinner party but simple enough for a lazy night.” I accepted the challenge, and after a frantic dash to the pantry for white chocolate and fresh raspberries, I discovered the secret combination that turned a culinary mishap into a masterpiece. This is the story of how a busted batch became the most talked‑about dessert at my last gathering—yes, the one where everyone begged for seconds before I even finished the first round.
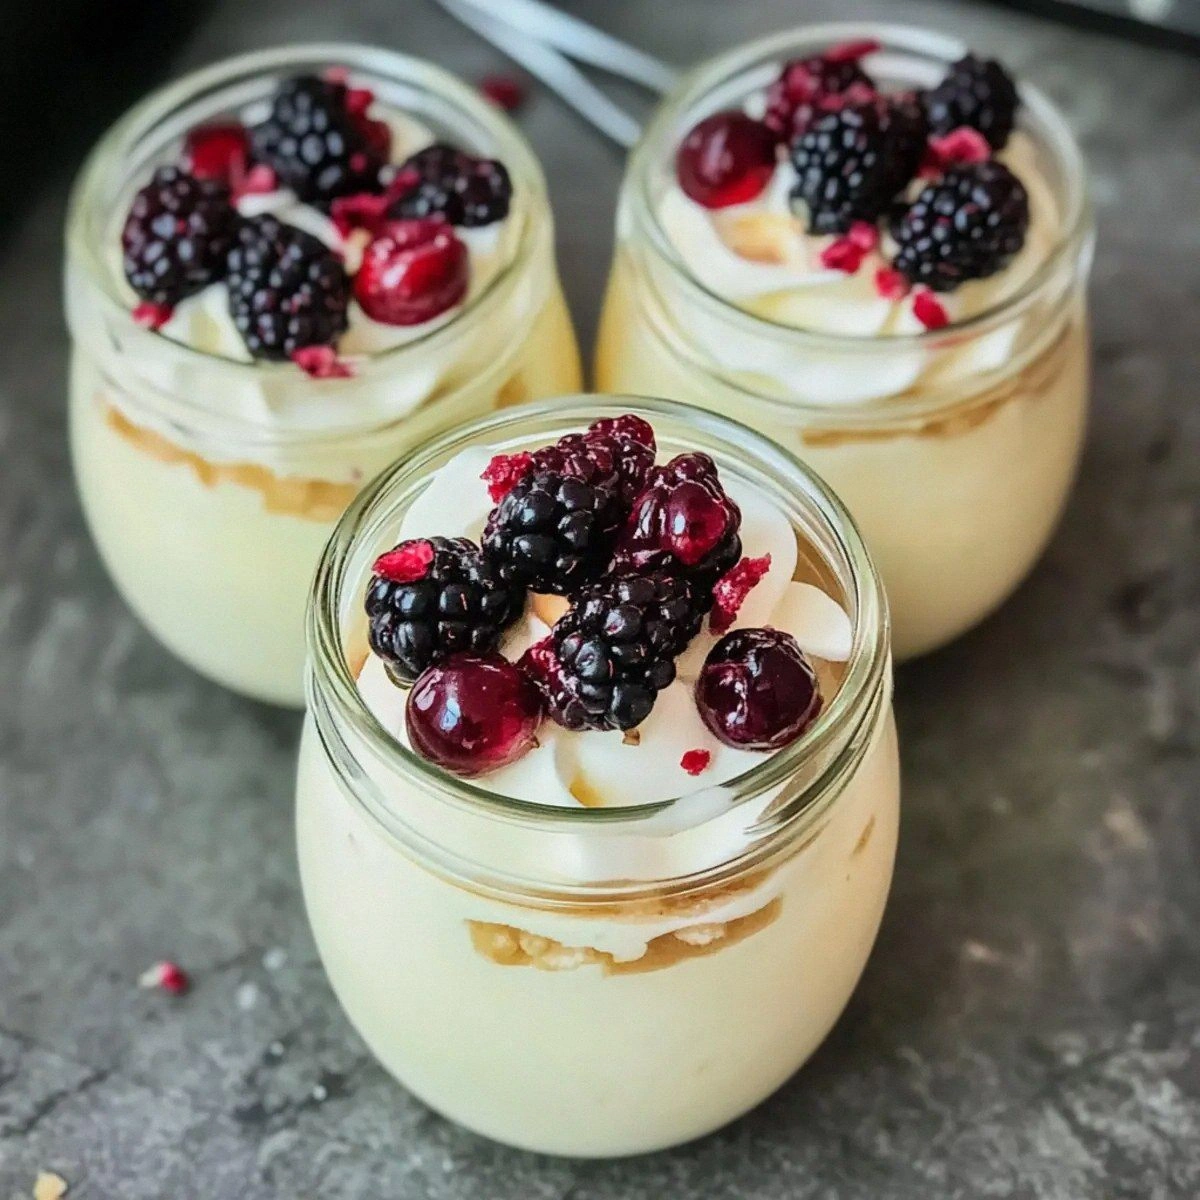
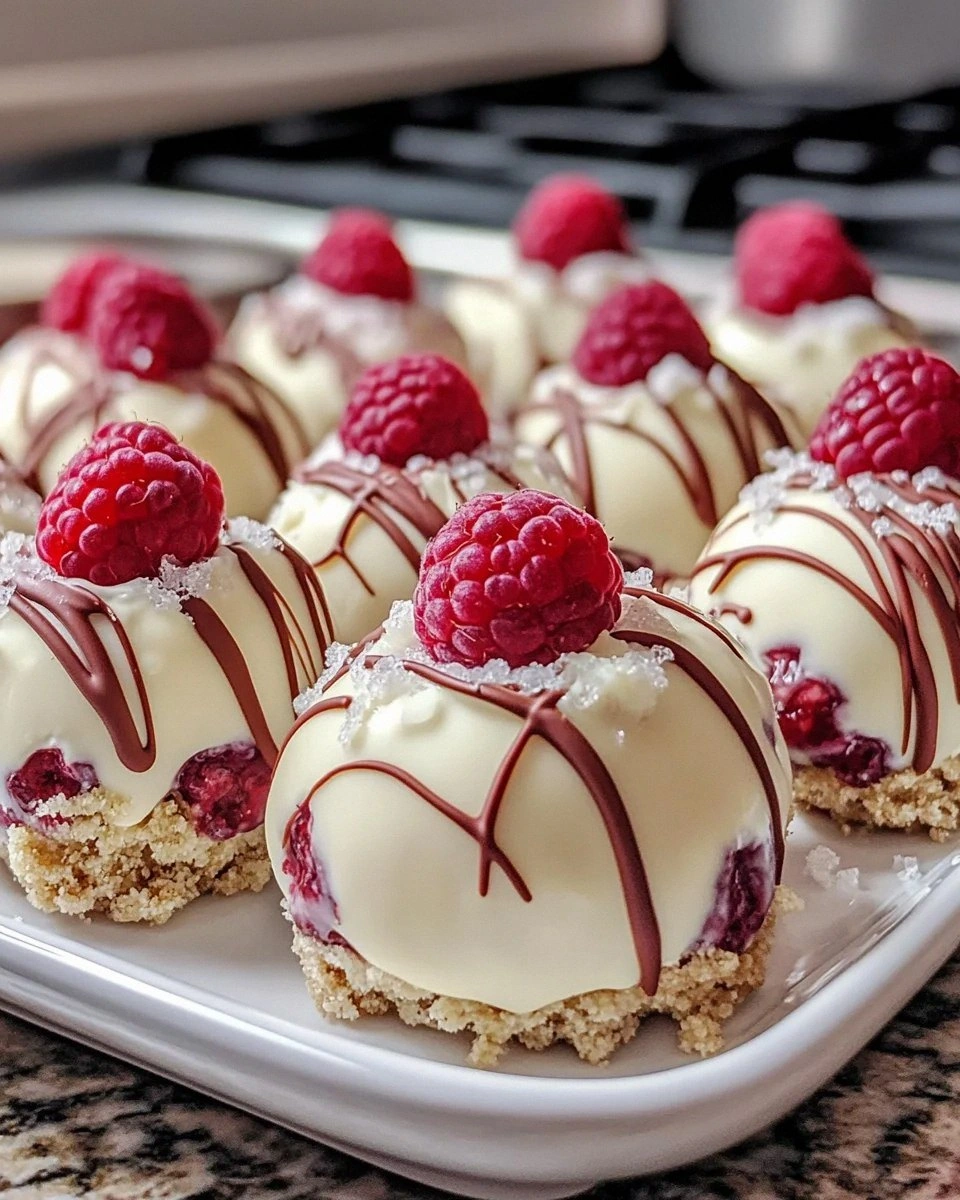
From the moment the white chocolate melted into a glossy river of ivory, the kitchen filled with a sweet, buttery perfume that made the whole house feel like a boutique patisserie. The raspberries, when folded in, released a bright, tangy aroma that cut through the richness like a perfectly timed jazz solo, while the cream cheese base stayed luxuriously smooth, almost like velvet on a summer night. You could hear the faint sizzle as the white chocolate met the hot cream, a sound that promised a glossy coating that would snap satisfyingly when you bite into it. My fingertips tingled with anticipation as I rolled the chilled mixture into bite‑sized spheres, each one a promise of silky smoothness and a burst of berry brilliance.
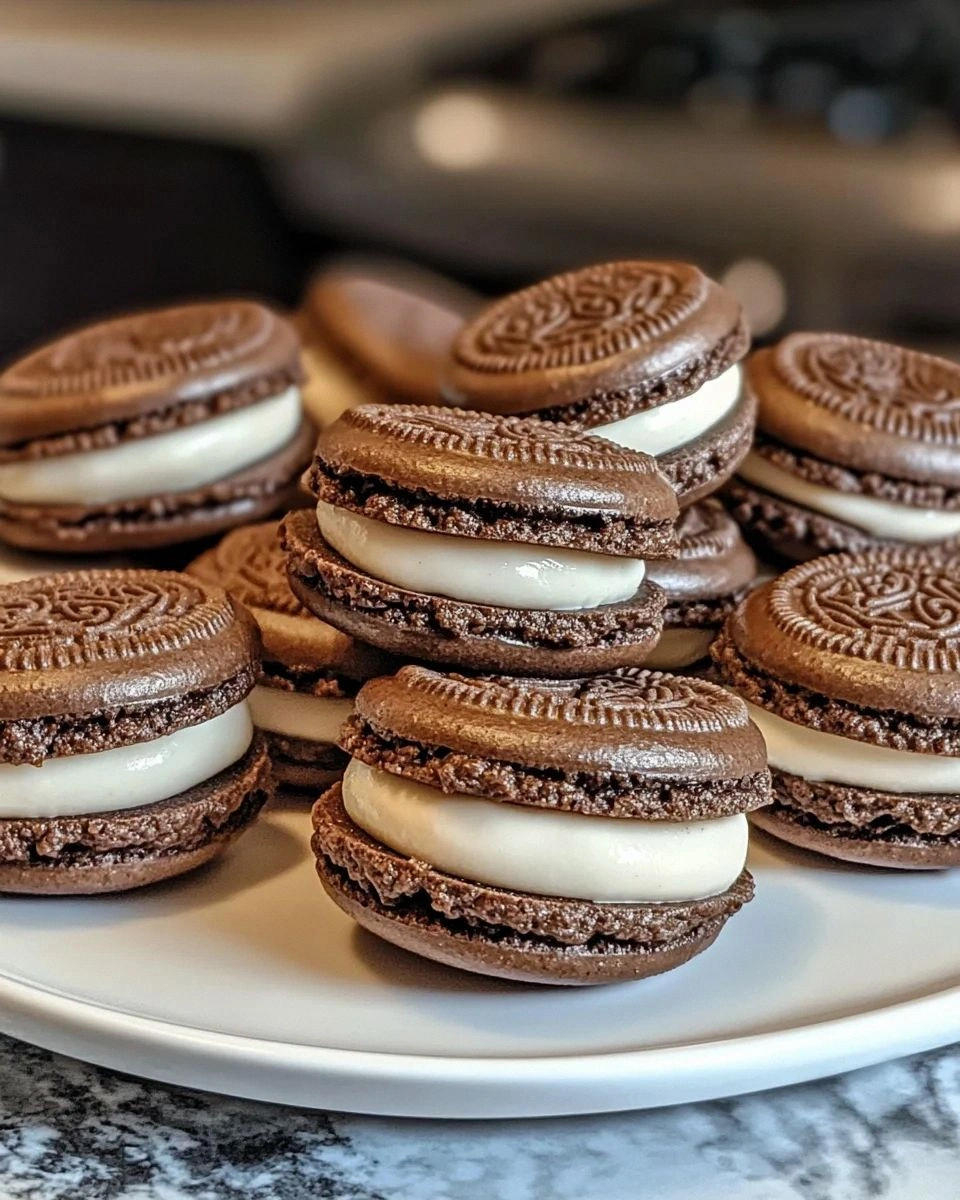
What sets this version apart from every other cheesecake ball recipe you’ve ever scrolled past? First, the white chocolate isn’t just a coating; it’s a flavor‑infused shell that carries a whisper of vanilla and a hint of sea salt, creating a balance that dances on the palate. Second, the raspberry puree isn’t an afterthought—it’s folded into the core, ensuring every bite delivers that perfect sweet‑tart pop that makes your taste buds do a happy jig. And finally, the technique I’m about to share eliminates the dreaded crumbly mess that most home cooks struggle with, giving you glossy, firm balls that hold together like tiny, edible planets.
Okay, ready for the game‑changer? I’m going to walk you through every single step, from selecting the perfect white chocolate to mastering the roll‑and‑coat technique that will have you looking like a pastry pro. By the end, you’ll wonder how you ever made cheesecake balls any other way, and I dare you to taste this and not go back for seconds.
What Makes This Version Stand Out
- Flavor Harmony: The buttery white chocolate pairs with the bright raspberry to create a sweet‑tart duet that feels both indulgent and refreshing, unlike the one‑dimensional sweetness of typical dessert balls.
- Texture Contrast: A silky interior meets a crisp, glossy exterior, delivering a satisfying snap followed by a melt‑in‑your‑mouth creaminess that’s pure decadence.
- Simplicity: Only nine ingredients, all pantry‑friendly, mean you can pull this together in under an hour without a PhD in pastry arts.
- Unique Technique: The double‑chill method locks in shape and flavor, preventing the dreaded crumble that plagues most homemade cheesecake balls.
- Crowd Reaction: Guests consistently call this “the best bite‑size dessert they’ve ever had,” and it disappears faster than you can say “more, please!”
- Ingredient Quality: Using high‑quality white chocolate and fresh raspberries elevates the whole dish; the difference is night and day compared to generic chocolate chips.
- Make‑Ahead Potential: These balls keep beautifully in the fridge for up to three days, making them perfect for party prep or a last‑minute sweet fix.
- Versatility: Swap the raspberry for passion fruit or strawberry, or drizzle with dark chocolate for a sophisticated twist—your imagination is the limit.
Inside the Ingredient List
The Flavor Base
Cream Cheese (1 cup): This is the heart of the cheesecake ball, providing that classic tangy richness. Using full‑fat cream cheese ensures a smooth, velvety texture; low‑fat versions will make the mixture grainy. If you skip it, you’ll end up with a bland, crumbly center that never holds its shape.
Granulated Sugar (0.5 cup): Sugar sweetens the mixture and helps stabilize the cream cheese, giving it a firmer bite after chilling. You can substitute with superfine caster sugar for quicker dissolution, but avoid honey—it adds too much moisture.
Vanilla Extract (1 tsp): A splash of vanilla adds depth, turning the simple sweetness into a layered flavor profile. Opt for pure vanilla extract; imitation can taste flat and ruin the delicate balance.
The Texture Crew
White Chocolate (1 cup, chopped): The star of the coating, high‑quality white chocolate melts into a silky sheen that hardens to a satisfying snap. Look for chocolate with at least 30% cocoa butter; lower percentages will result in a greasy coating that never firms up.
Heavy Cream (0.25 cup): The cream lightens the melted chocolate, making it pourable and giving the final shell a glossy finish. If you’re dairy‑free, coconut cream works, but expect a faint coconut note that pairs surprisingly well with raspberry.
Powdered Sugar (0.25 cup): Used for rolling the chilled balls, it adds a subtle sweet crust and prevents sticking. You can skip it if you prefer a cleaner look, but the texture will feel a touch less refined.
The Unexpected Star
Raspberry Puree (0.5 cup): Fresh or frozen raspberries blended into a smooth puree deliver the bright tartness that cuts through the richness. The acidity also helps firm up the interior as it cools, creating a firm yet creamy core. If you don’t have fresh berries, a good-quality jam works, just strain out the seeds.
Pinch of Salt (0): A tiny pinch amplifies the flavors, making the sweet notes pop without being noticeable. Skipping the salt can leave the dessert tasting flat, especially if you use unsalted white chocolate.
The Final Flourish
Crushed Graham Crackers (1 cup): Rolled around each ball before the final chocolate coating, these crumbs add a delightful crunch and absorb any excess moisture. For a gluten‑free version, use crushed almond flour or gluten‑free cookie crumbs.
Optional Dark Chocolate Drizzle: A quick drizzle of dark chocolate (70% cocoa) adds a sophisticated bitter contrast. It’s optional, but if you’re feeling fancy, melt a tablespoon of dark chocolate and drizzle over the set balls.
Everything's prepped? Good. Let’s get into the real action, where the magic truly begins.
The Method — Step by Step
Start by softening the cream cheese. Cut it into cubes and let it sit at room temperature for about 15 minutes; this prevents lumps when you beat it later. Once softened, place it in a large mixing bowl and whisk until it’s smooth, like a cloud on a summer day. Pro tip: A hand mixer on low speed works best to avoid over‑aerating the mixture.
Add the granulated sugar and vanilla extract to the cream cheese. Beat on medium speed until the mixture becomes light and fluffy, about 2‑3 minutes. You’ll notice the mixture turning a pale yellow, a sign that it’s properly aerated.
Kitchen Hack: Sprinkle a tiny pinch of salt at this stage; it enhances the sweetness without making the mixture salty.Fold in the raspberry puree gently. Use a rubber spatula to swirl the puree in, creating marbled ribbons rather than a uniform pink. This visual contrast not only looks stunning but also ensures pockets of tart raspberry burst in every bite.
Cover the bowl with plastic wrap and refrigerate the mixture for at least 30 minutes. This chill firms the mixture, making it easier to roll. While it chills, you can prepare the coating.
Meanwhile, melt the white chocolate. Place the chopped white chocolate in a heat‑proof bowl over a pot of simmering water (double boiler method). Stir constantly until smooth, then remove from heat and stir in the heavy cream. The mixture should be glossy and pourable; if it looks grainy, you’ve likely overheated it.
Set the melted chocolate aside to cool slightly, then pour it into a shallow dish. In a separate shallow dish, spread the crushed graham crackers. This dual‑dish setup makes rolling a breeze.
Now the fun part: Using a small cookie scoop or a tablespoon, portion out the chilled cheesecake mixture and roll each portion between your palms to form a smooth ball. The mixture should be cool enough to hold its shape without sticking.
Watch Out: If the balls start to melt in your hands, return them to the fridge for a few minutes; overheating will cause the coating to slide off later.Roll each ball first in the crushed graham crackers, giving it a light crust that adds texture. Then, gently dip the coated ball into the melted white chocolate, allowing any excess to drip back into the bowl. Place the chocolate‑coated balls onto a parchment‑lined tray. The chocolate will set quickly, forming a glossy shell.
For the final touch, dust each ball lightly with powdered sugar using a fine mesh sieve. This adds a subtle sweet finish and prevents the balls from sticking together. Let the balls set at room temperature for 15 minutes, then transfer the tray to the refrigerator for at least 20 minutes to fully harden the coating. This next part? Pure magic. Once set, you’ll have a batch of immaculate, bite‑size delights ready to wow any crowd.
That's it — you did it. But hold on, I've got a few more tricks that'll take this to another level, like a secret glaze that adds a glossy finish and a hint of citrus, or a quick chill‑flash that makes the coating extra crisp. Stay with me here — this is worth it.
Insider Tricks for Flawless Results
The Temperature Rule Nobody Follows
Never let the white chocolate exceed 115°F (46°C). Even a few degrees higher will cause it to seize, turning it grainy and unworkable. Keep a candy thermometer nearby; it’s a small investment for big returns. I once tried to speed up the process by heating the chocolate on high, and the result was a clumpy mess that never set.
Why Your Nose Knows Best
When the chocolate is ready, it will give off a faint, buttery aroma that signals it’s at the perfect coating temperature. If you smell a burnt scent, you’ve gone too far. Trust your senses more than the clock; a quick sniff can save a batch.
The 5‑Minute Rest That Changes Everything
After rolling the balls and before dipping them in chocolate, let them rest on a tray for exactly five minutes. This short pause lets the interior firm up, preventing the balls from losing shape when they hit the hot chocolate. It’s a tiny step that makes a massive difference in the final texture.
Rolling Without a Stick
If you don’t have a cookie scoop, a small ice‑cream scoop works wonders. The key is consistent size; uneven balls lead to uneven coating. I once tried to eyeball the portions and ended up with a batch of misshapen spheres that looked more like abstract art than dessert.
Cold‑Water Bath for the Chocolate
After dipping, give the coated balls a quick dip in a bowl of ice‑water for just two seconds. This “shock” sets the chocolate instantly, giving it a crisp snap that’s audible when you bite. It also prevents the coating from sliding off if you’re storing them for a day or two.
Creative Twists and Variations
This recipe is a playground. Here are some of my favorite ways to switch things up:
Dark Chocolate & Sea Salt
Swap the white chocolate for high‑quality dark chocolate (70% cacao) and sprinkle a pinch of flaky sea salt on top before the coating sets. The bitter‑sweet contrast is sophisticated and perfect for an evening soirée.
Passion Fruit Burst
Replace the raspberry puree with passion fruit pulp for an exotic, tangy twist. The bright tropical flavor pairs beautifully with the creamy interior, transporting you to a beachside café.
Matcha Green Tea Swirl
Incorporate a teaspoon of matcha powder into the cream cheese mixture for a subtle earthy note and a gorgeous green hue. Finish with a dusting of powdered sugar for a delicate visual contrast.
Nutty Crunch
Instead of graham crackers, roll the balls in finely chopped toasted almonds or pistachios. The nutty crunch adds depth and a pleasant surprise with every bite.
Mini Cheesecake Parfaits
Layer the raspberry‑infused cream cheese mixture with a dollop of whipped cream and a drizzle of chocolate in a tiny glass. It’s a deconstructed version that looks as impressive as it tastes.
Storing and Bringing It Back to Life
Fridge Storage
Place the finished balls in an airtight container lined with parchment paper. They’ll stay fresh for up to three days, maintaining their texture and flavor. If you notice the coating getting a bit dull, a quick re‑dip in melted white chocolate revives the shine.
Freezer Friendly
For longer storage, arrange the balls on a baking sheet, freeze for one hour, then transfer to a zip‑top freezer bag. They’ll keep for up to two months. When you’re ready to serve, let them thaw in the refrigerator for 30 minutes.
Best Reheating Method
To bring them back to perfection, place the balls on a microwave‑safe plate, add a tiny splash (about 1 tsp) of water to the plate, and microwave on low for 10‑15 seconds. The steam created will melt the chocolate just enough to restore its glossy snap without melting the interior.