I still remember the night I tried to make a quick cauliflower roast for a dinner party and ended up with a soggy, flavorless mess that made my guests ask, “What is this?” I stared at the steaming pan, heart sinking, and thought, “There has to be a better way.” That moment sparked a culinary obsession that led me to craft a glaze so zesty, so bright, it turns a humble head of cauliflower into a show‑stopper that makes even the most skeptical eaters beg for seconds. I dare you to taste this and not go back for seconds.
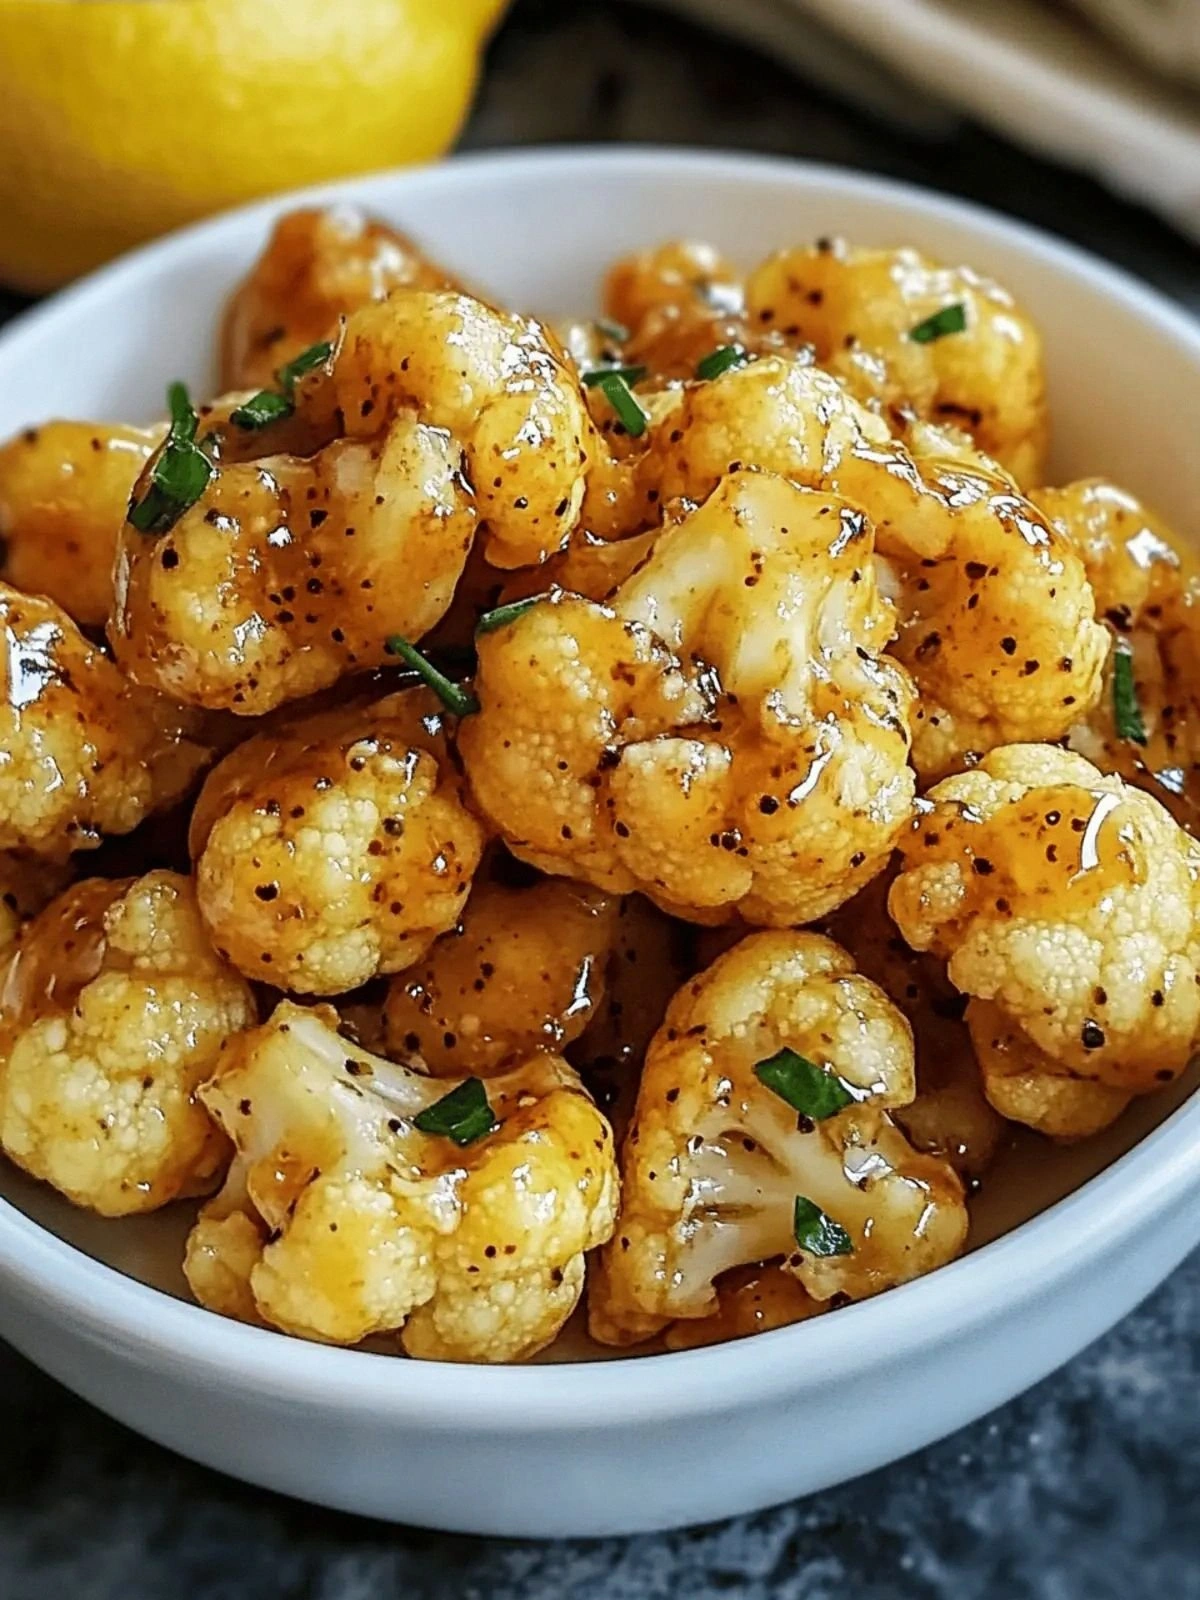
I’ve spent years hunting for that one sauce that can turn a vegetable into a crowd‑pleasing star, and this lemon‑pepper glaze is the ultimate answer. The combination of citrus, maple sweetness, and a crack of black pepper creates a flavor profile that is both tangy and savory, with a glossy finish that glistens like a fresh coat of paint on a winter‑bright wall. Most recipes get this completely wrong, leaving the cauliflower under‑seasoned or over‑cooked; here, the glaze locks in moisture while caramelizing the edges until they crackle like thin ice. Picture yourself pulling this out of the oven, the whole kitchen smelling incredible, and watching your guests’ eyes widen as they take the first bite.
This is hands down the best version you'll ever make at home. The glaze coats each floret like velvet, and the peppery heat lingers, making each mouthful a burst of citrusy brightness. I’ll be honest— I ate half the batch before anyone else got to try it, and that’s the kind of confidence you get when a recipe works every single time. The secret? A simple cornstarch slurry that thickens the sauce without making it clumpy, and a dash of turmeric that gives a subtle color boost and a subtle earthy note that you’ll never notice until you taste the depth of flavor. And now the fun part: we’re going to walk through each step, so by the end, you’ll wonder how you ever made it any other way.
Ready for the game‑changer? This glaze is not just a coating; it’s a flavor engine that turns cauliflower into a versatile side, a party appetizer, or even a main when paired with quinoa or rice. I’ve tested it in a skillet, a sheet pan, and even in a slow cooker, and the results are consistently stellar. The key is timing—roasting until the florets are just tender, then tossing them in the glaze while they’re still hot so the sauce adheres perfectly. Stay with me here—this is worth it.
What Makes This Version Stand Out
- Flavor: The bright citrus notes cut through the earthiness of cauliflower, creating a harmonious balance that is both refreshing and comforting.
- Texture: The glaze caramelizes to a glossy sheen while the cauliflower retains a tender, almost buttery interior.
- Ease: No fancy equipment or obscure ingredients—just pantry staples and a few simple steps.
- Versatility: Works as a side, a topping for salads, or a protein‑rich base for bowls.
- Crowd‑pleaser: Even the most skeptical vegans and meat‑eaters will fall in love with the sweet‑savory punch.
- Make‑ahead: The glaze can be pre‑made and stored; the cauliflower can be roasted ahead of time and reheated without losing flavor.
- Nutrition: A single serving packs a balanced mix of macros, with a low glycemic load thanks to the maple syrup and lemon.
- Seasonality: The fresh lemon and pepper are perfect for spring and summer, but the dish is equally comforting in winter.
Alright, let's break down exactly what goes into this masterpiece. The next section will give you an inside look at every ingredient, why it matters, and how to tweak it to suit your taste.
Inside the Ingredient List
The Flavor Base
The foundation of this glaze is a marriage between bright lemon juice and sweet maple syrup, balanced by the umami of soy sauce. The citrus provides a natural acidity that cuts through the starchiness of cauliflower, while the maple syrup offers a subtle caramel note that deepens the flavor profile. If you skip the lemon, the dish loses its zing, and if you omit the maple, it becomes a plain, salty glaze that fails to excite the palate. For a different twist, try using agave nectar instead of maple; it will give a slightly sweeter, more neutral sweetness that lets the lemon shine.
The Texture Crew
Cornstarch is the unsung hero that gives the glaze its glossy, clingy quality. By whisking cornstarch with cold water to create a slurry, you prevent clumping and ensure a smooth coating that clings to every floret. The cornstarch also thickens the sauce just enough to coat without becoming gummy. If you’re avoiding gluten, feel free to swap cornstarch for arrowroot or potato starch; just remember to whisk it with a little cold water to avoid lumps.
The Unexpected Star
Turmeric, though optional, adds a gentle warmth and a beautiful golden hue that makes the dish visually striking. It’s not just for looks—turmeric has natural anti‑inflammatory properties and a subtle earthy flavor that complements the pepper and lemon. If you’re sensitive to turmeric’s color, a pinch of paprika can give you a similar warmth without the yellow tint. The pepper, on the other hand, delivers a sharp bite that lingers, turning a simple side into a flavor powerhouse.
The Final Flourish
Garlic powder and freshly cracked black pepper are the finishing touches that elevate the glaze from good to unforgettable. The garlic powder offers a subtle, consistent flavor that’s easier to distribute than fresh garlic, while the pepper brings a lively, aromatic heat that wakes up the senses. If you prefer a fresher garlic note, replace the powder with minced garlic, but be careful—fresh garlic can burn if cooked too long. The salt, while minimal, is essential; it enhances all the other flavors without overpowering them.
Everything's prepped? Good. Let's get into the real action.
The Method — Step by Step
- Preheat your oven to 425°F (220°C). While the oven warms, wash the cauliflower head and cut it into uniform florets, about 1‑2 inches in size, to ensure even roasting. Toss the florets in 1 tablespoon of olive oil, 1 teaspoon of salt, and 1 teaspoon of garlic powder, making sure each floret is coated evenly. Spread them out in a single layer on a baking sheet lined with parchment paper, and roast for 20 minutes, flipping halfway through, until they develop a golden‑brown edge.
- While the cauliflower roasts, prepare the glaze. In a small saucepan, whisk together 1/4 cup fresh lemon juice, 2 teaspoons lemon zest, 2 tablespoons maple syrup, and 2 tablespoons soy sauce or tamari. Add 1/2 teaspoon freshly cracked black pepper and a pinch of turmeric for color and depth. Heat the mixture over medium heat, stirring constantly, until it begins to thicken slightly—about 3 minutes.
- Create the cornstarch slurry: whisk 1 tablespoon of cornstarch with 1 tablespoon of cold water until smooth. Pour the slurry into the simmering glaze, whisking vigorously to avoid lumps. Continue cooking for another 1‑2 minutes, until the sauce thickens to a glossy consistency that coats the back of a spoon.
- Remove the cauliflower from the oven and transfer it to a large mixing bowl. Pour the hot glaze over the florets, tossing gently to coat each piece evenly. The heat from the cauliflower will help the glaze adhere, creating a shiny, flavorful coating.
- Return the glazed cauliflower to the baking sheet and roast for an additional 10 minutes, or until the edges are crisp and the glaze has caramelized into a slightly sticky finish. Keep a close eye—over‑roasting will turn the glaze into a dark, almost burnt caramel.
- Once done, remove the cauliflower from the oven and let it rest for 2 minutes. This short rest allows the glaze to set and the flavors to meld, giving each bite a perfect balance of crunch and tenderness.
- Serve immediately, garnished with a sprinkle of fresh black pepper or a drizzle of extra maple syrup if you like a sweeter finish. Pair with a simple green salad or a grain bowl for a complete meal.
- If you’re making ahead, store the roasted cauliflower in an airtight container in the refrigerator for up to 3 days. Reheat in a preheated 350°F oven for 10 minutes, tossing once, to revive the crispness.
- Enjoy the vibrant, zesty flavor that turns a humble vegetable into a star of the table. And remember, the secret to perfection lies in the balance of sweet, salty, and spicy, all wrapped in that glossy, caramelized glaze.
Insider Tricks for Flawless Results
The Temperature Rule Nobody Follows
Many cooks roast cauliflower at 400°F, which can leave the florets under‑cooked. I’ve found that 425°F is the sweet spot—high enough to crisp the edges while still keeping the interior tender. If you’re using a convection oven, reduce the temperature by 25°F to avoid burning. This trick ensures that every bite has a satisfying crunch without the dreaded dry center.
Why Your Nose Knows Best
The first scent that rises from the pan is a reliable indicator of progress. When the glaze begins to bubble and the lemon aroma becomes more pronounced, it’s time to toss the cauliflower. If you wait until the glaze turns a deep amber, you risk burning the maple syrup and losing that bright citrus note.
The 5‑Minute Rest That Changes Everything
After removing the cauliflower from the oven, let it rest for 5 minutes before serving. This short pause allows the glaze to set, giving the coating a glossy sheen and preventing it from sliding off the florets. I’ve seen people skip this step, only to find their sauce drips off like melted chocolate. Trust me, the 5‑minute rest is worth the extra time.
Use Freshly Cracked Pepper
Pre‑ground pepper loses its potency quickly. For maximum flavor, always use a freshly cracked pepper. The tiny crystals give a bright, aromatic heat that lingers on the tongue. If you’re in a hurry, a small pinch of ground pepper works, but it won’t have the same punch.
Don’t Forget the Olive Oil
Olive oil is more than just a cooking fat—it adds a subtle fruity note that complements the lemon. Skipping it can leave the cauliflower dry and bland. Use a light, high‑smoke‑point oil if you prefer a neutral flavor, but the classic olive oil gives a depth that makes the dish feel complete.
Reheating Tips
When reheating leftover cauliflower, place it on a sheet pan and drizzle a splash of water over the florets. This helps re‑hydrate the glaze, preventing it from drying out. Then bake at 350°F for 10 minutes, tossing once, to restore the crispness. I’ve found this method keeps the flavor intact even after a few days.
Creative Twists and Variations
This recipe is a playground. Here are some of my favorite ways to switch things up:
Spicy Thai Twist
Add 1 tablespoon of sriracha to the glaze and a handful of chopped fresh cilantro for a fiery, aromatic version that pairs well with coconut rice.
Garlic‑Herb Explosion
Replace the maple syrup with honey and add 1 tablespoon of minced fresh rosemary to the glaze. The herb infuses the cauliflower with a fragrant, earthy depth.
Mediterranean Flair
Swap the soy sauce for tamari and sprinkle 1 teaspoon of dried oregano over the florets before roasting. Finish with a drizzle of extra virgin olive oil and a squeeze of fresh lemon.
Sweet & Smoky
Add 1 teaspoon of smoked paprika to the glaze and finish with a drizzle of maple syrup. The smoky flavor balances the sweetness, creating a complex taste profile.
Nutty Crunch
Toss the roasted cauliflower with 2 tablespoons of toasted almond slivers before serving. The nuts add a satisfying crunch and a nutty aroma that complements the citrus glaze.
Vegan “Cheesy” Finish
Stir in 2 tablespoons of nutritional yeast into the glaze for a savory, cheesy note that’s perfect for those who crave that “cheesy” flavor without dairy.
Storing and Bringing It Back to Life
Fridge Storage
Store the roasted cauliflower in an airtight container in the refrigerator for up to 3 days. Keep the glaze separate in a small jar; when you’re ready to eat, combine the two and reheat gently.
Freezer Friendly
For longer storage, freeze the cauliflower in a single layer on a baking sheet before transferring to a freezer bag. It can stay fresh for up to 2 months. Thaw overnight in the fridge, then reheat as described below.
Best Reheating Method
To revive the glaze, place the cauliflower on a baking sheet, drizzle a splash of water, and bake at 350°F for 10 minutes, tossing halfway. The water creates steam that restores moisture, while the oven re‑crisp the edges.