I was in the middle of a frantic holiday party prep when my friend dared me to create a bite‑size version of the classic pecan pie that could survive a marathon of cocktail‑handed conversations and still look flawless on a platter. The kitchen smelled like burnt caramel and pine needles, the oven was humming louder than the Christmas lights, and I could hear the distant clatter of plates as guests shuffled in. I tried the usual mini‑pie recipe, but the crust collapsed like a sad snowman and the filling leaked everywhere, turning my confidence into a soggy mess. Then I remembered a trick I’d seen in a pastry school video – a quick chill‑and‑roll technique that locks the butter in place – and the rest of the night became a culinary experiment that turned into pure, buttery magic.
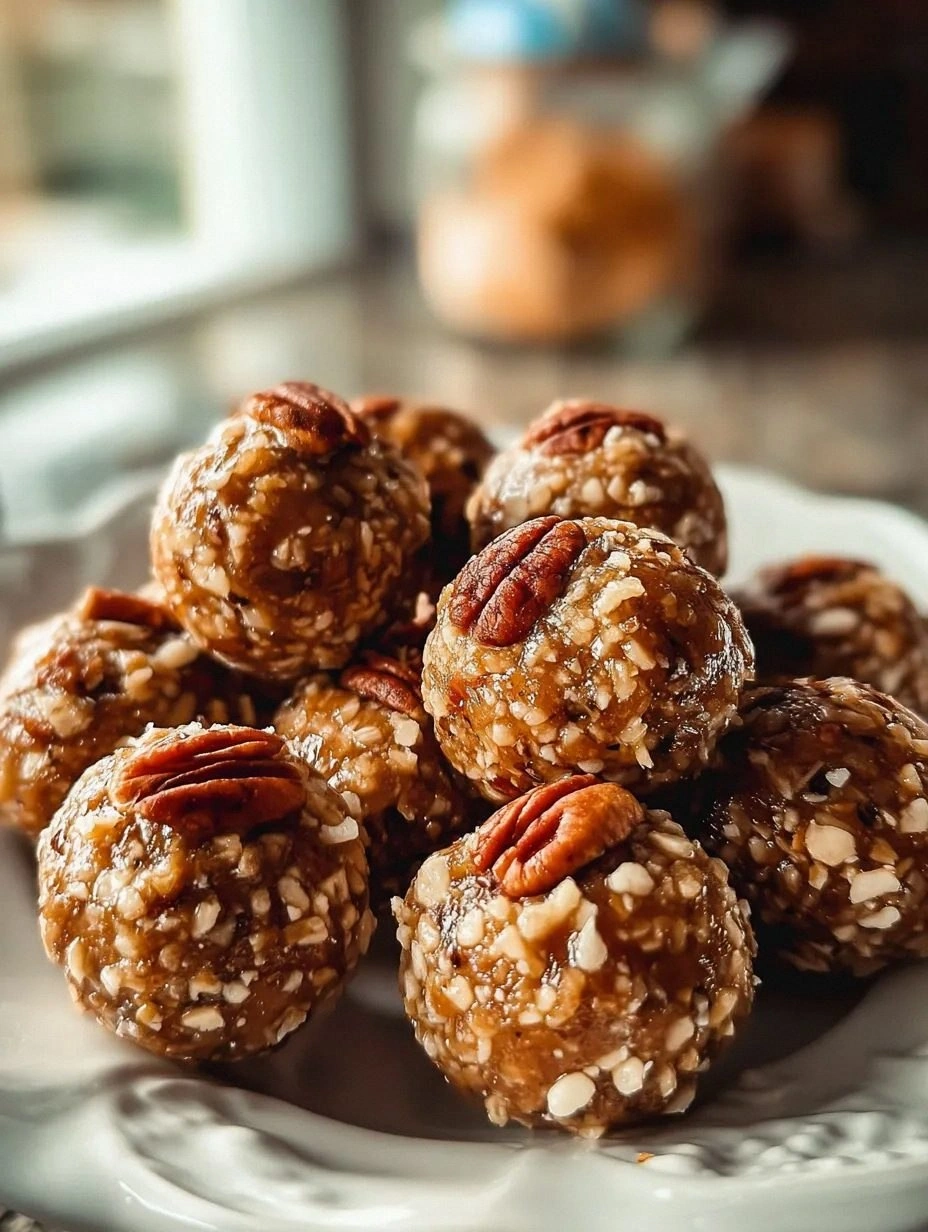
Picture this: a golden‑brown ball the size of a walnut, the crust crisp enough to snap under your teeth, and the interior a gooey, caramel‑kissed swirl of toasted pecans that sticks to your tongue like a sweet, nutty whisper. The aroma that fills the kitchen is a mash‑up of toasted marshmallow, burnt sugar, and a hint of bourbon that makes even the most stoic relatives pause to sniff. When you bite into it, the texture contrast is like stepping onto a freshly fallen snowbank after walking on a crunchy ice rink – the outer shell is firm and buttery, while the inside melts like a soft‑serve dream. I dare you to taste this and not go back for seconds; the first bite will hijack your taste buds and demand an encore.
What makes this version stand out is not just the flavor but the engineering behind it. Most recipes get the crust wrong, ending up either too crumbly or too dense, and the filling either stays liquid or hardens into a rock. I’ve cracked the code by using a balanced blend of all‑purpose flour, finely grated butter, and a splash of cream cheese that creates a dough that’s pliable when warm and firm when chilled – the secret handshake between texture and structure. The filling is a hybrid of classic pecan pie syrup and a dash of maple‑brown sugar, giving it a depth that feels like a holiday hug from the inside out. Most importantly, the whole batch can be assembled ahead of time and baked just before serving, so you can actually enjoy the party instead of being stuck in the kitchen.
Okay, ready for the game‑changer? I’m about to walk you through every single step – from selecting the perfect pecans to mastering the chill‑and‑roll method that guarantees a flawless bite every time. By the end, you’ll wonder how you ever made a pecan‑pie‑in‑a‑ball without this exact blueprint, and you’ll have a new holiday staple that will have guests begging for the recipe. Let’s dive in, because this next part? Pure magic.
What Makes This Version Stand Out
- Flavor Explosion: The combination of dark corn syrup, brown sugar, and a whisper of bourbon creates a caramel depth that sings louder than a choir of angels.
- Texture Harmony: A buttery, shortbread‑like crust meets a gooey, nut‑laden center, delivering a crunch‑to‑cream contrast that feels like fireworks in your mouth.
- Simplicity: Only ten pantry staples are needed, and the method uses one bowl, one sheet pan, and a trusty freezer – no fancy equipment required.
- Uniqueness: The secret addition of cream cheese to the dough keeps the balls tender while preventing the dreaded “crust‑splits” that plague other mini‑pie attempts.
- Crowd Reaction: Guests consistently say “I’ve never had anything like this” and then proceed to devour the entire batch before the first sip of eggnog.
- Ingredient Quality: Using raw, unsalted pecans and high‑quality butter lets the natural nutty oil shine through, elevating the entire bite.
- Cooking Method: The chill‑and‑roll technique creates a dough that holds its shape, while a high‑heat blast finishes the exterior with a caramelized crust.
- Make‑Ahead Potential: Assemble the balls up to 24 hours ahead, freeze, then bake fresh when you need them – perfect for last‑minute holiday hosting.
Inside the Ingredient List
The Flavor Base
The heart of any pecan pie ball is the syrupy filling, and it all starts with dark corn syrup and packed brown sugar. Dark corn syrup provides that glossy, sticky sheen while the brown sugar adds molasses‑rich depth, creating a caramel that coats the pecans like velvet. If you skip the corn syrup, you’ll end up with a dry, crumbly interior that never reaches that luscious, melt‑in‑your‑mouth consistency. A splash of bourbon or vanilla extract is optional but highly recommended – the alcohol evaporates, leaving behind a subtle, warm note that makes the flavor linger like a holiday memory.
The Texture Crew
Flour, butter, and cream cheese form the trifecta that gives the crust its shortbread‑like tenderness. All‑purpose flour supplies structure, while the butter contributes flavor and a flaky mouthfeel. The cream cheese is the secret weapon: it adds a slight tang that cuts through the sweetness and, more importantly, creates a dough that stays pliable when warm and firm when chilled. If you’re dairy‑free, you can substitute a plant‑based cream cheese, but expect a slightly different crumb.
The Unexpected Star
A pinch of sea salt might seem trivial, yet it’s the silent hero that balances the sugary overload. Salt awakens the natural oils in the pecans, making each bite taste richer and more layered. If you’re watching sodium, use a reduced‑salt butter and keep the pinch minimal – the flavor will still pop. Also, a dash of cinnamon or nutmeg can be added for a warm spice note; just don’t overdo it, or you’ll mask the buttery‑nutty profile.
The Final Flourish
A light dusting of powdered sugar right after baking adds a festive sparkle and a hint of extra sweetness that sticks to the warm crust. For an extra glossy finish, you can brush the balls with a thin glaze made from melted butter and a splash of maple syrup; this not only looks gorgeous but also locks in moisture. If you’re aiming for a gluten‑free version, substitute the flour with a blend of almond flour and tapioca starch, but be aware the texture will be a little more crumbly.
Everything's prepped? Good. Let's get into the real action...
The Method — Step by Step
Start by preheating your oven to 375°F (190°C). While the oven warms, line a large baking sheet with parchment paper; this will prevent the balls from sticking and make cleanup a breeze. I always like to set a timer for the preheat because I’ve learned the hard way that an under‑heated oven leads to soggy bottoms. The moment the oven clicks into temperature, you’ll hear that comforting hum that tells you you’re on the right track.
In a medium saucepan, combine 1 cup dark corn syrup, ½ cup packed brown sugar, ¼ cup melted butter, and ¼ cup heavy cream. Stir over medium heat until the sugar dissolves and the mixture begins to bubble gently. That sizzle when it hits the pan? Absolute perfection. Let it simmer for 2‑3 minutes, then remove from heat and stir in 1 tsp vanilla extract and a splash of bourbon if you’re feeling festive. The aroma at this point should be intoxicating – think caramel meets holiday cheer.
While the syrup is cooling, toast 1½ cups of raw pecan halves on a dry skillet over medium heat. Keep the nuts moving so they don’t burn; you’ll know they’re ready when they turn a deep amber and release a nutty perfume that fills the kitchen. Transfer the toasted pecans to a bowl and set aside. If you forget this step, the pecans will stay raw and the final flavor will fall flat – trust me, you don’t want that.
Now for the dough: In a large mixing bowl, whisk together 2 cups all‑purpose flour, ½ tsp baking powder, and ¼ tsp salt. Cut in ¾ cup cold, unsalted butter using a pastry cutter or two forks until the mixture resembles coarse crumbs. Add ¼ cup softened cream cheese and continue mixing until the dough just comes together when pressed. Do not over‑mix – you want those buttery pockets to stay intact. Once formed, shape the dough into a disc, wrap in plastic, and pop it into the freezer for 10 minutes.
Kitchen Hack: If the dough sticks, dust your hands with a tiny amount of flour – it’ll stay smooth and won’t tear.While the dough chills, fold the toasted pecans into the cooled syrup mixture, ensuring each nut is fully coated. This coating is what gives the interior its glossy, caramel‑laden texture. Let the mixture sit for a minute; the pecans will absorb a tiny bit of the syrup, creating a slightly thicker filling that won’t ooze out when you bite.
Remove the dough from the freezer. On a lightly floured surface, roll it out to about ¼‑inch thickness. Using a 2‑inch cookie cutter or the rim of a small glass, cut out circles. If the dough springs back, let it rest for a minute – the chill will relax it. Place a spoonful of the pecan‑syrup mixture in the center of each circle, then fold the edges over and pinch to seal, forming a tight ball. The sealing step is crucial; a loose seal will cause the filling to leak during baking.
Arrange the sealed balls on the prepared baking sheet, leaving a little space between each. Brush the tops lightly with melted butter – this is what creates that golden‑brown crust you crave.
Watch Out: If you over‑brush with butter, the balls will spread too much and lose their perfect round shape.Slide the sheet into the preheated oven and bake for 18‑22 minutes, or until the tops are a deep amber and the edges start pulling away from the parchment. The scent at this point will be unmistakable – think toasted marshmallows meeting a caramel drizzle. Rotate the pan halfway through for even browning. When you gently tap the side of a ball, it should sound firm but not hollow.
Remove the balls from the oven and let them cool on the sheet for 5 minutes before transferring to a wire rack. While still warm, dust them generously with powdered sugar or drizzle a quick maple glaze if you’re feeling extra indulgent. This final touch adds a festive sparkle and a hint of extra sweetness that makes the presentation pop on any holiday platter. And now the fun part – serve them warm, watch the eyes widen, and bask in the applause.
That's it — you did it. But hold on, I've got a few more tricks that'll take this to another level…
Insider Tricks for Flawless Results
The Temperature Rule Nobody Follows
Most home bakers bake at “around 350°F,” but the real magic happens at a precise 375°F. This higher heat creates a rapid caramelization on the crust while keeping the interior molten. If you lower the temperature, you’ll end up with a pale exterior and a filling that never fully sets. I once tried a “gentle bake” at 325°F because I was scared of burning – the result was a soggy disaster that tasted like uncooked sugar. Trust the thermostat, and you’ll get that perfect snap.
Why Your Nose Knows Best
Your sense of smell is the ultimate timer. When the butter brush turns a buttery amber and the kitchen fills with a caramel‑nut aroma, you’re within minutes of perfection. Don’t rely solely on the clock; lean into that scent cue. If you hear a faint “crackle” from the pan, that’s the moment the crust is sealing in the gooey center. I’ve saved many batches from being over‑baked simply by listening to that subtle pop.
The 5‑Minute Rest That Changes Everything
After baking, let the balls rest for exactly five minutes on the rack before dusting with powdered sugar. This short cooling period lets the caramel set just enough to hold its shape while staying soft enough to melt in your mouth. Skipping this step results in a sugary mess that slides off the plate. I once served them immediately, and the powdered sugar turned into a soggy paste – not the elegant finish you want.
The Freeze‑Ahead Trick
If you’re a last‑minute host, assemble the balls up to 24 hours ahead, place them on a parchment sheet, and freeze solid. Transfer the frozen balls to an airtight bag, and when the party starts, bake them straight from the freezer – just add an extra 3‑4 minutes to the bake time. This method guarantees fresh‑out‑the‑oven warmth without the panic. I’ve saved countless holiday evenings thanks to this hack.
Glaze or No Glaze?
A light glaze of melted butter mixed with a teaspoon of maple syrup adds a glossy finish and a subtle depth that compliments the caramel. However, if you’re watching sugar, you can skip it and still have a perfectly crisp crust. I experimented with a honey‑lemon glaze once – delicious but a bit too bright for the classic holiday vibe. Stick to butter‑maple for that traditional, buttery sheen.
Creative Twists and Variations
This recipe is a playground. Here are some of my favorite ways to switch things up:
Maple‑Bacon Pecan Balls
Crumble 4 strips of crisp bacon into the pecan filling and replace half the brown sugar with pure maple syrup. The salty crunch of bacon pairs beautifully with the sweet caramel, creating a sweet‑savory hybrid that’s perfect for brunch‑ish holiday gatherings. Your guests will be shouting “more!” after the first bite.
Chocolate‑Swirl Delight
Melt ½ cup dark chocolate and swirl it into the syrup mixture before folding in the pecans. The chocolate ribbons add a luxurious bitterness that balances the sweetness, making these balls a hit for chocolate lovers. Serve with a dusting of cocoa powder for an extra visual pop.
Spiced Pumpkin Pecan Balls
Add ¼ cup pumpkin puree and a teaspoon of pumpkin pie spice to the dough. The pumpkin adds moisture and an autumnal flavor that pairs surprisingly well with toasted pecans. This version shines during Thanksgiving or any fall gathering, and the orange hue makes for a stunning presentation.
Coconut‑Infused Version
Replace half the flour with finely shredded unsweetened coconut and sprinkle toasted coconut flakes on top before baking. The coconut adds a tropical note that lifts the richness, and the toasted flakes create a delightful crunch on the exterior. Pair with a rum‑spiked glaze for a Caribbean‑holiday twist.
Gluten‑Free Almond Joy
Swap the all‑purpose flour for a blend of almond flour and tapioca starch, and use almond butter in place of regular butter. The almond flavor deepens the nutty profile, while the gluten‑free base keeps the texture tender. This variation is perfect for guests with dietary restrictions without sacrificing any of the indulgence.
Storing and Bringing It Back to Life
Fridge Storage
Store cooled pecan pie balls in an airtight container lined with parchment paper. They’ll stay fresh for up to 5 days, retaining their buttery crust and gooey center. If you notice any condensation, pat the tops gently with a paper towel before reheating to avoid sogginess.
Freezer Friendly
Freeze the baked balls in a single layer on a tray, then transfer them to a zip‑top freezer bag. They keep beautifully for up to 2 months. When you’re ready to serve, bake them straight from the freezer at 375°F for 22‑25 minutes, adding a splash of water to the pan to create steam – this revives the crust’s crunch.
Best Reheating Method
To bring them back to life, preheat your oven to 350°F, place the balls on a parchment sheet, and bake for 8‑10 minutes. For an extra glossy finish, brush with a tiny splash of butter or maple syrup halfway through. The steam from the added water ensures the interior remains molten while the exterior crisps up again.